Free Crochet Princess Doll Pattern: 8 Easy Steps to a Beautiful Amigurumi Doll
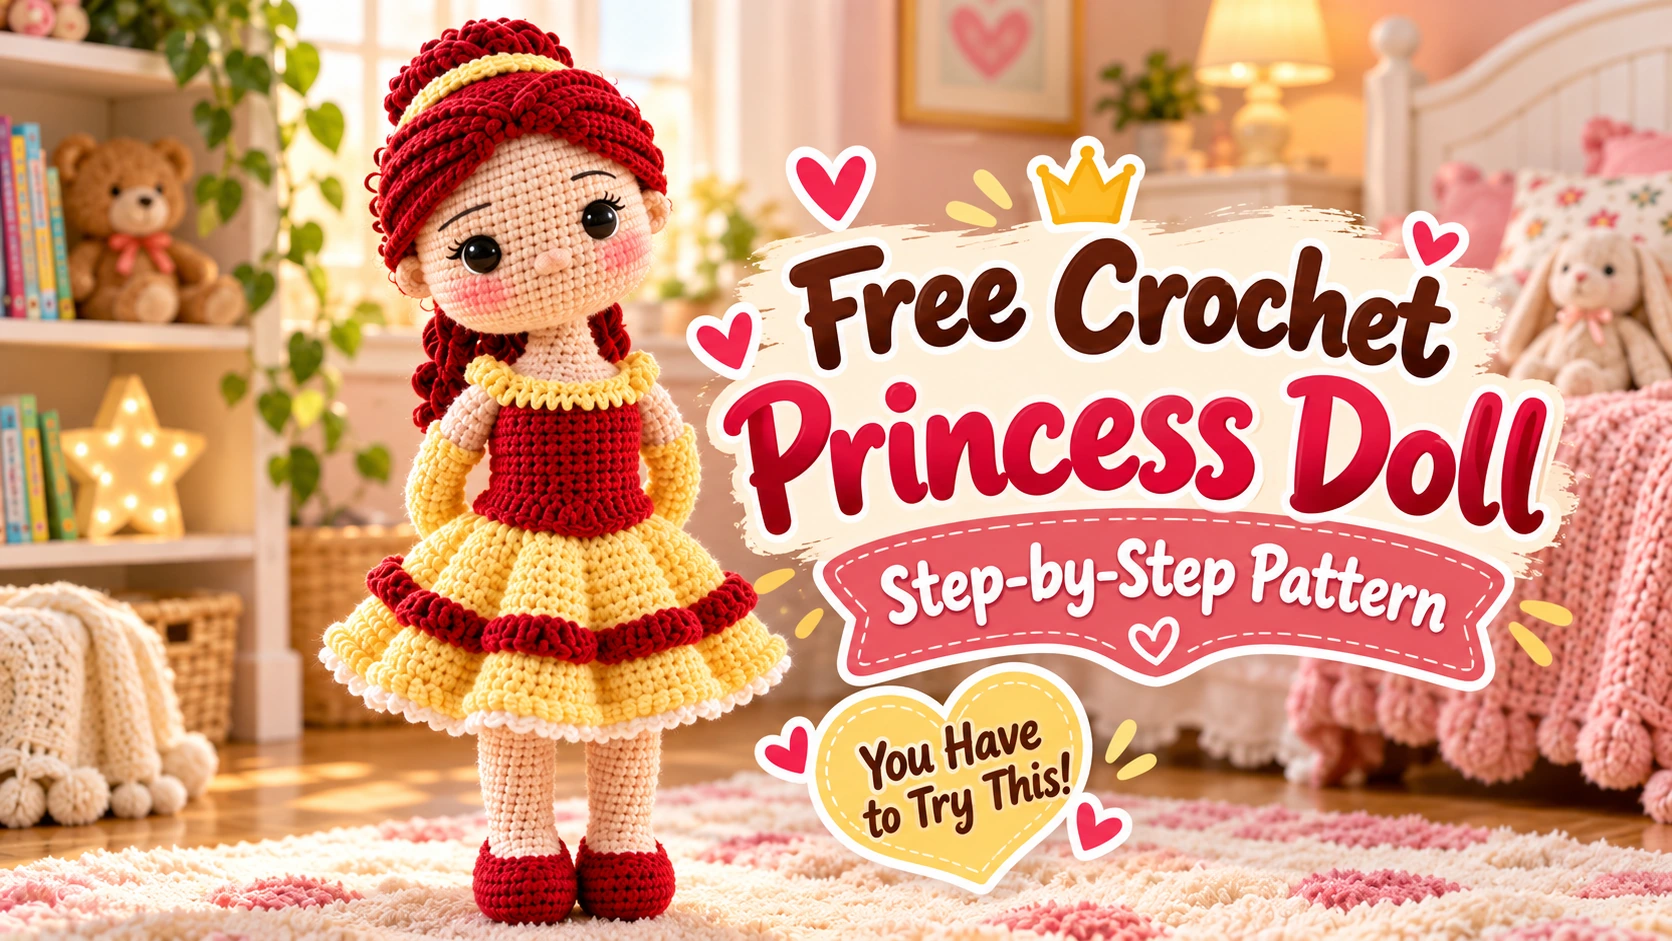
Imagine finishing the last stitch, arranging a tiny red strand of hair into place, and suddenly realizing that the bundle of yarn sitting on your table a few evenings ago has turned into an elegant little princess.
That is the magic of this crochet princess doll pattern.
At first glance, she looks complicated.
She has a layered dress, fitted bodice, shaped shoes, long arms, expressive embroidered features, a carefully styled wig, and the proportions of a collectible amigurumi doll.
But here is the surprising part:
You do not make everything at once.
You make one small piece.
Then another.
Then suddenly the legs become a body, the body gets a dress, the head gets a face, and the final hairstyle gives your doll her personality.
And that is exactly why this is such a satisfying crochet project.
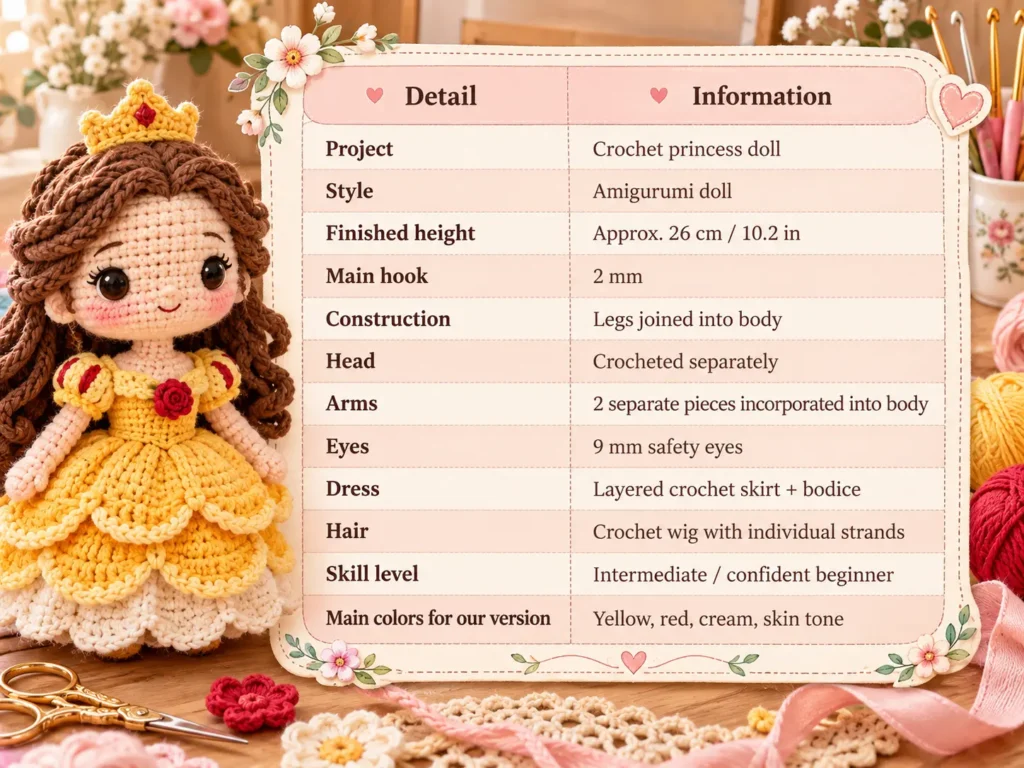
Crochet Princess Doll Pattern at a Glance
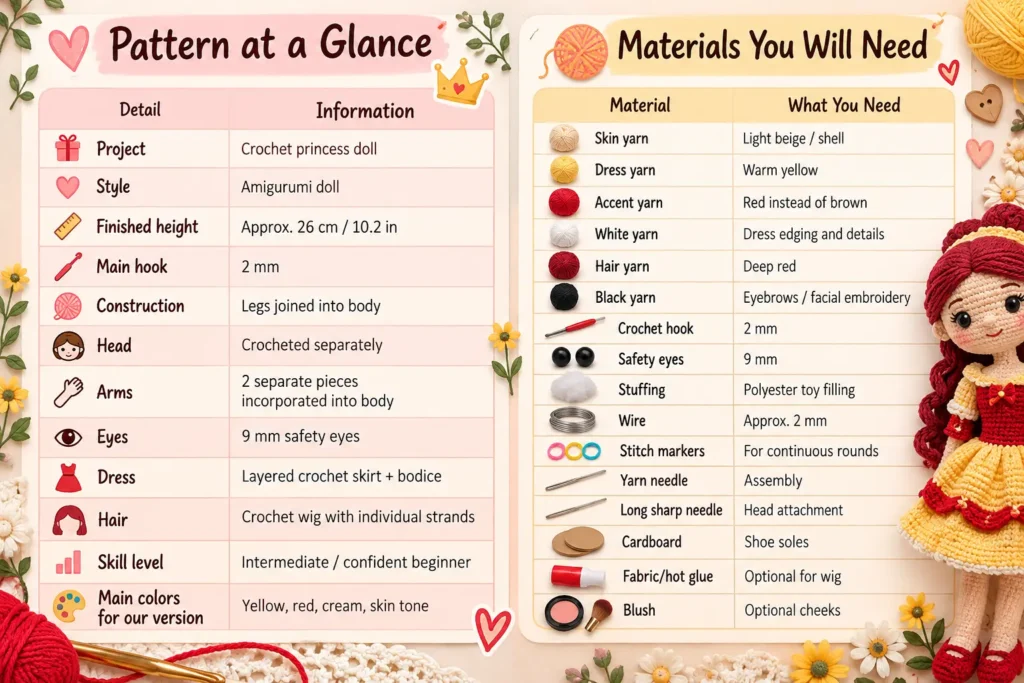
Materials You Will Need
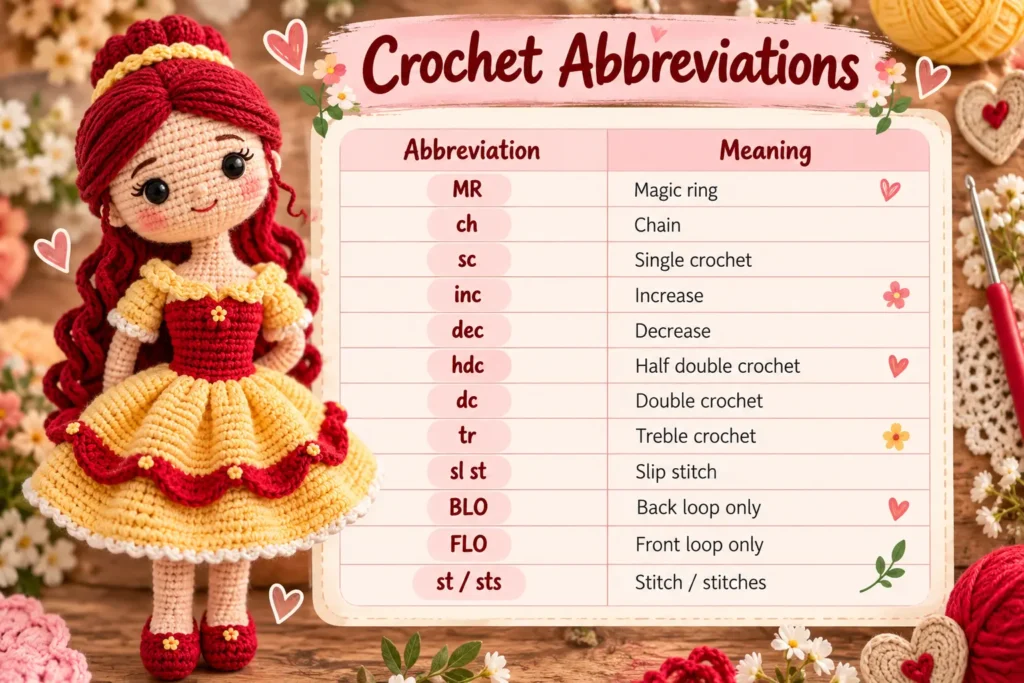
Crochet Abbreviations
The doll is mainly worked in continuous rounds, and the source recommends using a stitch marker to keep track of your position.
Now grab that red yarn.
Our princess needs a dress.
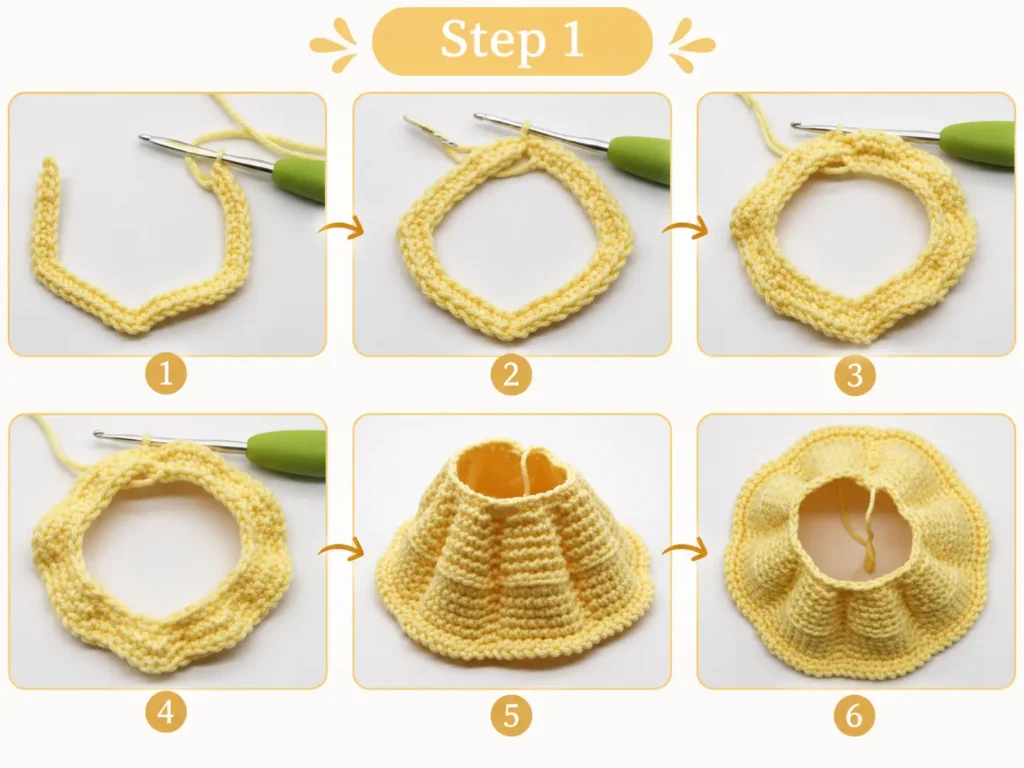
Step 1: Crochet the Layered Princess Skirt
The skirt is one of the details that makes this crochet princess doll pattern instantly recognizable.
It begins as a narrow ring and gradually opens into a structured layered skirt.
The clever use of front and back loops creates space for the decorative edging.
Skirt Pattern
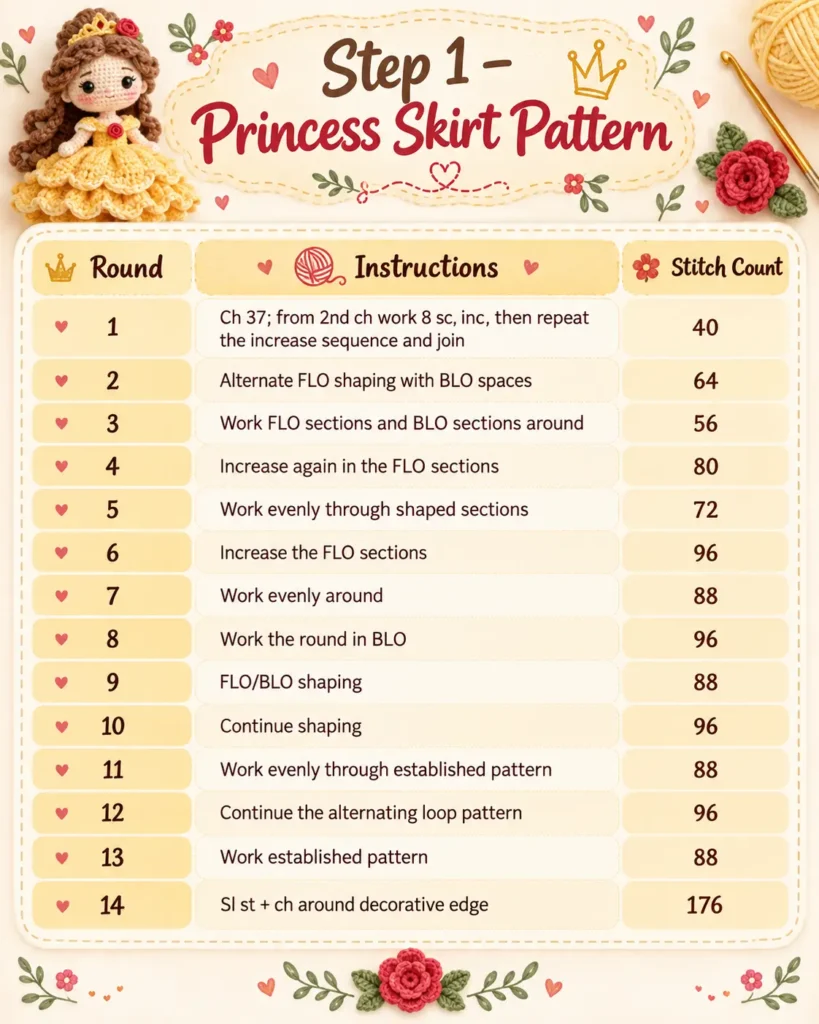
The skirt construction and alternating loop technique come directly from the source instructions.
Add a white decorative edge to give the hem extra contrast.
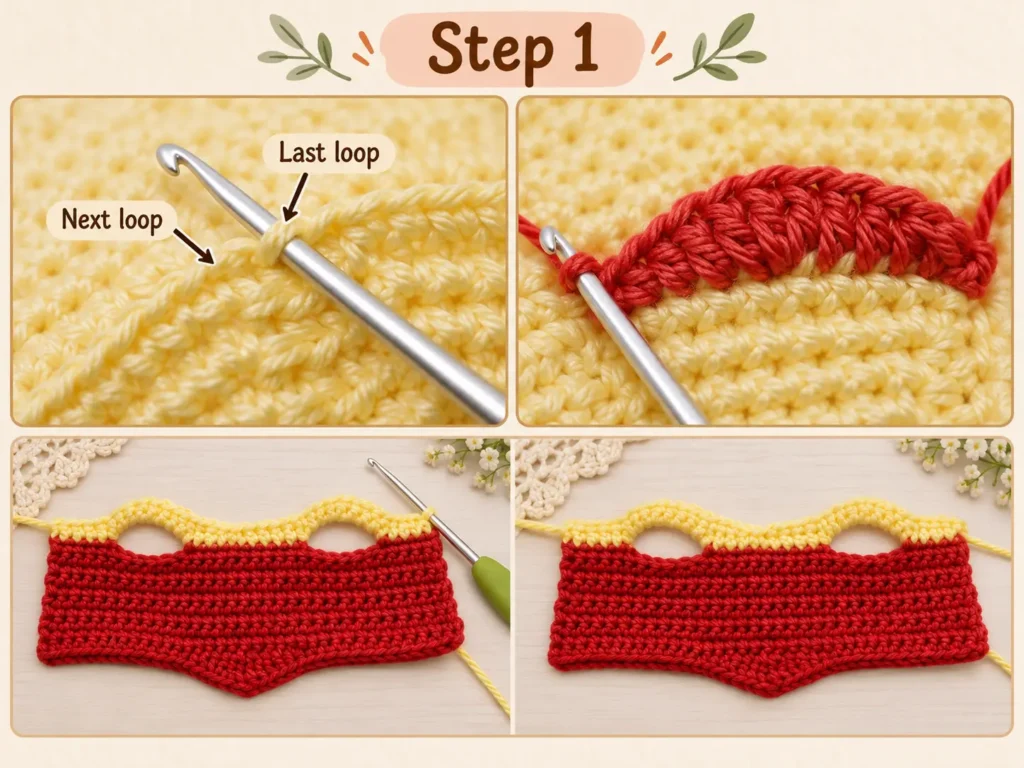
Make the Red Princess Bodice
Bodice Pattern
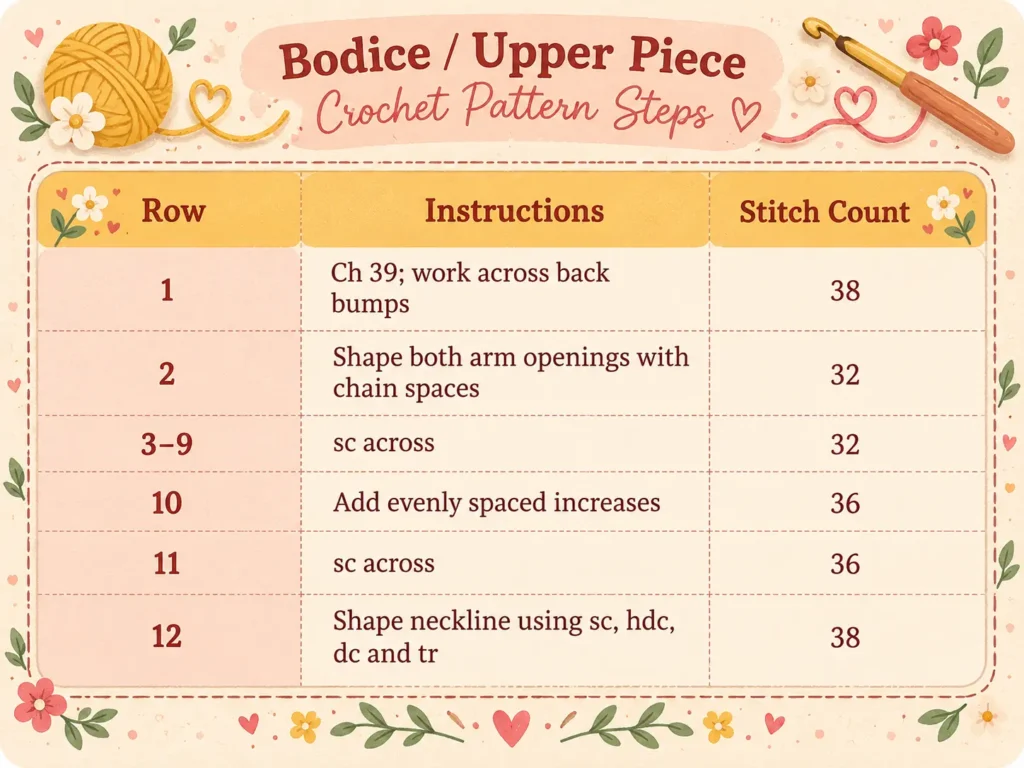
Tiny Crochet Tip: When shaping the bodice, use the chain spaces to create clean arm openings, then continue working the lower section evenly before shaping the neckline. Once it looks neat and symmetrical, set the bodice aside—you’ll fit and secure it around the doll’s body later.
Step 3: Crochet Two Arms
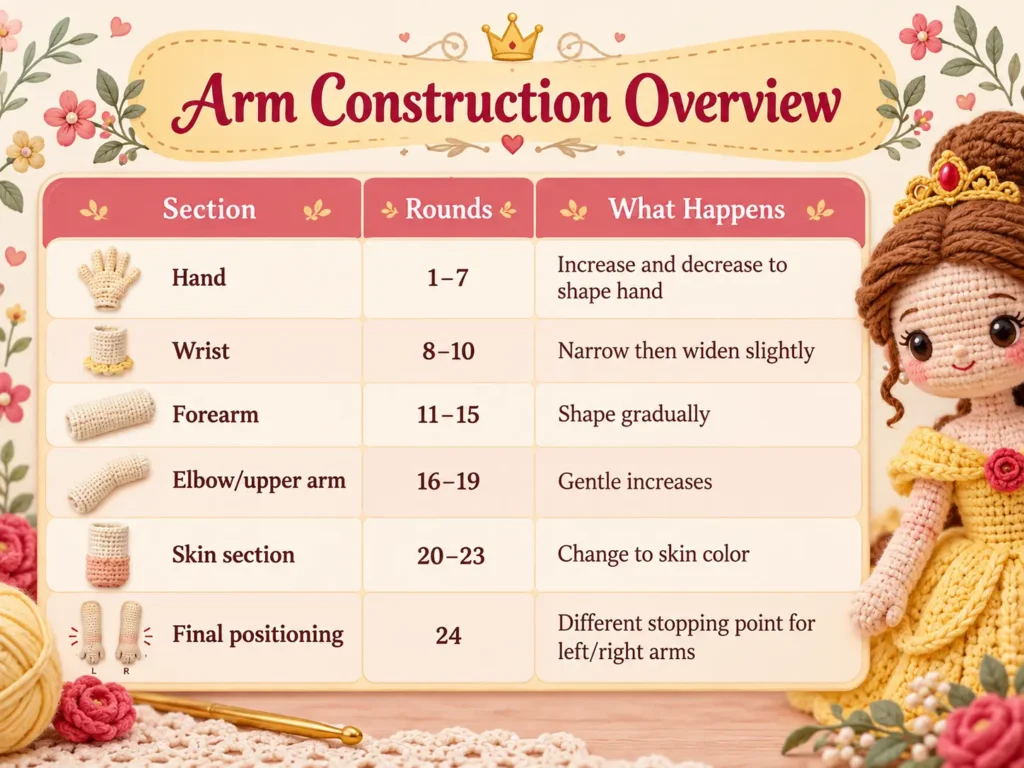
The arms of this crochet princess doll pattern are more shaped than simple amigurumi tubes.
Subtle increases and decreases create the wrist, forearm, elbow area, and upper arm.
Make two matching pieces.
Crochet both arms through Round 24, but don’t worry about making them perfectly stiff yet. Once they’re attached to the body, you can add the wire inside to help them hold a natural pose and give your little princess a more polished finish.
Simplified Arm Construction
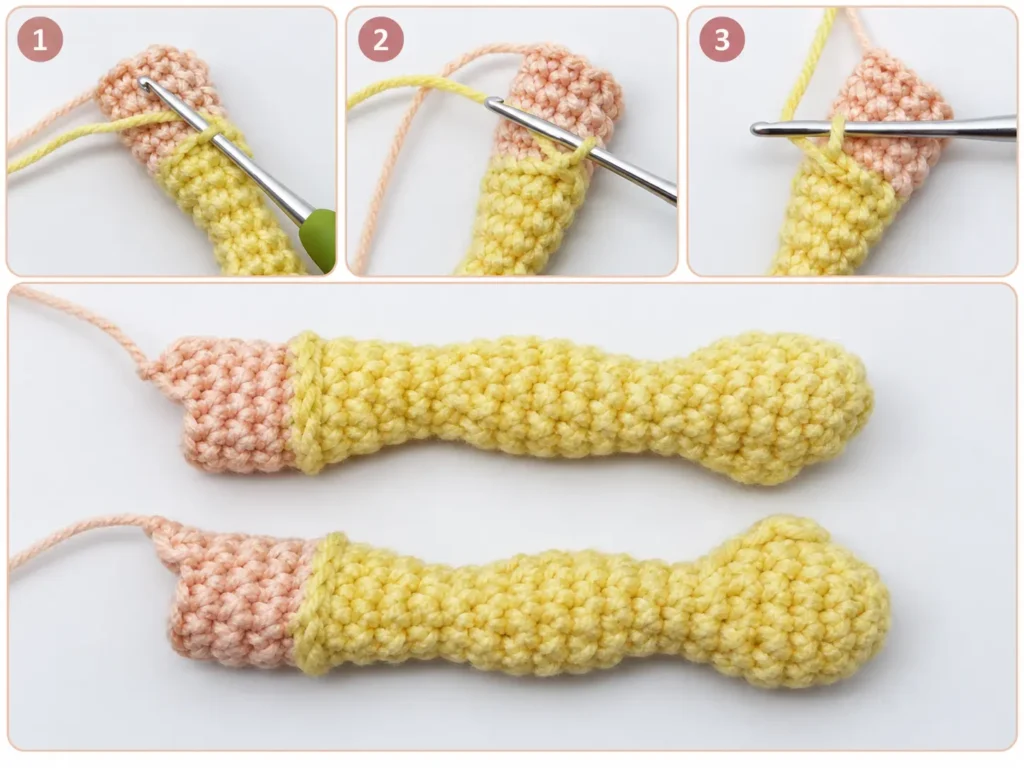
Step 4: Crochet the Shoes and Long Legs
This is where the doll begins getting those elegant proportions.
Each leg starts with a shaped shoe.
A small cardboard sole is inserted inside each foot to help the shoes keep their form.
Shoe Beginning
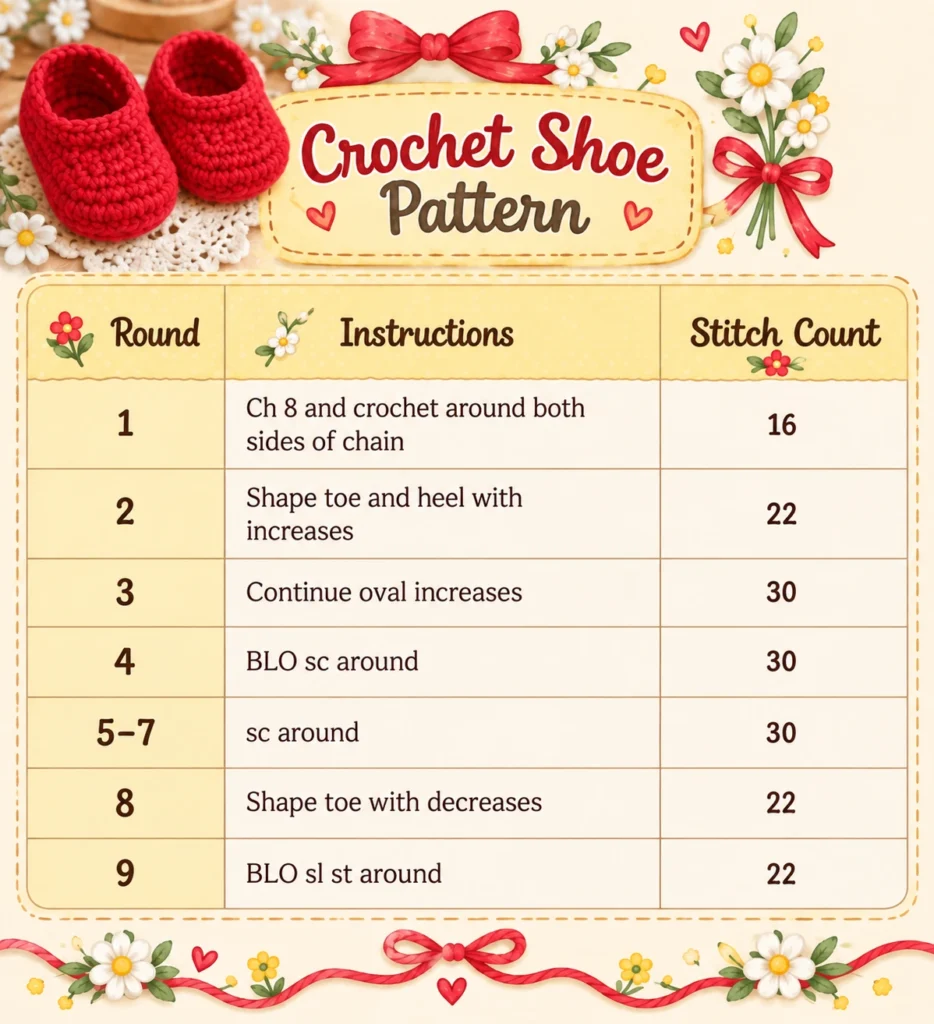
After that, change to the skin tone and continue forming the legs.
Start adding a little stuffing to the toe as soon as the foot begins to take shape, then keep filling the leg gradually as you work upward. Small amounts at a time will help you get a smooth, even shape without stretching the stitches too much.
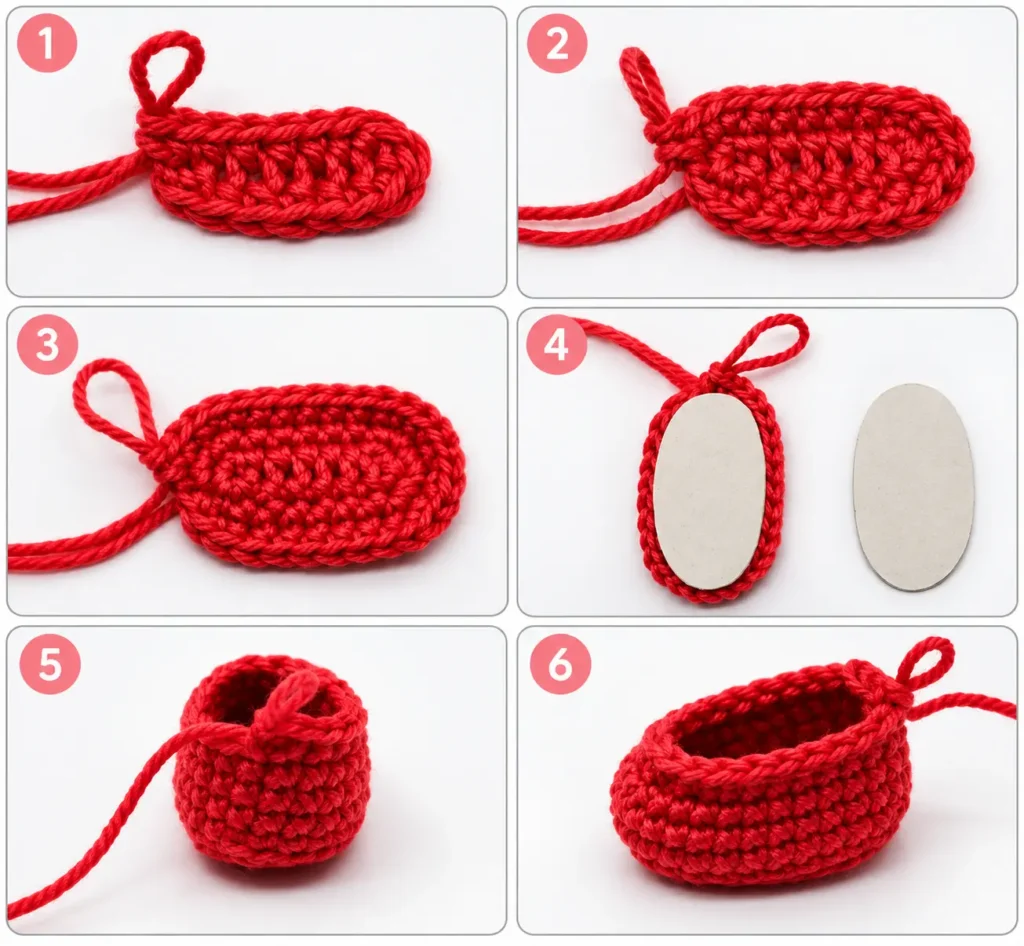
Step 5: Join the Legs and Crochet the Body
This part feels almost magical.
You start with two separate legs.
A few rounds later, you suddenly have the beginning of an entire doll.
The legs are joined using a short chain, creating one continuous body section.
Body Construction
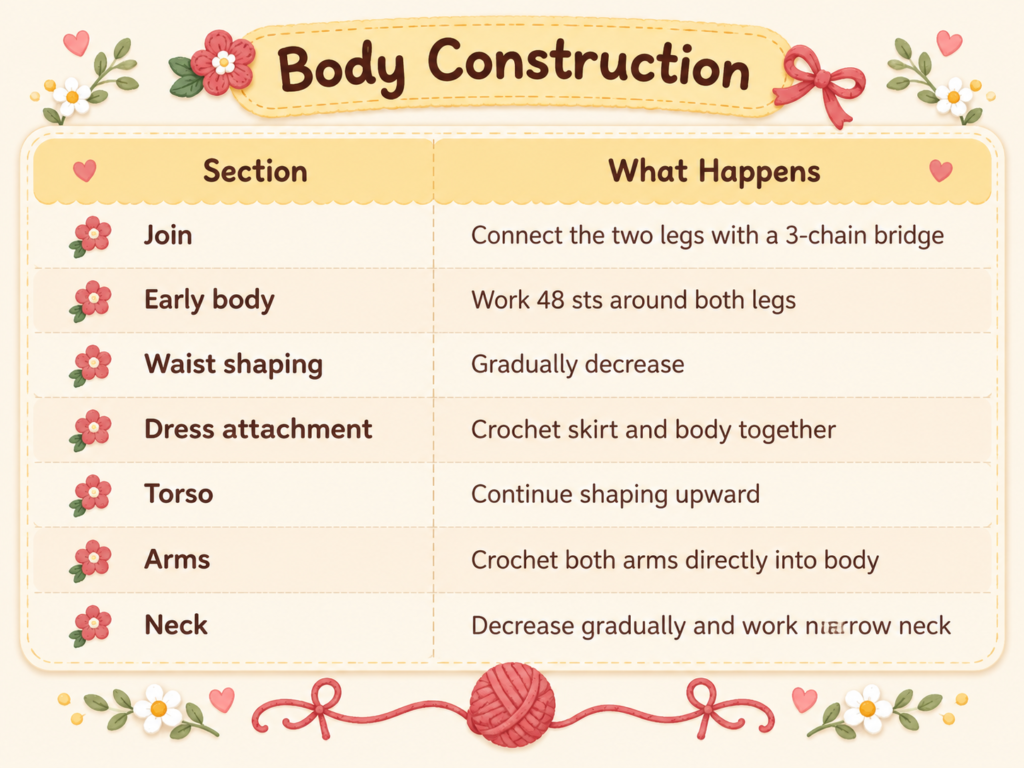
The skirt is actually incorporated directly into the body construction, which gives the dress a much cleaner finish than simply sewing it around the waist afterward.
The arms are then crocheted into the body across three stitches each.
Pro Tip
Before closing the torso, check three things:
Are both arms sitting at the same height?
Is the skirt centered?
Is the body firmly stuffed without stretching the stitches?
Fixing these things now is much easier than fixing them later.
Step 6: Crochet the Head and Create the Face
Now your crochet princess doll pattern begins developing personality.
The head is crocheted separately from the bottom upward, starting with a narrow neck cavity before expanding dramatically to create the large amigurumi head.
Head Pattern Overview
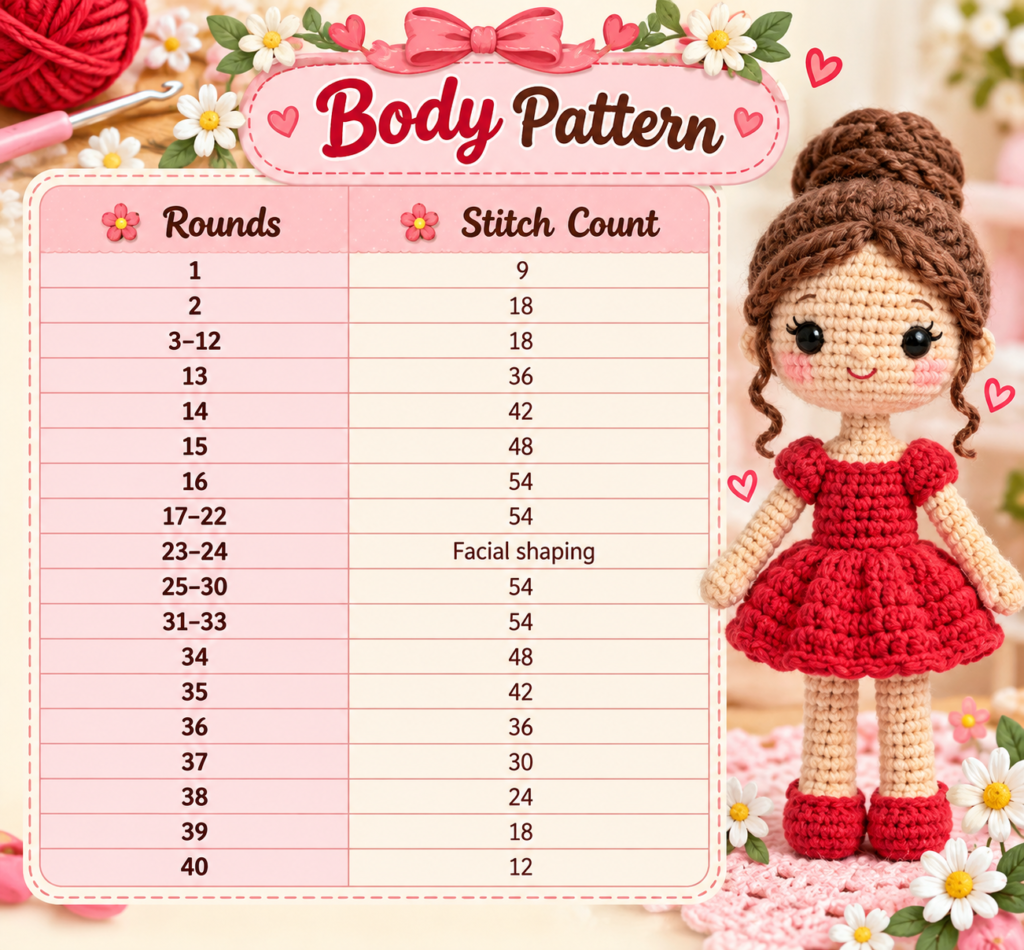
Install the 9 mm safety eyes before closing the head.
The face is then enhanced with white yarn around the eyes, dark embroidery for the eyelashes and eyebrows, and a small embroidered nose.
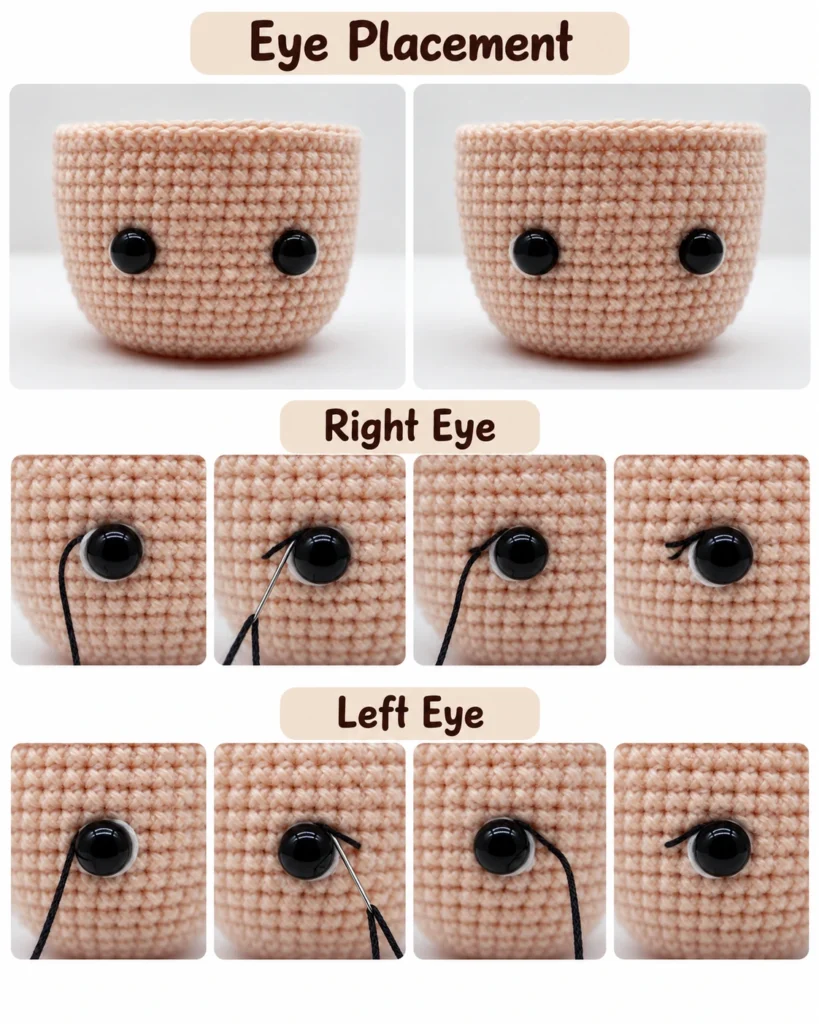
The nose is embroidered across approximately three stitches.
A little blush on the cheeks creates the final soft princess expression.
And suddenly?
She is looking back at you.
That is usually the moment this project stops feeling like “crochet pieces” and starts feeling like a character.
Step 7: Attach the Head Securely
The original design uses a long needle and lengths of strong cotton yarn passed through the neck structure and head.
The head is then positioned over the neck, tightened securely, and the yarn ends are tied and hidden inside.
Take your time here.
A beautifully crocheted doll can still look slightly strange if the head leans too far forward or backward.
Before tightening everything permanently, look at your doll from:
front, side, and back.
When the posture looks natural, secure it.
Step 8: Make the Red Crochet Wig
This may be my favorite section.
Because the hair completely transforms the doll.
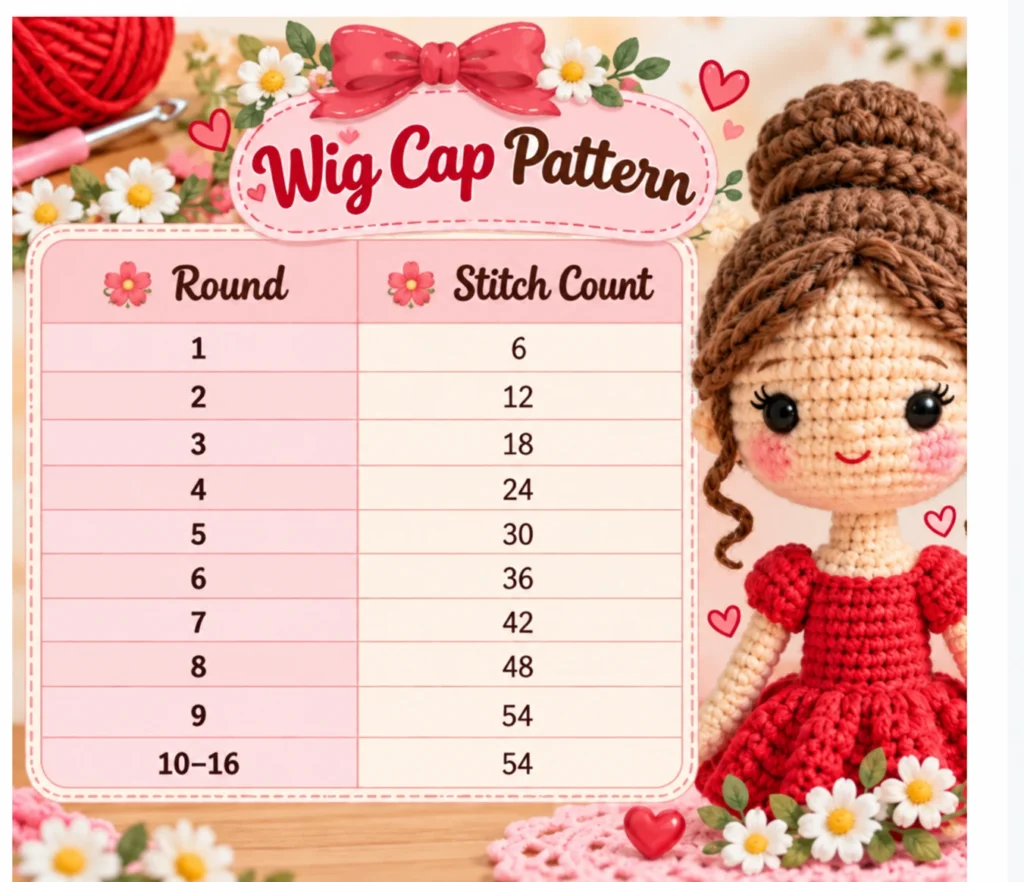
The original crochet princess doll pattern creates an actual crochet wig cap followed by individual strands.
For our version, replace the original brown hair yarn with deep red yarn.
Think rich cherry red, wine red, or deep auburn.
Wig Cap
The wig cap construction is worked before the individual hair strands are added.
The source then creates several groups of hair strands at different lengths.
Shorter strands shape the back and sides, while longer strands create the dramatic upper layer. Кукла Бэль Кукла Бэль
Once the placement looks right, pin everything first.
Do not rush into sewing.
Move one strand.
Look again.
Move another.
Look again.
Hair placement changes the doll’s entire expression.
Finally, twist the longest strands into a bun at the top and allow some ends to fall naturally down the back. Кукла Бэль
Hair Ribbon
Finish the hairstyle with a small crocheted band:
Ch 40, then work 39 sc across the back bumps of the chain.
Leave a long tail and sew the band around the bun.
That final hair-ribbon instruction appears on the last page of the source.
How to Make Your Crochet Princess Doll Look Professional
For a cleaner finished crochet princess doll pattern, keep your tension consistent throughout the body.
Use invisible increases and decreases whenever possible.
Stuff small areas gradually.
Pin the wig before sewing it.
Check facial symmetry from a distance rather than only looking closely.
And do not underestimate color.
Crochet Princess Doll Pattern FAQ
Is this crochet princess doll pattern suitable for beginners?
This project is best for confident beginners or intermediate crocheters. You should already know how to work a magic ring, single crochet, increases, decreases, BLO/FLO stitches, and continuous rounds.
How tall is the finished crochet princess doll?
Using the recommended yarn and 2 mm hook, the finished doll is approximately 26 cm tall. Кукла Бэль
Can I use a larger crochet hook?
Yes, but changing the hook and yarn thickness will also change the final size of your doll.
Does the crochet princess doll pattern use wire?
Yes. The source uses approximately 2 mm wire, including wire inside the arms to help provide structure.
Is the hair crocheted?
Yes. The hairstyle is built from a crochet wig cap plus individually crocheted strands that are arranged, pinned, and then secured to the head.
Final Thoughts
Some amigurumi projects are cute because they are simple.
This one is special for almost the opposite reason.
You watch it slowly transform.
First shoes.
Then long legs.
Then a skirt.
Then a body.
Then suddenly there are arms, a head, a face, and a dramatic red hairstyle.
By the time you finish this crochet princess doll pattern, it is difficult to remember that everything began as a few ordinary balls of yarn.
And that is exactly what makes detailed amigurumi so addictive.
Make the classic yellow-and-red version first.
Then try burgundy and cream.
Or blue and silver.
Or create an entirely new princess of your own.
Because once you’ve made one?
There is a very good chance she is going to need a friend. 👑❤️
Keep Crocheting With Tiny Crochet Nest
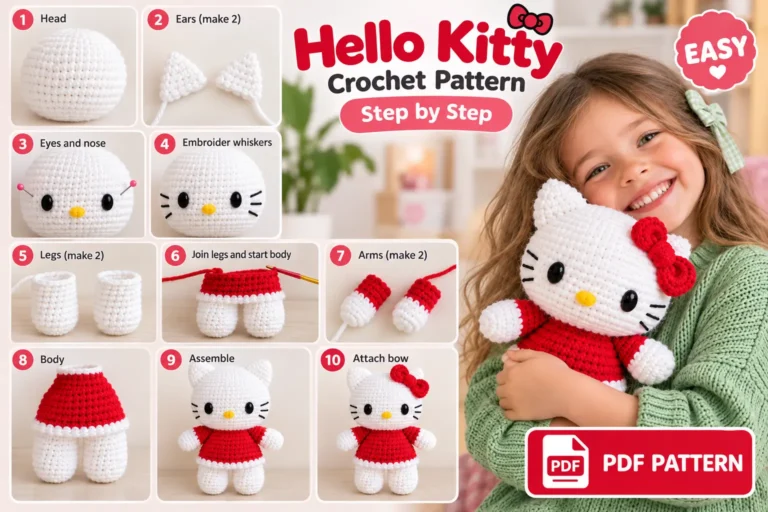
If you enjoyed this princess project, make another cute character with the Hello Kitty Crochet Pattern.
For another adorable amigurumi project, try the Panda Crochet Pattern.
And if you want something completely different for the spooky season, save the Halloween Eyeball Crochet Pattern for later. 🎃
You can also follow Tiny Crochet Nest on Facebook for new crochet ideas, free patterns, and project inspiration.
Save this pattern for later, choose your red and yellow yarn, and start bringing your little crochet princess to life. ❤️🧶