Crochet Tote Bag Pattern: 6 Easy Steps to a Stunning Striped Bag
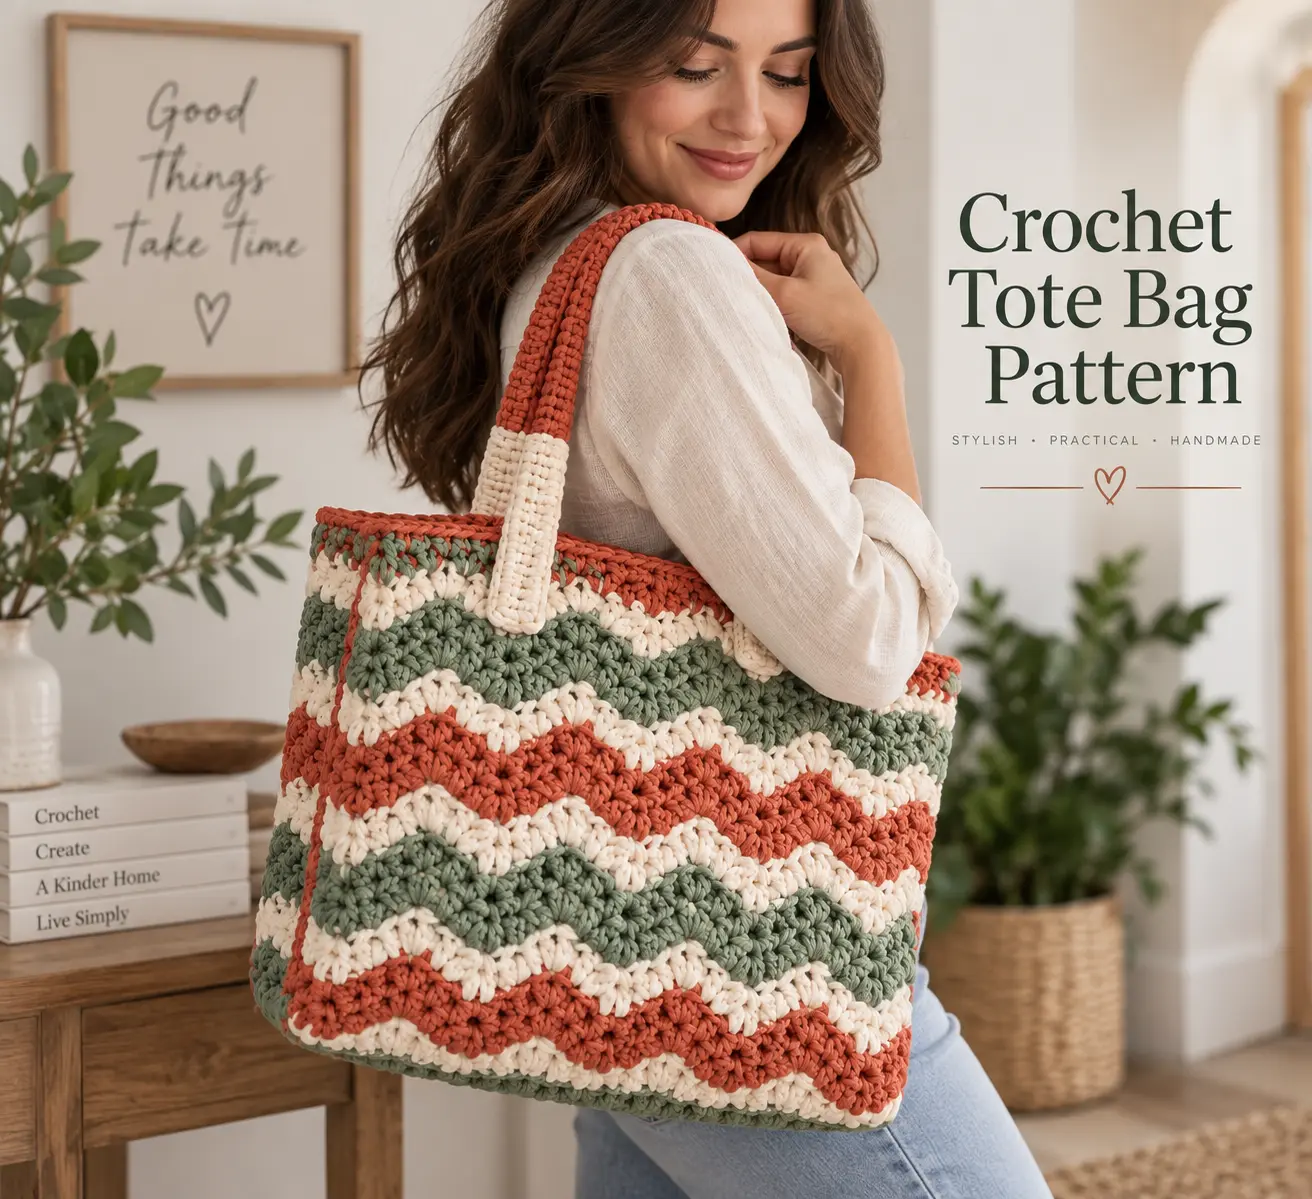
If you are looking for a crochet tote bag pattern that combines generous space, a structured shape, and beautiful striped texture, this everyday tote is a lovely project to make.
The bag is constructed from separate front, back, side, and base panels. Once the panels are complete, they are joined together before adding the top edging and two sturdy crochet handles.
For this version, we will use sage green, warm cream, and terracotta — a warm, earthy palette chosen not only for its timeless style but also for the feelings these colors are traditionally associated with. Sage green symbolizes harmony, renewal, and calm. Warm cream brings a sense of comfort, purity, and softness, while terracotta represents warmth, grounding, and stability. Together, they create a balanced and inviting color combination that gives this crochet tote a natural, elegant feel.
You can easily substitute your own favorite colors while keeping the same A-B-A-C stripe sequence.
The finished tote measures approximately 15 inches (38 cm) wide, 8 inches (20.5 cm) deep, and 16 inches (40.5 cm) high.
Crochet Tote Bag Pattern Materials
The original construction uses Lily Sugar’n Cream yarn and works with two strands held together. For solid-color yarn, the source calls for 6 balls of Color A, 5 balls of Color B, and 6 balls of Color C, with each original ball measuring 70.9 g / 109 m.
For our updated palette, use:
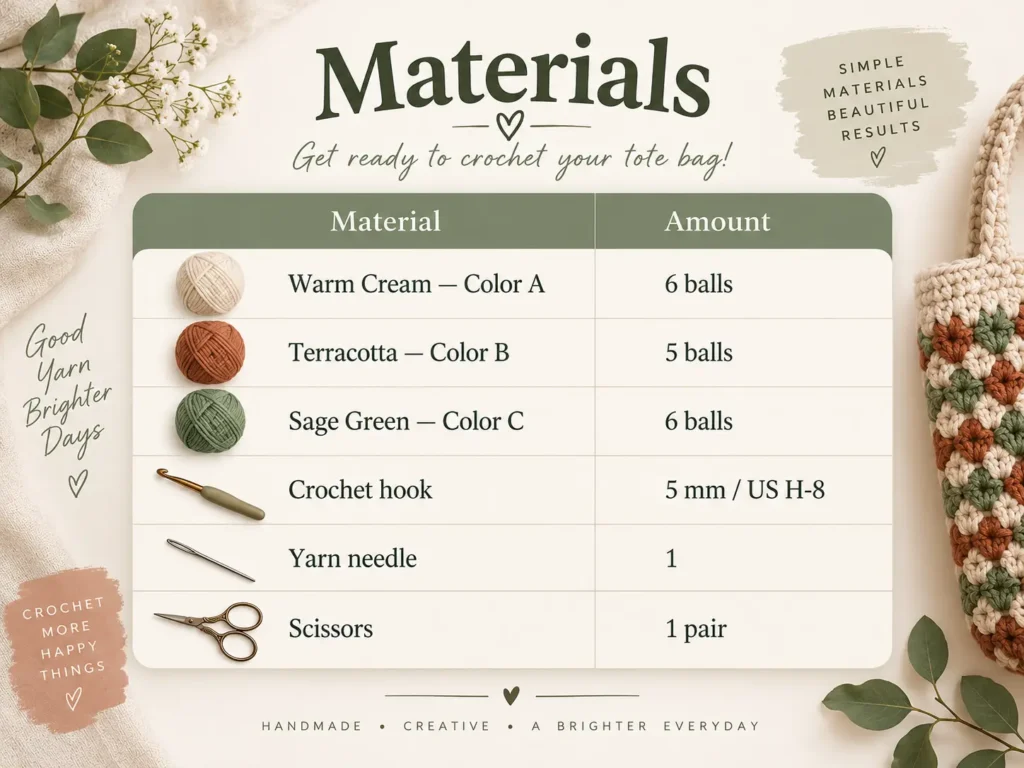
If you substitute another yarn, try to stay close to the original yardage and, more importantly, check your gauge before starting all of the panels.
Gauge
With two strands of yarn held together:
12 dc × 6 rows = 4 inches / 10 cm
The original pattern specifically recommends changing hook size when necessary to obtain gauge.
Getting the gauge reasonably close is especially useful for this crochet tote bag pattern, because the front, back, side panels, and base all need to fit together neatly.
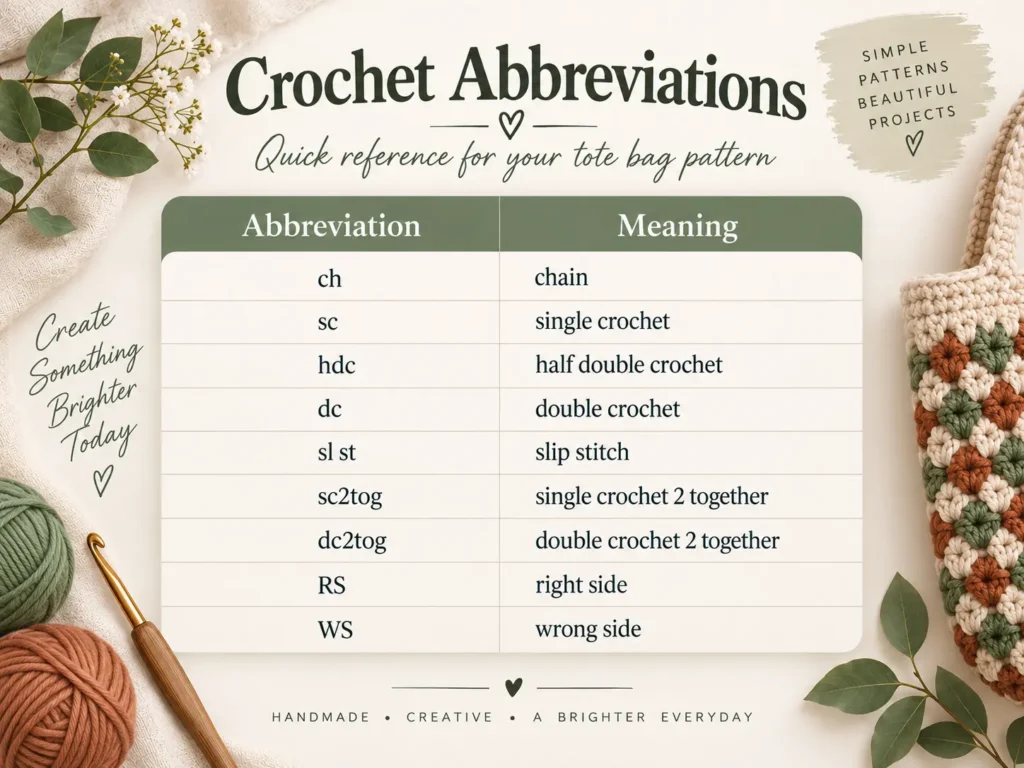
Crochet Abbreviations
Color Change and Stripe Pattern
When changing colors, work the current stitch until the last two loops remain on the hook. Pull the new color through those two loops to complete the stitch, then continue with the new shade.
Use this eight-row stripe sequence:
2 rows Color A → 2 rows Color B → 2 rows Color A → 2 rows Color C
Then repeat.
This is the same eight-row structure used by the source pattern.
With our colors, that becomes:
Cream → Terracotta → Cream → Sage Green
The combination creates a much more neutral everyday look while preserving the striped character of the original bag.
Step 1: Crochet the Front and Back Panels
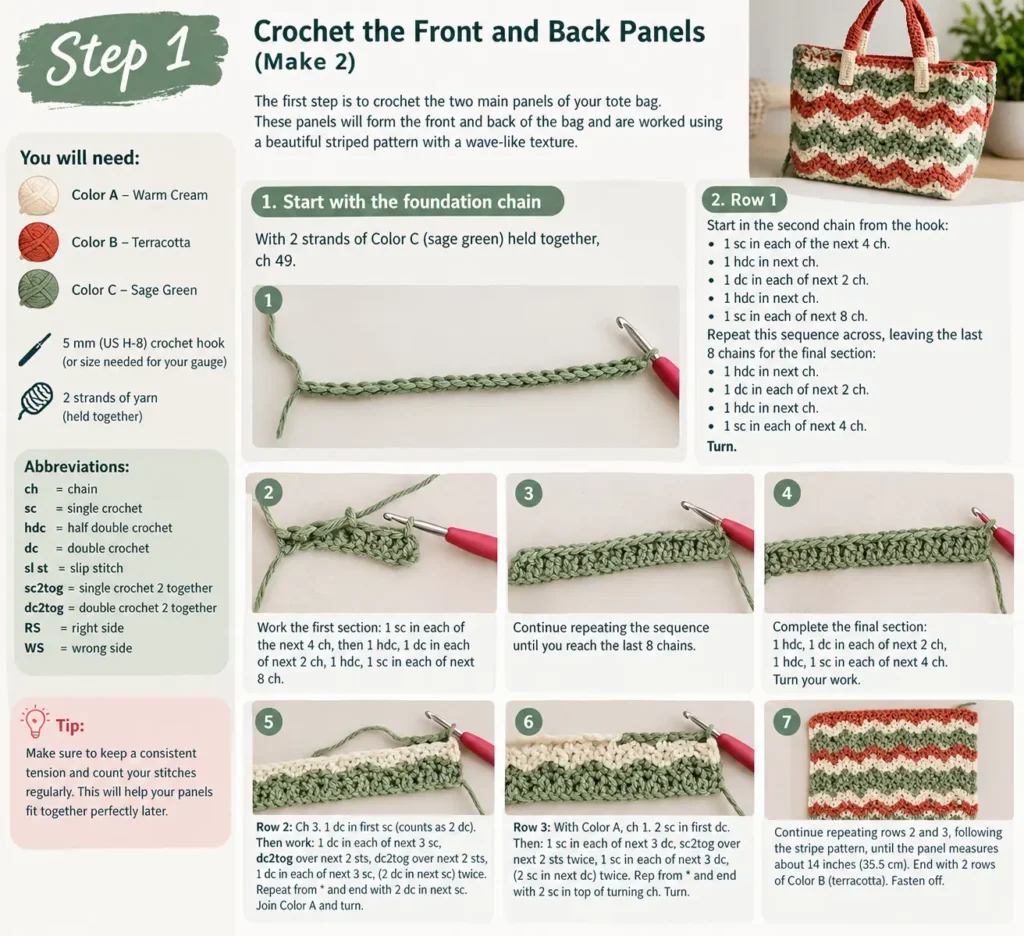
Make 2 identical panels.
With 2 strands of Color C — Sage Green — held together, ch 49.
Row 1
Starting in the second chain from the hook:
Work 1 sc in each of the next 4 ch.
Then work:
1 hdc in next ch, 1 dc in each of next 2 ch, 1 hdc in next ch, 1 sc in each of next 8 ch.
Repeat this sequence across until the final 8 chains.
Finish with:
1 hdc in next ch, 1 dc in each of next 2 ch, 1 hdc in next ch, 1 sc in each of the final 4 ch.
Turn.
Row 2
Ch 3.
Work 1 dc into the first sc. Together, the beginning ch-3 and dc count as 2 dc.
Work 1 dc in each of the next 3 sc.
Make dc2tog over the next 2 stitches, then make another dc2tog over the following 2 stitches.
Work 1 dc in each of the next 3 sc.
Work 2 dc in the next sc twice.
Repeat the shaping sequence across as established.
End with 2 dc in the next sc.
Join Color A — Warm Cream.
Turn.
Row 3
With Color A, ch 1.
Work 2 sc in the first dc.
Work 1 sc in each of the next 3 dc.
Make sc2tog over the next 2 stitches twice.
Work 1 sc in each of the next 3 dc.
Work 2 sc in the next dc twice.
Repeat the shaping sequence across.
Finish with 2 sc in the top of the turning chain.
Turn.
These first three rows establish the textured shaping used throughout the panels. The source then repeats the last two rows while maintaining the eight-row color sequence.
Continue the Panel
Continue repeating Rows 2 and 3 while following the stripe sequence until the panel measures approximately:
14 inches / 35.5 cm
Finish after 2 rows of Color B — Terracotta.
Create the Handle Openings
Join Color A.
Ch 1 and work 2 sc in the first dc.
Then work:
1 sc in each of next 3 dc, sc2tog over next 2 sts twice, 1 sc in each of next 3 dc, ch 4, skip next 2 dc, 1 sc in each of next 3 dc, sc2tog over next 2 sts twice, 1 sc in each of next 3 dc.
Work 2 sc in each of the next 2 dc.
Repeat the previous main sequence once more.
Finish with 2 sc in the top of the turning chain.
Turn.
Next Row
Ch 3 and work 1 dc in the first sc.
Work:
1 dc in each of next 3 sc, dc2tog over next 2 sts twice, 1 dc in each of next 2 sts, 6 dc in the ch-4 space, 1 dc in each of next 2 sts, dc2tog over next 2 sts twice, 1 dc in each of next 3 sc.
Work 2 dc in each of the next 2 sc.
Repeat the main sequence once more.
Work 2 dc in the final sc.
Join Color C and turn.
Work another 2 rows in pattern, then fasten off.
Make the second panel exactly the same way.
The alternating increases and decreases create the subtle wave texture that gives this crochet tote bag pattern much more personality than a plain rectangular bag.
Step 2: Make the Side Panels
Make 2.
With 2 strands of Color C held together:
Ch 37.
Follow the same established stitch pattern used for the front and back panels.
Continue working in the stripe sequence until each side panel measures approximately:
16 inches / 40.5 cm
Fasten off.
The PDF uses this same front-and-back stitch pattern for both side pieces, simply beginning them with the shorter 37-chain foundation.
You should now have four main pieces:
2 front/back panels + 2 side panels.
Step 3: Join the Crochet Bag Panels
Arrange the four panels into a rectangle, positioning the two side panels opposite each other.
Place the wrong sides of two adjoining panels together.
Using 2 strands of Color B — Terracotta — join the yarn with a slip stitch at the upper corner.
Ch 1.
Working through both layers, crochet single crochet stitches evenly down the entire side edge.
Fasten off.
Repeat the process for the remaining seams until all four panels form the body of the tote.
These visible crochet joins add definition and help give the finished crochet tote bag pattern its structured appearance.
Step 4: Crochet the Rectangular Base
With 2 strands of Color C — Sage Green — held together:
Ch 49.
Base Row 1
Starting in the second chain from your hook:
Work 1 sc in every chain across.
48 sc
Turn.
Base Row 2
Ch 1.
Work 1 sc in every sc across.
Turn.
Repeat Base Row 2 until the piece measures approximately:
12 inches / 30.5 cm
End after a WS row.
Do not fasten off.
Attach the Base
With the RS of the base facing you, position the bottom edge of the assembled bag body behind the base.
The wrong sides should face each other.
Carefully align the corners.
Ch 1.
Working through both layers, work single crochet stitches evenly around all four sides of the rectangular base.
Join with a sl st to the first sc.
Fasten off.
The separate rectangular bottom adds depth and structure, making this crochet tote bag pattern particularly practical for an everyday carry bag.
Step 5: Add the Top Edging
With the RS facing you, join 2 strands of Color B — Terracotta — with a slip stitch at any corner of the upper edge.
Ch 1.
Work reverse single crochet evenly around the entire top edge.
Unlike ordinary crochet, reverse single crochet is worked from left to right.
Join with a sl st to the first stitch.
Fasten off.
The original design uses this reverse-sc round to create the finished top border.
It gives the opening a slightly corded appearance and creates a clean transition between the striped body and handles.
Step 6: Crochet the Handles
Make 2 handles.
With 2 strands of Color B — Terracotta — held together:
Ch 95 loosely.
Handle Row 1
Starting in the second chain from the hook:
Work 1 sc in every chain across.
94 sc
Turn.
Handle Row 2
Ch 1.
Work 1 sc in every stitch across.
Turn.
Repeat Row 2 one more time.
Fasten off.
Attach the Handles
Push both ends of one handle through the openings in the front panel toward the wrong side.
Sew the two ends together securely.
Bring the two sides of the handle together.
Using 2 strands of Color A — Warm Cream, tightly wrap the center 4 inches / 10 cm of the handle.
Secure the yarn firmly.
Repeat for the second handle on the back panel.
Your striped everyday tote is complete.
How to Customize This Crochet Tote Bag Pattern
One of the biggest advantages of this crochet tote bag pattern is how different it can look simply by changing three colors.
Our combination of sage green, warm cream, and terracotta gives the bag a modern handmade aesthetic that works throughout the year.
You could also try combinations such as charcoal + oatmeal + camel, dusty rose + cream + taupe, olive + beige + brown, or navy + ivory + mustard.
Whatever palette you choose, keep track of which shade represents A, B, and C so you don’t lose the original stripe sequence.
You can also make the bag look calmer by choosing three shades from the same color family, or make the wave pattern stand out more strongly by using contrasting colors.
Tips for a Neater Striped Crochet Tote
Because this bag uses two strands together, pay particular attention to consistent tension. Make a gauge swatch before beginning all four panels so you don’t discover later that the side pieces and front panels are different sizes.
Count your stitches regularly on the shaped rows. The increases and decreases are what form the attractive wave effect, so accidentally missing one can move the entire motif out of alignment.
When joining the panels, distribute the single crochet stitches evenly along each edge. Too many joining stitches can make a seam flare, while too few can cause puckering.
Finally, don’t make the handle foundation chain too tight. The original instructions specifically call for chaining the handles loosely, which helps them lie more comfortably once assembled.
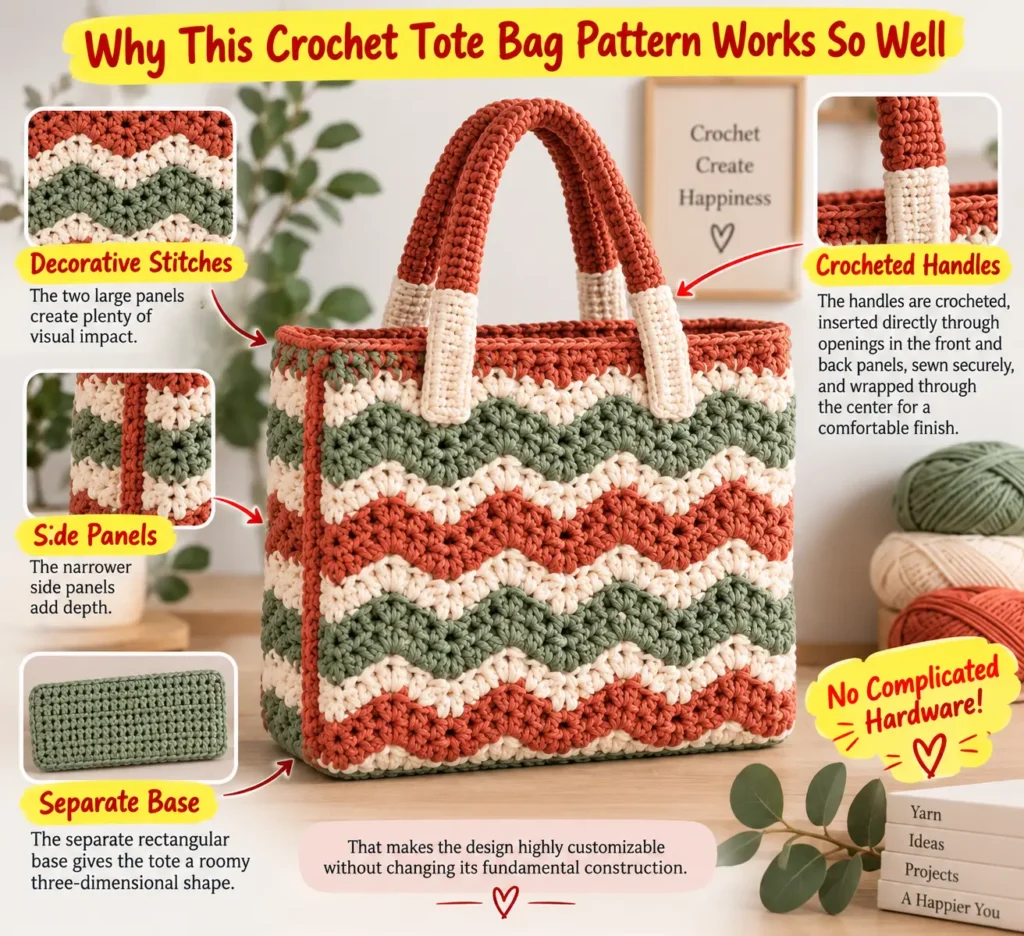
This crochet tote bag pattern combines decorative stitches with a practical panel-based construction.
The two large panels create plenty of visual impact, the narrower side panels add depth, and the separate rectangular base gives the tote a roomy three-dimensional shape.
The bag also avoids complicated hardware. The handles are crocheted, inserted directly through openings made in the front and back panels, sewn securely, and wrapped through the center for a comfortable finish.
That makes the design highly customizable without changing its fundamental construction.
Crochet Tote Bag Pattern FAQ
What size does this crochet tote bag pattern make?
This crochet tote bag pattern creates a generously sized everyday bag measuring approximately 15 inches / 38 cm wide, 8 inches / 20.5 cm deep, and 16 inches / 40.5 cm high. Its rectangular base and side panels give the tote plenty of useful interior space.
What crochet hook is best for this crochet tote bag pattern?
For this crochet tote bag pattern, use a 5 mm / US H-8 crochet hook, or adjust your hook size if necessary to achieve the correct gauge. Maintaining the recommended gauge helps the front, back, side panels, and base fit together properly.
Does this crochet tote bag pattern use two strands of yarn?
Yes. This crochet tote bag pattern is worked primarily with two strands of yarn held together. Using double strands creates a thicker fabric that gives the finished tote more structure and durability.
Can I change the colors in this crochet tote bag pattern?
Absolutely. One of the easiest ways to personalize this crochet tote bag pattern is by choosing your own three-color palette. Simply assign your shades to Colors A, B, and C and keep the same eight-row stripe sequence.
You can create a neutral tote, a bold colorful bag, or a soft earthy version without changing the construction of the pattern.
How many panels are used in the crochet tote bag pattern?
The crochet tote bag pattern is constructed from two front/back panels, two narrower side panels, and one rectangular base.
The separate-panel construction helps create the roomy, structured shape of the finished bag and also makes assembly easier to understand.
How are the handles made in this crochet tote bag pattern?
Each handle in the crochet tote bag pattern begins with 95 chains and is worked with three rows of single crochet.
The finished handles are inserted through the openings in the front and back panels, sewn securely, and wrapped through the center with contrasting yarn for a comfortable and decorative finish.
Is this crochet tote bag pattern customizable?
Yes. This crochet tote bag pattern is easy to customize with different yarn colors while keeping the same stitch sequence and construction.
You can also experiment with tonal palettes, high-contrast stripes, or earthy shades like sage green, warm cream, and terracotta to give your tote a completely different look.
Is this crochet tote bag pattern suitable for an everyday bag?
Yes. The combination of a rectangular base, structured panels, double-strand yarn, and sturdy crocheted handles makes this crochet tote bag pattern well suited for creating a practical everyday tote.
The decorative wave texture keeps the design visually interesting while the roomy construction makes the finished bag useful as well.
Final Thoughts
A handmade tote is one of those crochet projects that can be both decorative and genuinely useful. With its generous dimensions, wave-inspired texture, three-color stripes, rectangular base, and sturdy handmade handles, this crochet tote bag pattern can easily become an everyday favorite.
The best part is that one pattern can create many completely different bags. Choose three shades that match your style, keep the A-B-A-C stripe sequence, and make the design your own.
If you enjoy practical and playful crochet projects, you may also like our Hello Kitty crochet pattern, this adorable panda crochet pattern, or our step-by-step crochet baby sneakers pattern guide. They’re great projects to explore next if you want to keep building your crochet skills and handmade collection.
Save this crochet tote bag pattern for later and choose your favorite three-color combination before you start crocheting.