Amazing Crochet Baby Sneakers Pattern Guide: Newborn to 9 Months
Tiny crochet shoes are always adorable, but sneaker-style baby booties have a completely different look from traditional crochet slippers.
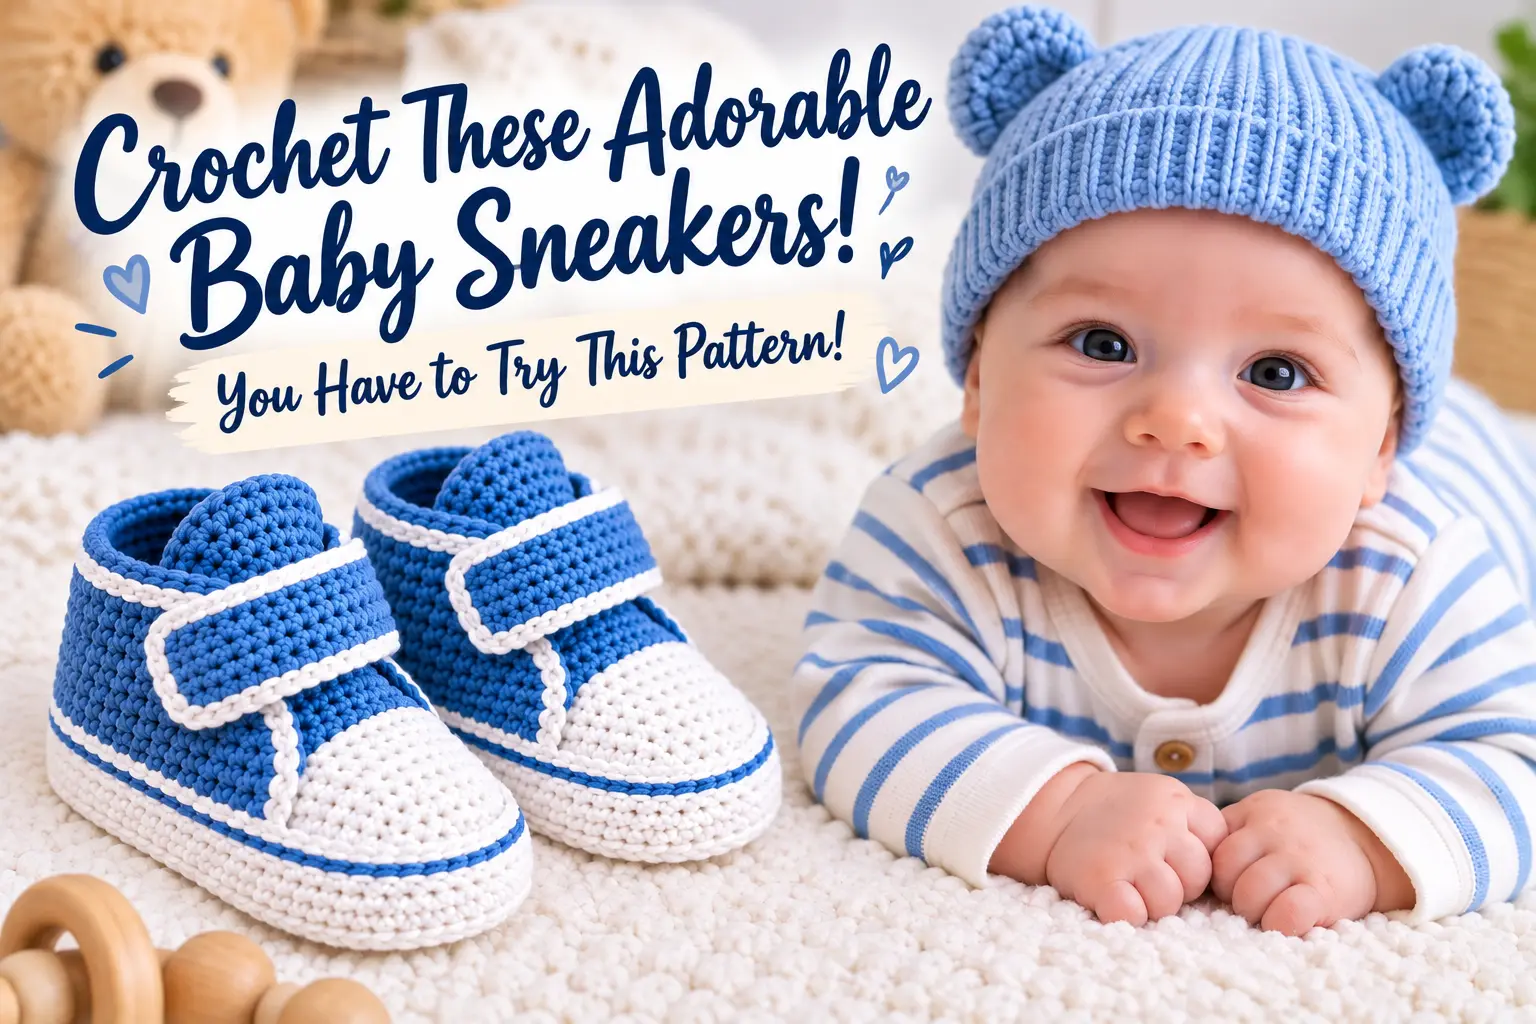
This crochet baby sneakers pattern creates a pair of miniature shoes with a layered sole, shaped upper, separate tongue and adjustable Velcro-style strap. The finished design looks surprisingly similar to a real pair of sneakers while remaining soft enough for little feet.
The design covered in this guide is the Blue Velcro Sneakers pattern by Anna Ushakova. It is an intermediate-level crochet pattern available in four sizes, from newborn through approximately 9 months. The complete row-by-row instructions belong to the original designer and are not reproduced here. (Ravelry)
Instead, this guide will help you understand the sizing, yarn requirements, construction and techniques involved before you start.
Crochet Baby Sneakers Pattern at a Glance
Here are the main details you should know before beginning:
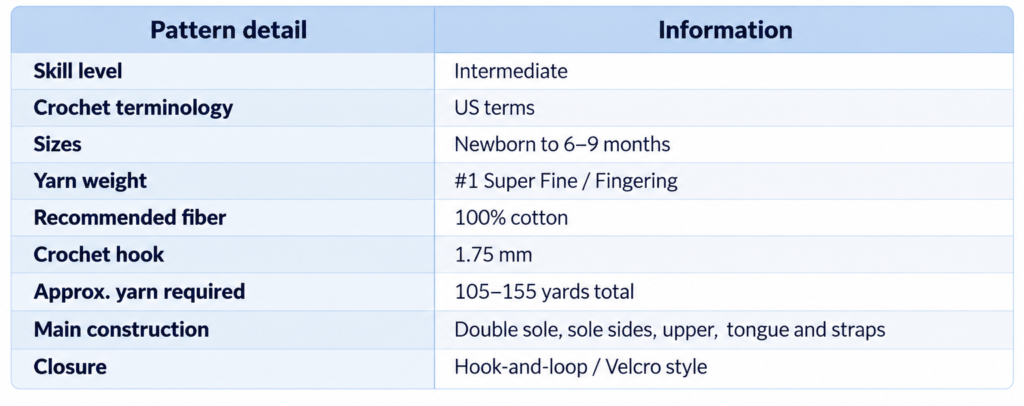
The original PDF specifies Hobbii Rainbow Deluxe 8/4, a 100% cotton yarn, while also allowing a comparable #1 Super Fine/Fingering cotton substitute. It lists a 1.75 mm hook together with stitch markers, scissors, measuring tape, tapestry needle, textile glue and Velcro tape.
The designer classifies the project as intermediate, and the pattern includes four sizes from newborn through 9 months.
Crochet Baby Sneakers Size Chart
One of the most useful parts of this pattern is that sizing is based on the baby’s actual foot length, not age alone.
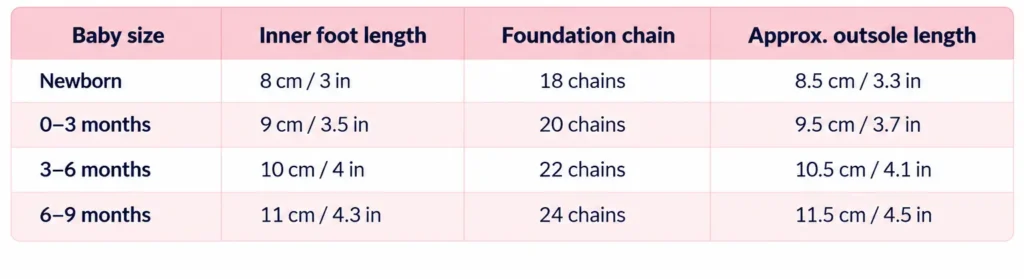
The pattern itself recommends measuring the baby’s inner foot length whenever possible. The age ranges are provided as averages because babies of the same age do not necessarily have the same foot size.
How to choose the right size
Measure from the back of the heel to the end of the longest toe.
Then compare that measurement with the inner foot length column rather than choosing a size only because the baby is, for example, three months old.
If you are making the sneakers as a gift and cannot measure the baby’s foot, the age chart can still be used as an approximate reference.
Yarn for Crochet Baby Sneakers
The original project uses fingering-weight cotton.
The specified yarn is Hobbii Rainbow Deluxe 8/4, with a #1 Super Fine/Fingering 100% cotton yarn suggested as the substitute category.
Cotton is particularly well suited to a project like this because it provides visible stitch definition and helps the shoe maintain a more structured appearance than a very fluffy yarn would.
When substituting yarn, however, don’t rely on the yarn label alone.
The finished measurements and gauge matter more.
Gauge Matters More Than You Might Think
The pattern gauge is:
30 single crochet stitches × 33 rounds = 4 inches / 10 cm.
For a scarf, being slightly off gauge may not matter very much.
For a baby shoe that is only around 8–11 cm long, a relatively small gauge difference can noticeably change the final size.
The pattern specifically advises checking the sole while crocheting. If your sole is longer than required, you may need to crochet more tightly or change to a hook approximately 0.25–0.5 mm smaller.
That is one of the most important checks to make before continuing with the rest of the shoe.
Crochet Techniques Used in the Pattern
Although the finished sneakers look detailed, they are constructed mostly from familiar crochet stitches.
The pattern uses techniques including:
- chain stitches
- single crochet
- half double crochet
- double crochet
- slip stitches
- increases
- decreases
- front loop only
- back loop only
- working in rounds
- working back and forth
- invisible joining
The instructions use US crochet terminology throughout.
Because the project also requires shaping, counting and positioning components accurately, it makes sense that the designer rates it as intermediate rather than beginner-friendly.
How the Crochet Baby Sneakers Are Constructed
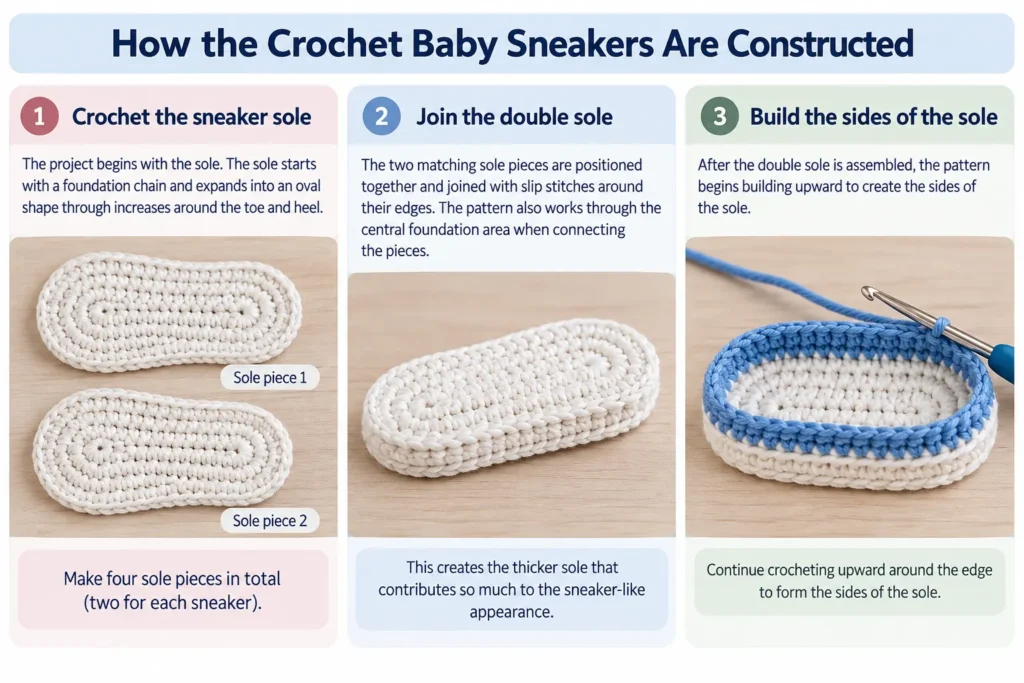
4. Add the contrasting sneaker detail
A line of slip stitches is added around the sole before the upper is developed.
Visually, this helps separate the sole from the upper and makes the finished piece resemble a tiny manufactured sneaker rather than a conventional crochet bootie.
5. Shape the upper and toe
The upper begins from the heel and is worked around the shoe.
The toe is gradually narrowed using decreases.
For example, the newborn upper begins with 70 stitches and is progressively shaped across subsequent rounds.
The other three sizes use their own stitch counts to maintain similar proportions as the shoes become larger.
Accurate stitch counting is particularly important during this section because the shaping determines the appearance of the toe.
The Crochet Sneaker Tongue
A separate tongue is then built at the front of the shoe.
Rather than being worked in continuous rounds, this section is crocheted back and forth from loops in the upper.
The tongue gradually widens through increases and is finished around the top edge.
The newborn version is shorter, while the three larger sizes receive longer tongue instructions to keep the overall proportions balanced.
This separate tongue is one of the details that gives the project its recognizable sneaker shape.
Adding the Velcro Closure
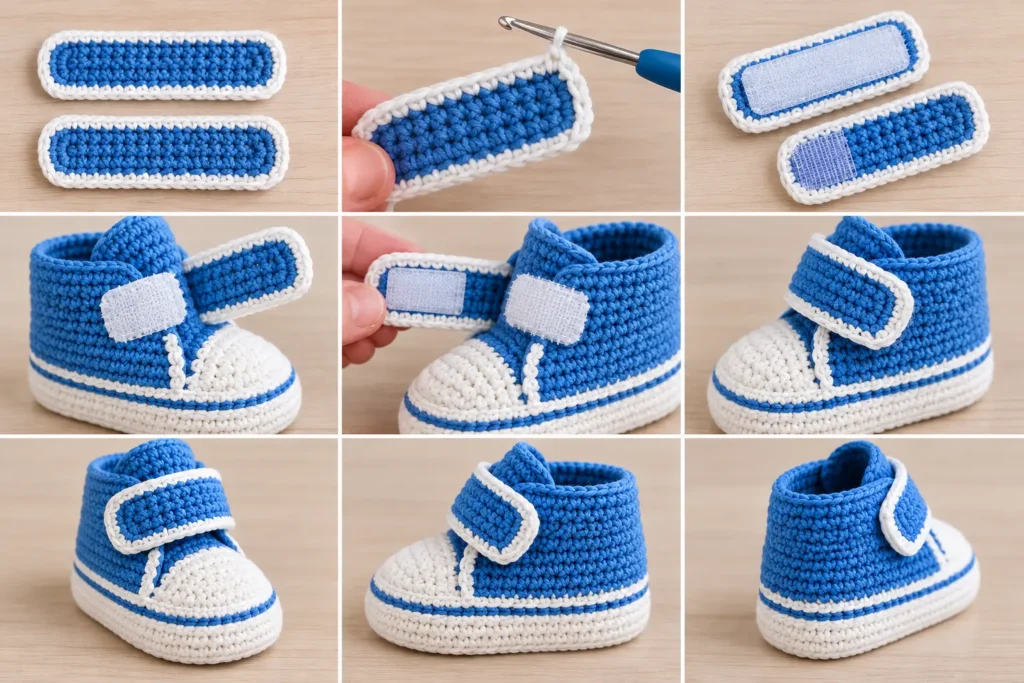
The closure is another distinctive feature of the design.
The left and right sneakers are not identical during this stage because the straps need to face opposite directions.
For the newborn size, for example, the left and right straps begin at different positions around the heel and sides. Once crocheted, the hook-and-loop pieces are attached to the strap and corresponding side of the shoe.
The larger sizes use appropriately longer and wider closure sections.
A safety note for baby shoes
When making anything for a baby, inspect attached components carefully.
Hook-and-loop tape and any other added component should be attached securely, and the finished shoes should be checked regularly for loose pieces or damaged stitching.
These crochet sneakers are best thought of as soft baby footwear rather than walking shoes.
Finishing the Sneakers
The last step adds contrasting slip stitches around the upper edges of the shoes and their straps.
After that, weave in the yarn ends carefully and compare the two finished shoes.
Check that:
- both soles have the same length;
- both shoes have a similar overall shape;
- the tongues sit centrally;
- the closures line up correctly;
- no yarn ends or attached pieces are loose.
A baby shoe display or another suitable shaping form can also help maintain the finished shape during drying. The original pattern specifically mentions shoe forms as useful both for checking size and for drying finished booties in shape.
Is This Crochet Baby Sneakers Pattern Beginner-Friendly?
Probably not as a first-ever crochet project.
The individual stitches are familiar, but the project combines several techniques:
working around a foundation chain, shaping with increases and decreases, working through selected loops, making left and right components and assembling multiple pieces accurately.
The designer therefore labels the pattern intermediate.
A confident beginner who already understands stitch counting and decreases may still be able to follow it, but someone learning chains and single crochet for the first time would probably be more comfortable starting with a simpler baby bootie.
Common Problems to Watch For
My sole is too long
Check your gauge before continuing.
The original pattern recommends tightening your tension or reducing the crochet hook by approximately 0.25–0.5 mm when the sole comes out larger than expected.
My two shoes aren’t the same size
Compare them frequently rather than waiting until the end.
Using the same yarn, hook and tension for both is essential.
My upper doesn’t line up correctly
Recount the stitches before and after shaping rounds.
Toe shaping depends on decreases being positioned correctly.
Which size should I make?
Use actual foot length whenever you can.
Age should be treated only as an approximate sizing guide.
Where to Get the Full Crochet Baby Sneakers Pattern
The complete Blue Velcro Sneakers crochet pattern is by Anna Ushakova and is listed as a paid pattern through the designer’s Ravelry presence/CrochetClubStoreCo. The listing confirms the four sizes, fingering-weight cotton yarn, 1.75 mm hook and US crochet terminology used in the PDF. (Ravelry)
This article is an independent sizing and construction guide. It does not reproduce the designer’s complete row-by-row paid instructions.
Frequently Asked Questions
What yarn is best for a crochet baby sneakers pattern?
For this crochet baby sneakers pattern, the original design uses Hobbii Rainbow Deluxe 8/4 or another #1 Super Fine/Fingering 100% cotton yarn. Cotton helps create defined stitches and gives the finished baby sneakers a more structured appearance.
What crochet hook size is recommended?
This crochet baby sneakers pattern uses a 1.75 mm crochet hook. Because baby shoes are small, even a slight difference in tension can affect the finished sole length, so checking your gauge is important before continuing.
What sizes are included in the crochet baby sneakers pattern?
The crochet baby sneakers pattern includes four sizes: newborn, 0–3 months, 3–6 months and 6–9 months. The corresponding inner foot measurements range from approximately 8 cm to 11 cm.
Whenever possible, measure the baby’s actual foot rather than choosing a size only by age.
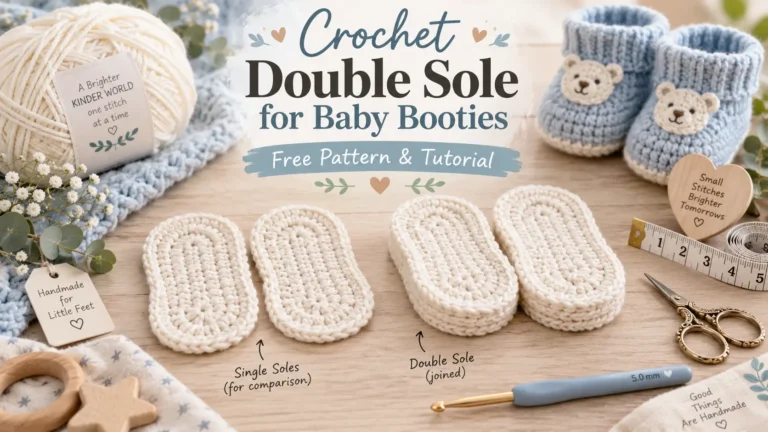
Does this baby sneakers crochet pattern use a double sole?
Yes. The design uses four crochet sole pieces in total. Two matching soles are joined together for each sneaker, creating a thicker and more structured base.
This double-sole construction is one of the details that gives the finished shoes their sneaker-like appearance.
Is this a free crochet baby sneakers pattern?
No. The complete crochet baby sneakers pattern belongs to designer Anna Ushakova and is offered as a paid pattern.
This article does not reproduce the complete row-by-row instructions. Instead, it explains the sizing, materials, crochet techniques and construction so you can better understand the project before purchasing or starting the original pattern.
You can find the full pattern on Ravelry.
Are crochet baby sneakers suitable for beginners?
This project is better suited to an intermediate crocheter or a confident beginner who already understands working in rounds, increases, decreases, front-loop crochet and stitch counting.
If you’re still learning, start with a simpler baby bootie project first, then return to this sneaker construction once you’re comfortable with shaping.
Final Thoughts
This crochet baby sneakers design is an interesting project for crocheters who want to move beyond traditional baby booties.
The combination of the reinforced sole, shaped upper, separate tongue, contrasting details and adjustable strap produces a much more sneaker-like result while still using familiar crochet techniques.
The key to a successful pair is not speed. Check the sole measurement first, count carefully during shaping, and compare the left and right shoes frequently as you work.
Once you understand how this type of crochet footwear is constructed, many of the same principles—especially sizing, sole shaping and careful finishing—will also be useful for future baby shoe projects.
Not sure which size to make? See our complete Crochet Baby Shoe Size Chart.
Love this project? Save it on Pinterest! Pin this crochet baby sneakers guide to your favorite crochet or baby-pattern board so you can easily find it when you’re ready to start your next pair.