Crochet Bear Baby Booties: 7 Easy Steps for Beginners
There is something incredibly sweet about making tiny crochet shoes by hand, but adding a little bear face makes them even harder to resist.
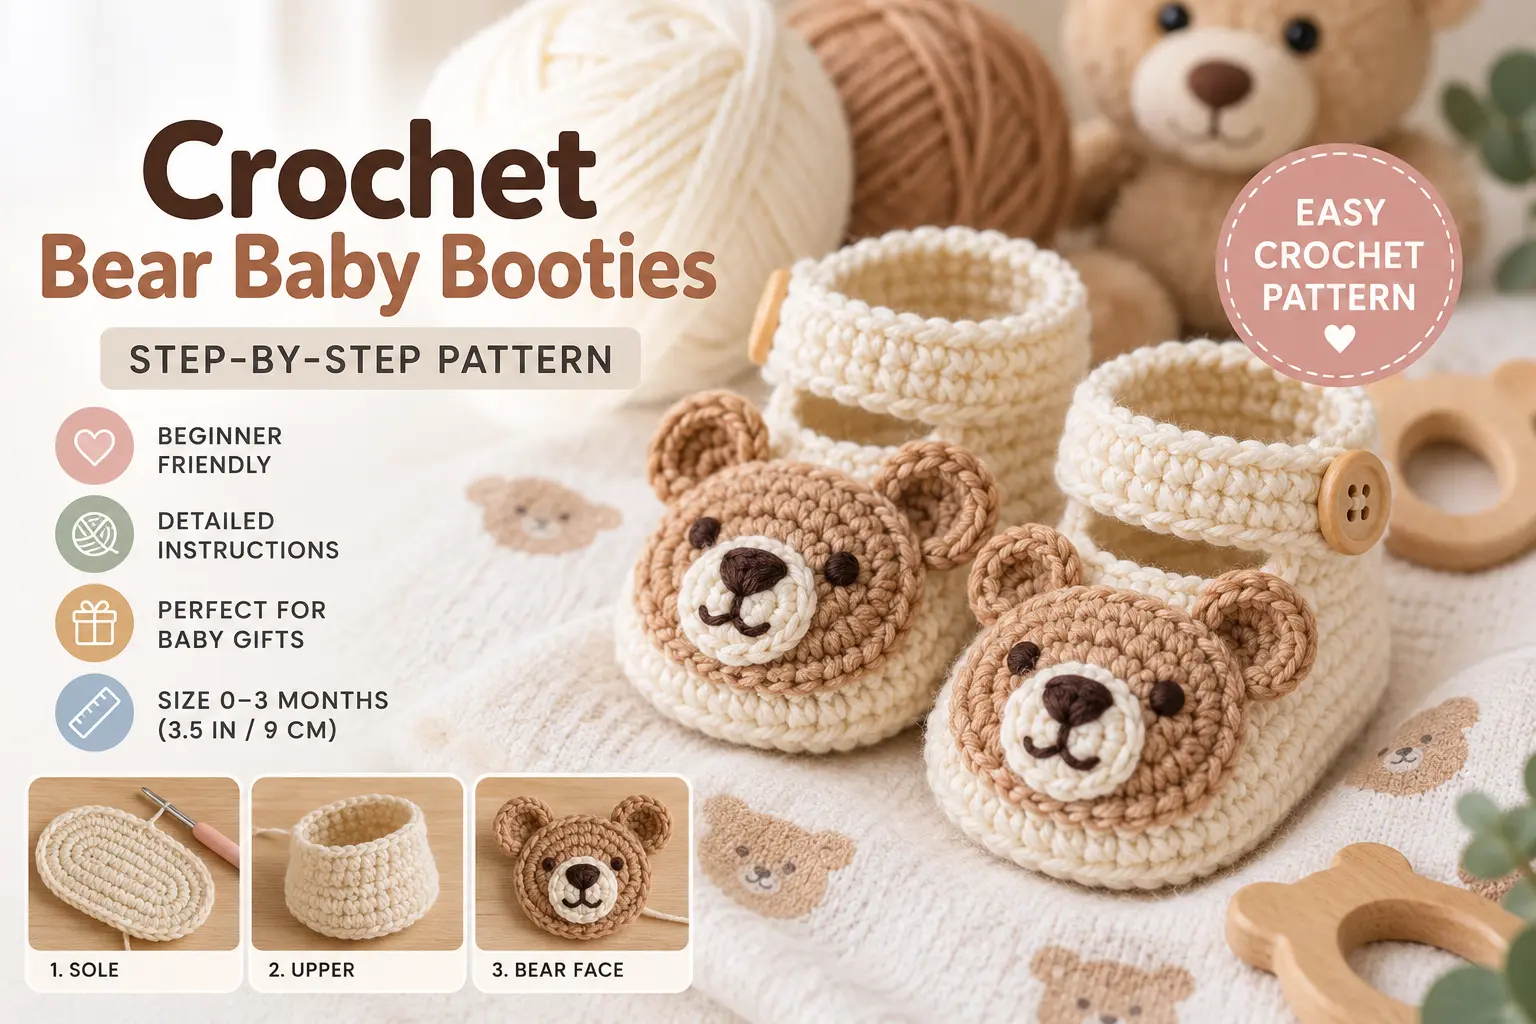
These crochet bear baby booties combine everything I love about baby crochet projects: they are small, practical, customizable, and cute enough to become a handmade gift on their own. The soft bootie shape keeps little feet cozy, while the ankle strap and bear-inspired details give the finished pair a playful look.
In this tutorial, I’ll show you how you can crochet your own pair, from the sole to the little bear face. I’ll also share a few tips I use when working on baby-sized projects, especially when it comes to yarn choice, sizing, tension, and finishing.
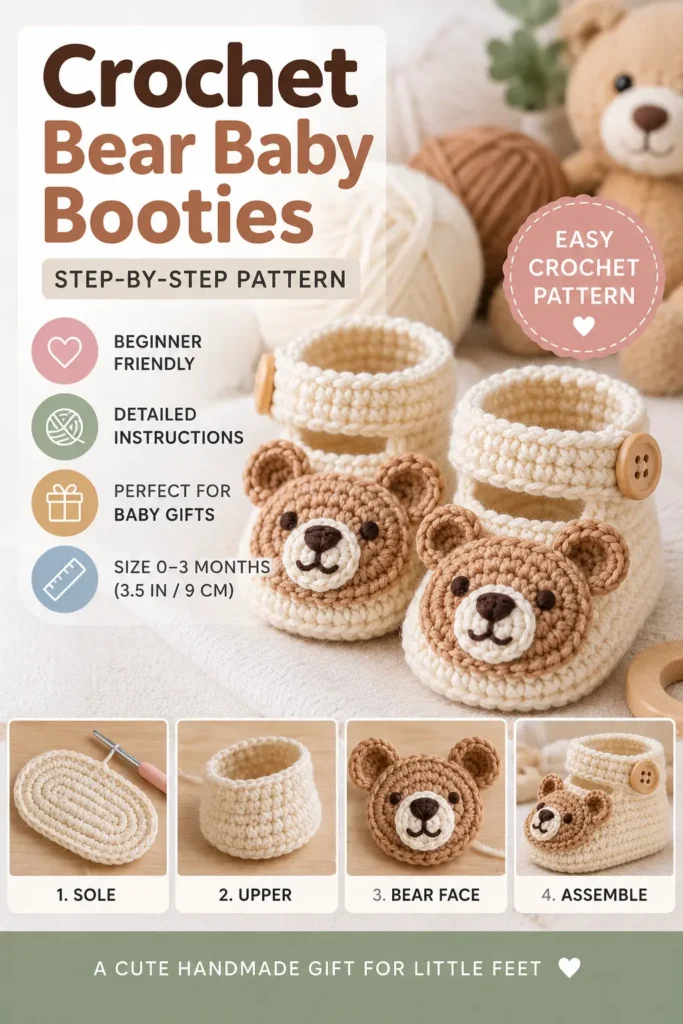
This pattern is designed for approximately 0–3 months, with a finished sole measuring about 3.5 inches (9 cm).
If you’re making these as a baby shower gift, I think neutral shades such as cream, oatmeal, beige, and soft brown are especially lovely—but you can absolutely make them in any color you like.
Crochet Bear Baby Booties Pattern at a Glance
Before we start, here are the main details you’ll want to know.
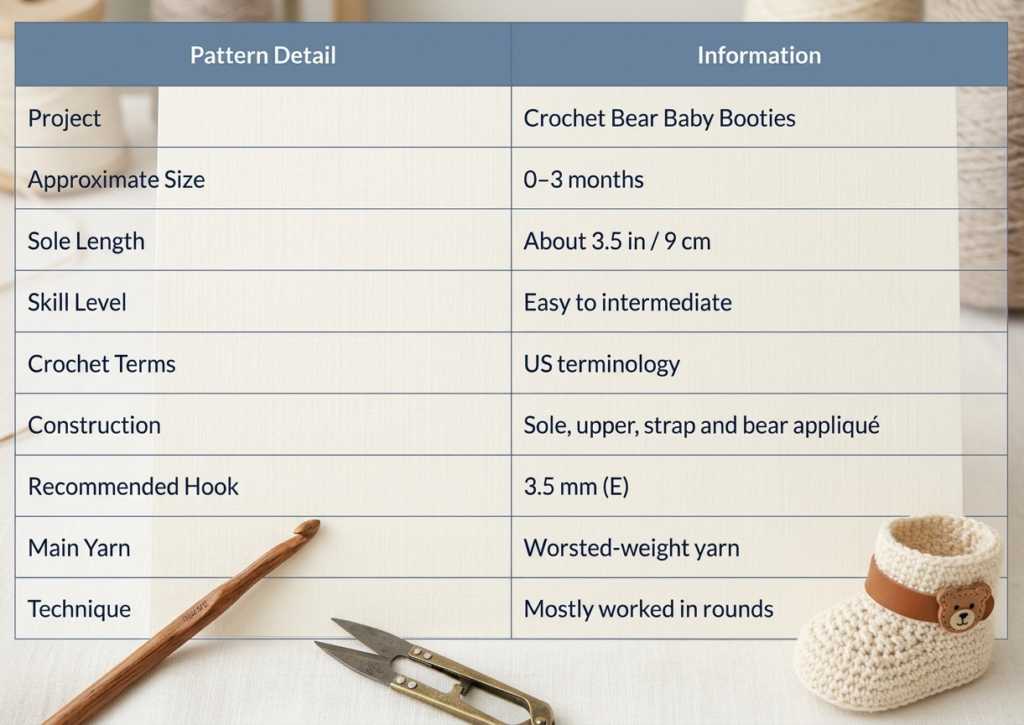
The size is only a guide. Babies’ feet vary, and your finished measurements can change depending on the yarn, hook, and your personal crochet tension.
I always recommend measuring the sole before finishing the second bootie.
Materials You’ll Need
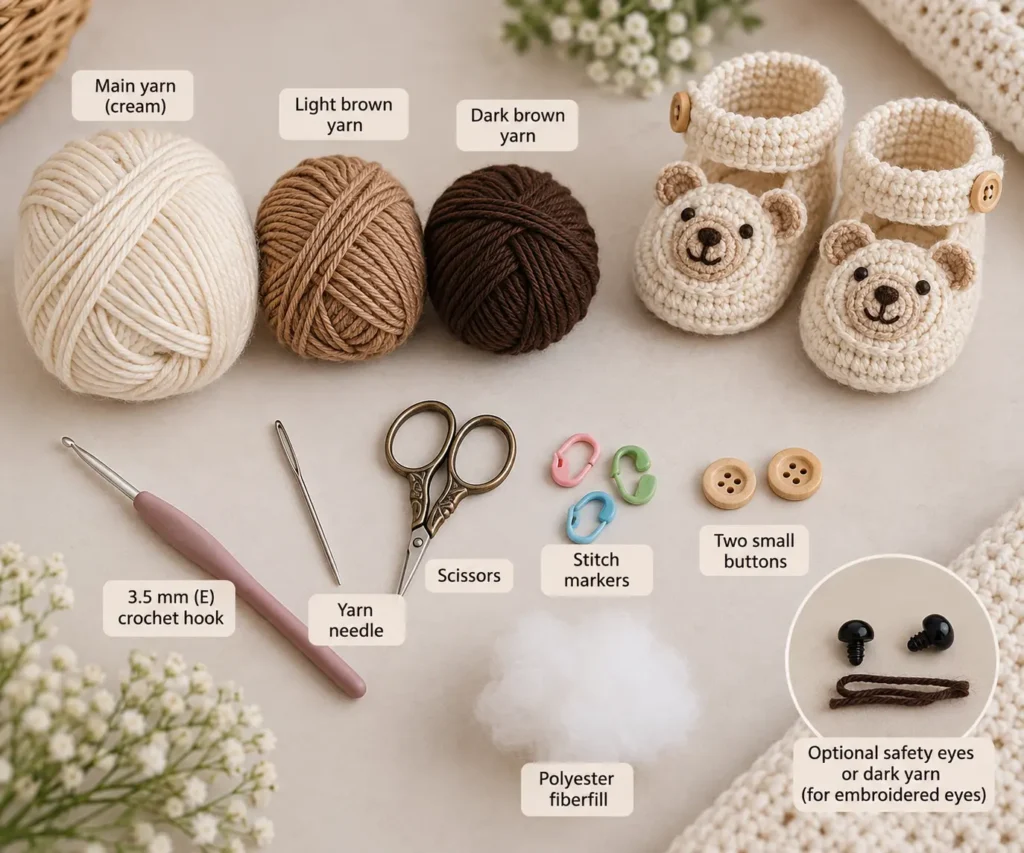
You don’t need a huge yarn stash for this project. In fact, crochet baby booties are a great way to use small amounts of leftover yarn.
For one pair, prepare:
- Worsted-weight yarn in cream or your preferred main color
- Small amount of light brown yarn
- Small amount of dark brown yarn
- 3.5 mm (E) crochet hook
- Yarn needle
- Scissors
- Stitch markers
- Two small buttons
- A small amount of polyester fiberfill
- Optional safety eyes or dark yarn for embroidered eyes
A quick note about baby safety
For items intended for very young babies, I personally prefer embroidered facial features rather than removable plastic pieces.
Buttons, beads, safety eyes, and other small decorations may become choking hazards if they loosen. If the booties will actually be worn by a baby rather than used for a photo or keepsake, make sure every component is securely attached and appropriate for the child’s age.
Best Yarn for Crochet Baby Bear Booties
The yarn you choose makes a noticeable difference here.
You want the booties to feel soft against delicate skin while still having enough structure to maintain their shape.
A smooth, baby-friendly yarn is usually easier to work with than a fuzzy yarn because you can clearly see your stitches. That becomes particularly useful when shaping such a small sole.
I like cream for the main bootie and warm brown for the muzzle because the combination creates a classic teddy-bear look.
You could also try:
- Cream and caramel
- Beige and chocolate brown
- Soft pink and cream
- Sage green and beige
- Powder blue and ivory
- Oatmeal and terracotta
If you’re making a baby shower gift, choose colors that complement the nursery or the parents’ style.
Crochet Abbreviations
This tutorial uses US crochet terminology.
MR – Magic ring
ch – Chain
sl st – Slip stitch
sc – Single crochet
inc – Increase
dec – Decrease
hdc – Half double crochet
dc – Double crochet
st(s) – Stitch(es)
FO – Fasten off
If you’re relatively new to crochet, don’t worry if the construction looks complicated at first. Each individual section is quite small.
The trick is to work slowly and count your stitches.
How to Crochet Bear Baby Booties
The booties are constructed in several pieces.
You’ll begin with the oval sole, build the upper section around it, add an ankle strap, and then make the little bear face separately before sewing everything together.
Make two identical booties.
Step 1: Crochet the Sole
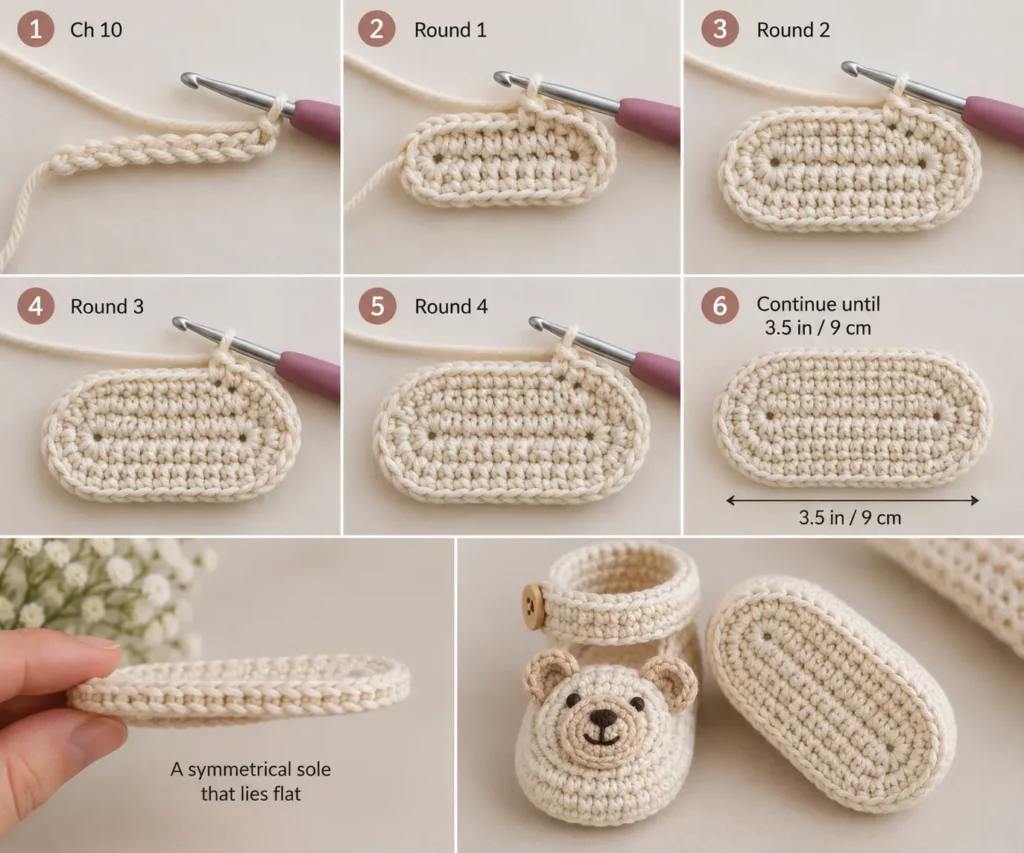
Start with your main cream yarn.
Instead of thinking of the sole as a flat circle, imagine creating a small elongated oval. You will crochet around both sides of the foundation chain, increasing around the toe and heel to form the rounded shape.
Foundation
Ch 10.
Starting in the second chain from your hook:
Round 1: Sc across the chain, work several stitches into the final chain to turn the corner, then continue along the opposite side of the foundation chain. Add extra stitches at the heel as needed to create a smooth oval.
Round 2: Work sc around, increasing evenly at both rounded ends.
Round 3: Continue increasing around the toe and heel while keeping the sides relatively straight.
Round 4: Work another shaping round, placing increases around the curves only.
Continue until your sole measures approximately:
3.5 inches / 9 cm from heel to toe.
The exact stitch count is less important than achieving a symmetrical sole that lies flat.
My tip for a cleaner sole
Don’t place all your increases directly on top of the increases from the previous round.
I prefer staggering them slightly. This helps prevent the sole from developing obvious corners and gives you a smoother, more natural shoe shape.
Once you’re happy with the size, work one final round of single crochet without increasing.
Fasten off and weave in your ends.
Step 2: Build the Upper Bootie
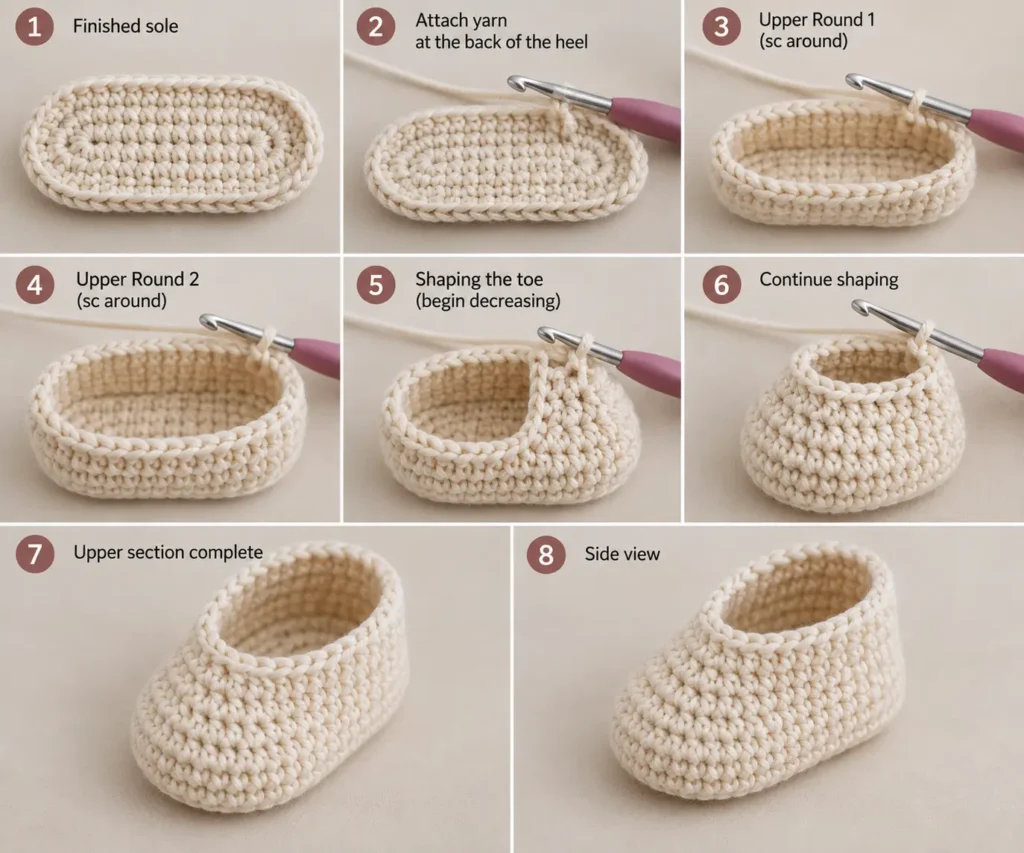
Now we transform that flat sole into an actual shoe.
Attach your main yarn at the back of the heel.
For the first round, crochet into the back loops only.
This creates a subtle ridge between the sole and upper section, which I love because it makes the finished bootie look more structured.
Upper Round 1
Work one sc into each stitch around.
Join if you’re working in joined rounds, or place a stitch marker if you prefer continuous rounds.
Upper Round 2
Sc around without increasing.
You should now see the sides beginning to rise.
Shaping the toe
On the following rounds, begin decreasing across the front section of the bootie.
Keep the heel and side stitches relatively straight while placing your decreases around the toe.
I recommend marking the center front before you begin.
Work approximately:
- Sc around the heel and first side
- Decrease evenly across the toe
- Sc along the opposite side and back to the heel
Repeat the shaping for several rounds.
The opening should gradually become smaller while the toe curves upward.
Check the shape as you go
This is one of those projects where I don’t rely exclusively on stitch counts.
Put the bootie on a flat surface after every shaping round.
Ask yourself:
Does the sole stay flat?
Is the toe centered?
Do both sides look even?
If one side appears noticeably different, it’s much easier to correct a round now than after you’ve finished the entire shoe.
Step 3: Create the Ankle Strap
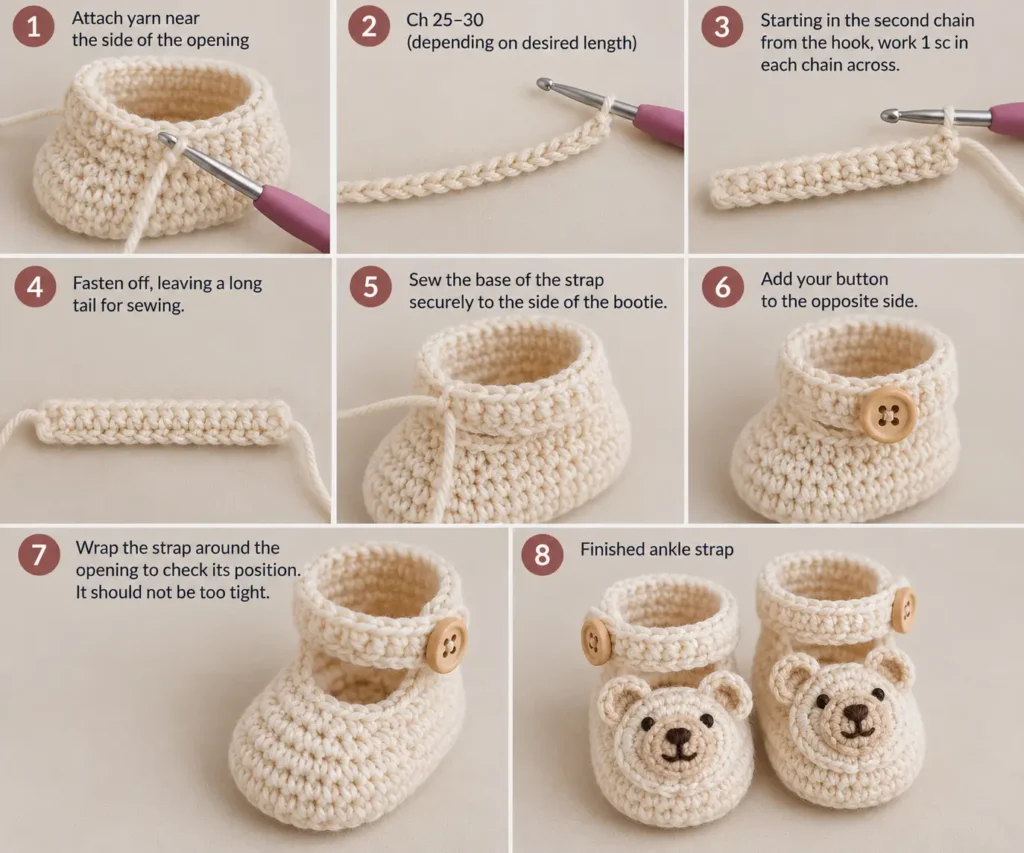
The ankle strap is both decorative and practical.
Attach the yarn near the side of the bootie opening.
Ch approximately 25–30, depending on your gauge and desired strap length.
Starting in the second chain from the hook, work:
1 sc in each chain across.
Fasten off, leaving a long tail for sewing.
Sew the base of the strap securely to the side of the bootie.
Add your button to the opposite side.
Before attaching the button permanently, wrap the strap around the ankle opening to check its position.
You don’t want it excessively tight.
For decorative or photo-prop booties, a tiny wooden-style button looks beautiful. For functional baby footwear, consider using a crocheted closure or another baby-safe alternative instead of a detachable small component.
Step 4: Crochet the Bear Face
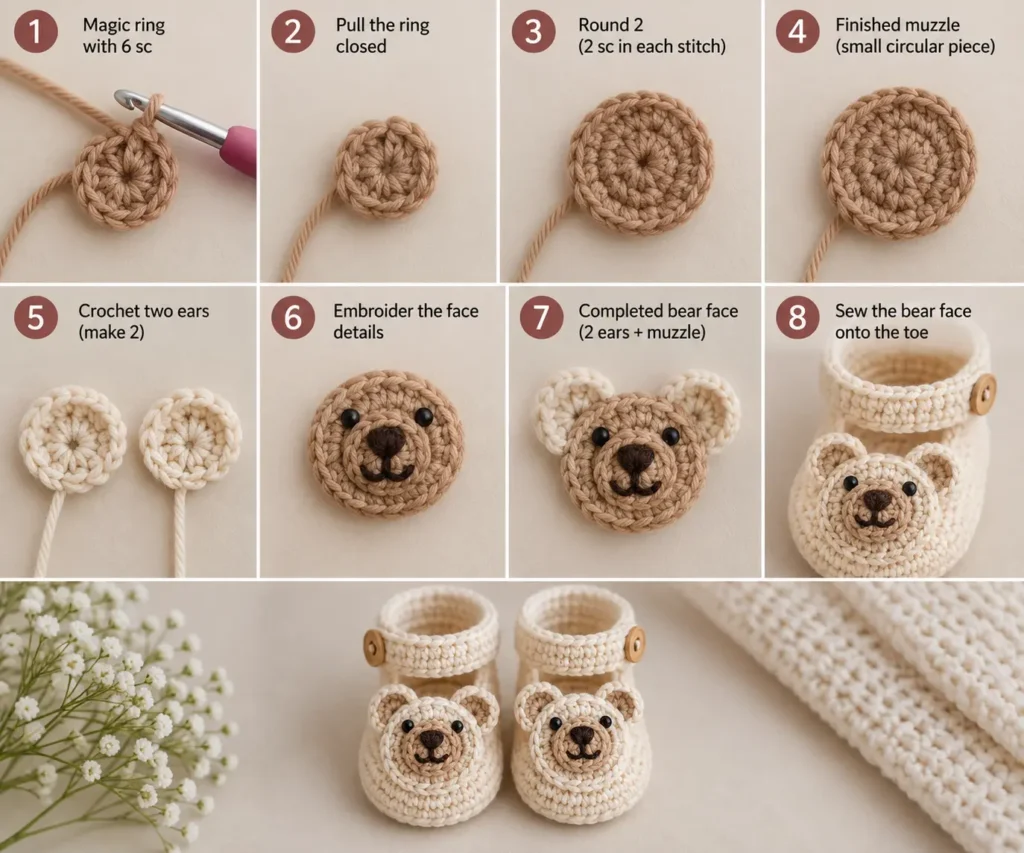
Now we get to my favorite part.
The tiny bear face is what transforms a simple pair of crochet baby shoes into crochet bear baby booties.
We’ll make the face separately and sew it onto the toe.
Bear Muzzle
Using light brown yarn:
Round 1: Make a magic ring and work 6 sc into the ring.
Pull the ring closed.
Round 2: Work 2 sc into each stitch around.
You should now have a small circular muzzle.
If you want a slightly larger muzzle, add another round while spacing your increases evenly.
Fasten off and leave a long sewing tail.
Step 5: Crochet the Bear Ears
Make two ears for each bootie.
Using the main cream yarn:
Create a magic ring and work a small cluster of single crochet stitches into it.
Instead of completing a full large circle, keep each ear tiny and slightly rounded.
Fasten off with a sewing tail.
Make sure both ears are approximately the same size before attaching them.
Tiny differences are normal—and honestly, I think they add a little handmade personality.
Step 6: Embroider the Bear’s Features
Place the muzzle in the center of the toe but don’t sew it down immediately.
First, position the ears and check the proportions.
Once you’re happy with everything, sew the muzzle securely to the bootie.
Using dark brown yarn, embroider:
- A small triangular or oval nose
- A short vertical line beneath the nose
- A tiny curved mouth
- Two eyes
Try to keep the expression simple.
With such a small appliqué, too many details can make the face look crowded.
I usually prefer a minimal teddy-bear expression.
Step 7: Assemble Your Crochet Bear Baby Booties
Now all the pieces come together.
Position the bear face on the front of each bootie.
Pin or hold everything temporarily before sewing.
Then:
- Sew the muzzle securely.
- Attach both ears.
- Embroider the eyes, nose, and mouth.
- Attach the ankle strap.
- Add the closure.
- Weave in every yarn end carefully.
Repeat the process for the second bootie.
Before cutting your final yarn tails, compare both shoes side by side.
This little check can save you from discovering later that one bear face sits noticeably higher than the other.
How to Make Both Baby Booties Match
Making one tiny shoe is easy.
Making the second one look exactly like the first? That’s where crochet likes to test us!
I recommend keeping notes while making the first bootie.
Write down:
- Your final sole stitch count
- Number of upper rounds
- Where you placed the toe decreases
- Strap chain length
- Number of stitches in each ear
- Exact bear-face placement
Then follow those notes for bootie number two.
I also like making matching components together.
For example, crochet both soles first, then both uppers, followed by all four ears. This makes it easier to maintain consistent tension.
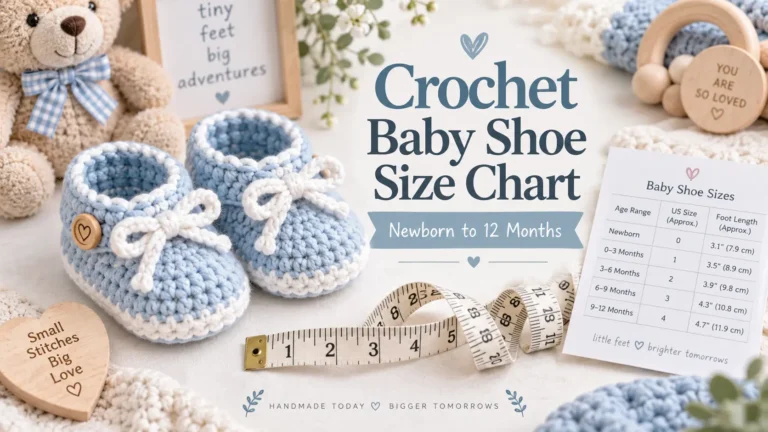
Crochet Baby Booties Size Guide
This particular design is intended for approximately 0–3 months, with a 9 cm or 3.5-inch sole.
However, age-based sizing should always be considered approximate.
| Approximate Age | Suggested Sole Length |
|---|---|
| Newborn | 3.25–3.5 in / 8–9 cm |
| 0–3 months | 3.5–3.75 in / 9–9.5 cm |
| 3–6 months | 3.75–4.25 in / 9.5–10.8 cm |
| 6–12 months | 4.25–4.75 in / 10.8–12 cm |
These are general reference measurements rather than guaranteed sizing. Yarn thickness and crochet tension can change the final dimensions significantly.
If you have access to the baby’s foot measurement, use that instead of relying only on age.
How to Make the Booties Larger
Want to adapt your bear baby booties crochet pattern for an older baby?
The easiest method is to adjust the sole first.
Use a slightly longer foundation chain and continue shaping until you reach your desired sole length.
After that, add enough stitches and rounds to the upper section to match the larger sole.
Don’t simply switch to a much larger hook.
While that can increase the overall size, it can also produce loose stitches and change the structure of the bootie.
I prefer adjusting the pattern itself while keeping a fabric density that feels appropriate for baby shoes.
Cute Ways to Customize Your Bear Baby Booties
Once you understand the basic construction, this pattern becomes surprisingly versatile.
You could turn the bears into different little animals by changing only a few details.
For example:
Bunny booties: Replace the round ears with long crochet ears.
Panda booties: Use cream with black ears and eye details.
Polar bear booties: Make everything white with a soft gray muzzle.
Brown teddy booties: Use caramel or warm brown as the main color.
Girl baby booties: Add a tiny crochet bow beside one ear.
Woodland booties: Try warm beige, rust, sage, and brown.
This is one reason I enjoy simple appliqué-based patterns. You can create several completely different designs from essentially the same bootie construction.
Common Problems and How to Fix Them
My sole curls instead of lying flat
You may not have enough increases around the toe and heel.
Add increases gradually around the curved sections rather than along the straight sides.
My sole is wavy
This usually means there are too many increases.
Undo the most recent round and reduce the number of increases.
My bootie looks too wide
Add additional decreases across the toe section.
Avoid decreasing around the heel unless the back of the bootie is also too loose.
My bear face looks uneven
Mark the center stitch of the toe before sewing your appliqué.
Then align the center of the muzzle with that stitch.
It’s a tiny detail, but it makes positioning much easier.
One bootie is bigger than the other
Your tension probably changed.
Measure both soles before beginning the upper sections. If they don’t match at that stage, correct them before continuing.
Are Crochet Baby Booties Good for Beginners?
I would describe these crochet bear baby booties as an easy-to-intermediate project.
If you already know how to:
- Make a magic ring
- Chain
- Single crochet
- Increase
- Decrease
- Crochet in the round
- Sew crochet pieces together
you should be comfortable attempting them.
The individual techniques aren’t particularly difficult. The challenge comes from working at such a small scale and making two matching shoes.
If this is your first pair, take your time.
Tiny projects don’t necessarily mean instant projects!
How Long Does It Take to Crochet Baby Booties?
For an experienced crocheter, a simple pair may take a couple of hours.
If you’re a beginner or you’re adding detailed animal faces, expect it to take longer.
I wouldn’t rush this project.
Careful shaping and neat finishing make a much bigger difference than speed, particularly because every stitch is visible on something this small.
Are Crochet Bear Baby Booties a Good Baby Shower Gift?
Absolutely.
Handmade baby shoes are small enough to include in a gift basket but personal enough to feel special.
You could pair them with:
- A crochet baby blanket
- A matching teddy bear hat
- A handmade cardigan
- A baby bonnet
- A neutral onesie
- A keepsake box
You could even make the booties in the same yarn as a blanket or hat to create a coordinated handmade set.
Washing and Caring for Crochet Baby Booties
Always check the care instructions on your yarn label first.
For delicate handmade baby items, gentle washing is usually the safest option.
I recommend placing the booties in a laundry bag if machine washing is permitted.
After washing, reshape them while damp and allow them to dry naturally.
Avoid aggressive wringing because it can distort the sole and tiny appliqué pieces.
Frequently Asked Questions
What yarn is best for crochet bear baby booties?
A soft, smooth, washable yarn is a practical choice. Worsted-weight yarn provides enough structure for the shoe while remaining easy to crochet. Always check the fiber and care instructions if the booties will be worn by a baby.
What size are these crochet baby booties?
This tutorial is designed around a sole measuring approximately 3.5 inches (9 cm), generally suitable for babies around 0–3 months. Actual fit varies, so measuring the baby’s foot is preferable whenever possible.
Can beginners crochet bear baby booties?
Yes, provided you’re comfortable with basic crochet stitches, increases, decreases, and working in rounds. The bear appliqué is made separately, which keeps the construction manageable.
Can I make these booties without buttons?
Yes—and for very young babies, I often prefer it. You can create a crocheted loop or sewn closure instead, avoiding detachable decorative pieces.
Can I use cotton yarn?
Yes. Cotton can give the booties excellent stitch definition, particularly around the bear face. Just remember that different fibers behave differently, so check your finished sole measurement.
Can I sell finished crochet bear baby booties?
If you’re working from your own pattern or a pattern whose license permits selling finished products, handmade booties can make a lovely craft-market item. Always check the original designer’s terms when using someone else’s pattern.
Final Thoughts
I have a soft spot for crochet projects that look impressive without requiring an enormous amount of yarn, and these crochet bear baby booties fit that description perfectly.
The basic shoe is simple enough to customize, while the little ears and embroidered teddy face turn it into something memorable. Make them in classic cream and brown for a timeless teddy-bear look, or choose colors that match a nursery, baby blanket, or handmade outfit.
Most importantly, don’t worry about making every stitch look factory-perfect. The tiny differences between your two bears are part of what makes handmade crochet so charming.
So grab your hook, choose your softest yarn, and make a tiny pair of bear booties for some very tiny feet. 🧶🤎
Love this crochet pattern? Save it to your favorite Pinterest crochet board so you can easily find it when you’re ready to start your next pair.
And if you’re looking for another adorable project for little ones, try my Crochet Baby Baseball Cap Pattern. It’s a fun handmade accessory that pairs beautifully with other baby crochet projects.
You can also explore my Crochet Baby Booties Pattern for another sweet design to add to your baby crochet collection.
Happy crocheting, and don’t forget to save this pattern for later! 🧶📌