Free Crochet Purse Pattern: 8 Easy Steps to a Stunning Bag
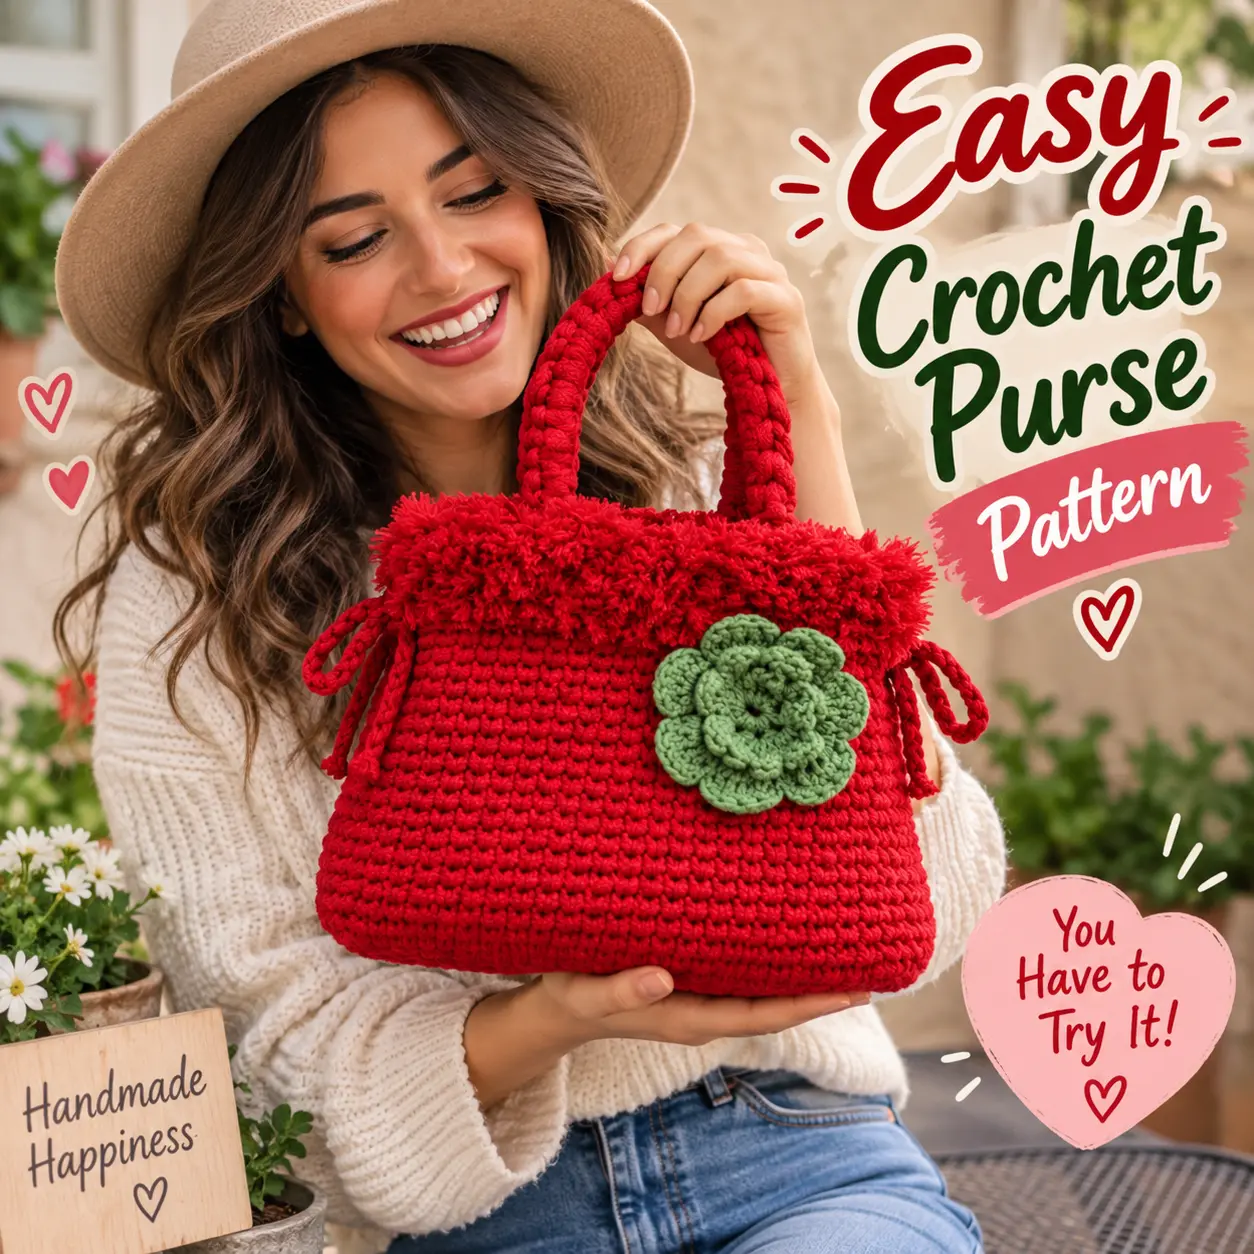
Want to crochet something that looks boutique-worthy but still feels wonderfully handmade? This crochet purse pattern turns yarn into a charming little handbag with sturdy handles, useful inside pockets, a fluffy trim, and one seriously adorable flower.
For our version, we’re giving the original design a playful makeover: the purse will be red and the flower green. Think strawberry-meets-garden-party—with enough personality to make people ask, “Wait… you made that?”
And yes, you absolutely can.
The finished purse measures approximately 20 cm (8″) wide × 10 cm (4″) deep × 23 cm (9″) high. It’s compact enough to carry comfortably but roomy enough for your phone, keys, wallet, and the mysterious collection of tiny objects every handbag somehow acquires.
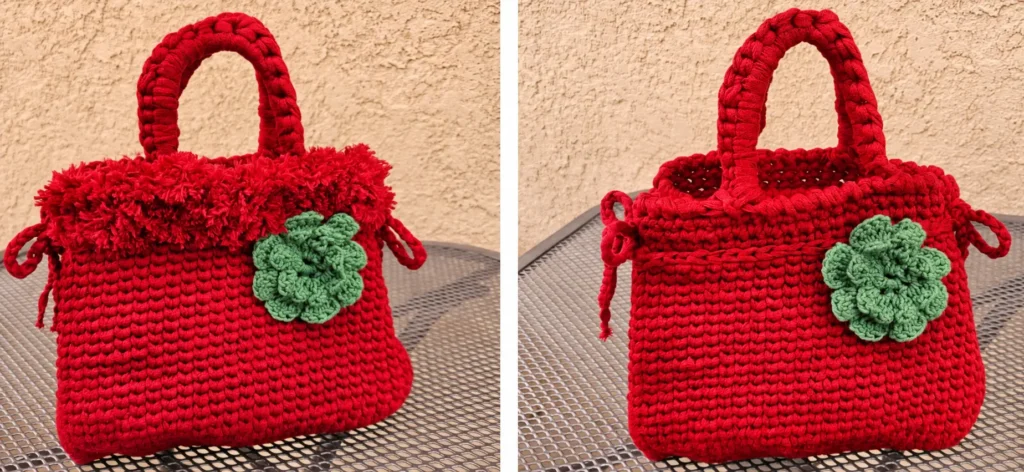
Before we make the first chain, though, let’s get everything onto the table.
Materials You’ll Need
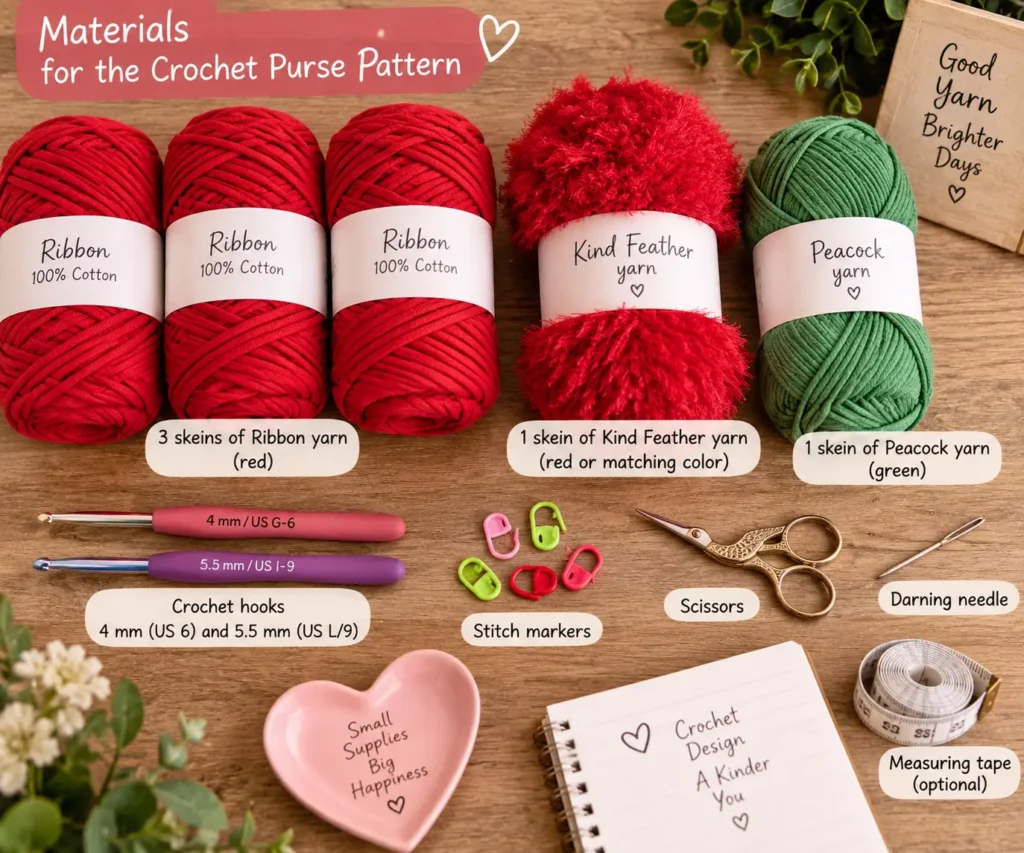
This crochet purse pattern combines different yarn textures to create a bag that feels much more interesting than a simple rectangle with handles.
For the adapted red-and-green version, use red as your main Ribbon yarn color, red or a complementary fluffy yarn for the upper accent, and green yarn for the flower applique.
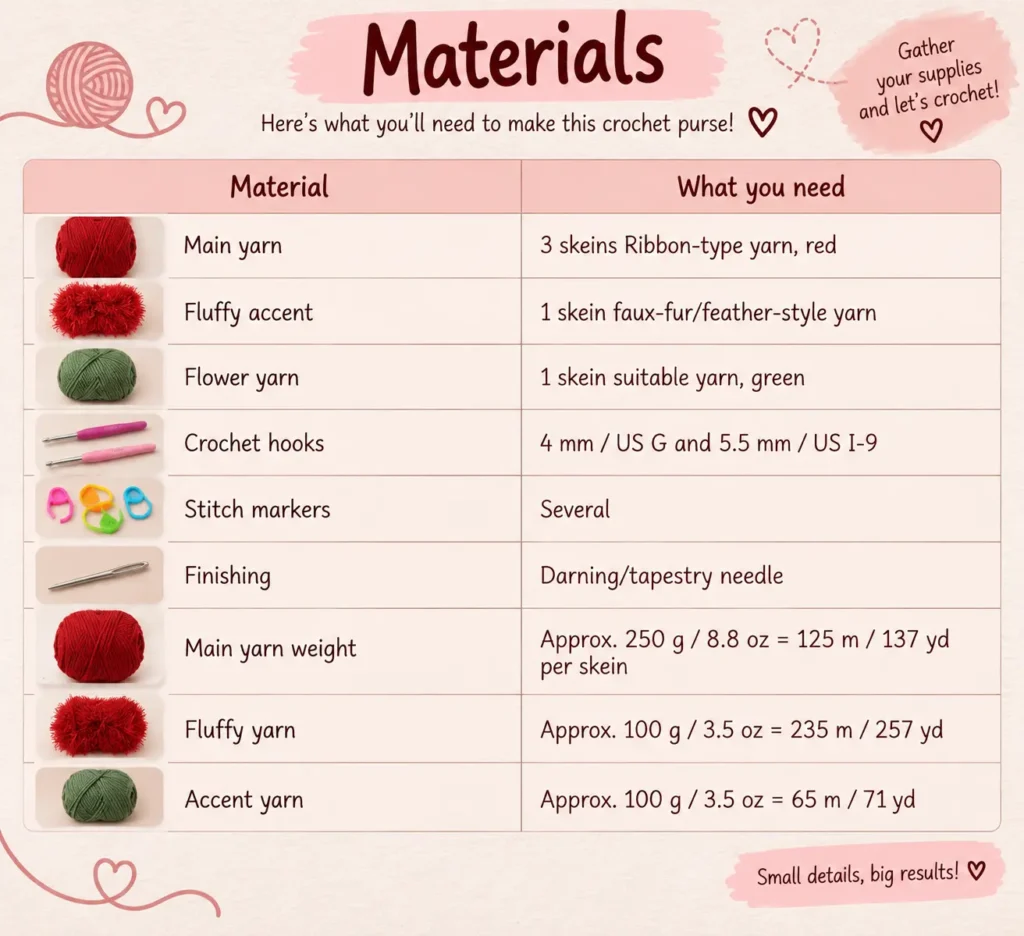
The original gauge is approximately 12.25 stitches × 13 rows per 10 × 10 cm (4 × 4″), worked in single crochet with the 4 mm hook.
Don’t panic if “gauge swatch” sounds like homework. Ten minutes checking your tension now can prevent your cute handbag from unexpectedly becoming either a coin purse or carry-on luggage.
And once your yarn is ready, the fun part starts.
🧶 Shop the Supplies
Everything you need to get started with this crochet purse pattern.
5.5 mm Crochet Hook
Ergonomic crochet hook for working the body, handles and finishing details.
View on Amazon →4 mm Crochet Hook
A comfortable ergonomic hook for crocheting the purse base and smaller details.
View on Amazon →Green Cotton Yarn
Soft green yarn that’s perfect for creating the decorative crochet flower.
View on Amazon →Red Faux Fur Yarn
Soft red fuzzy yarn for adding the fluffy trim and cozy finishing details to the bag.
View on Amazon →As an Amazon Associate I earn from qualifying purchases.
Crochet Abbreviations to Know
The construction uses mostly approachable crochet techniques, but there is one stitch that gives the bag its distinctive texture: the waistcoat stitch.
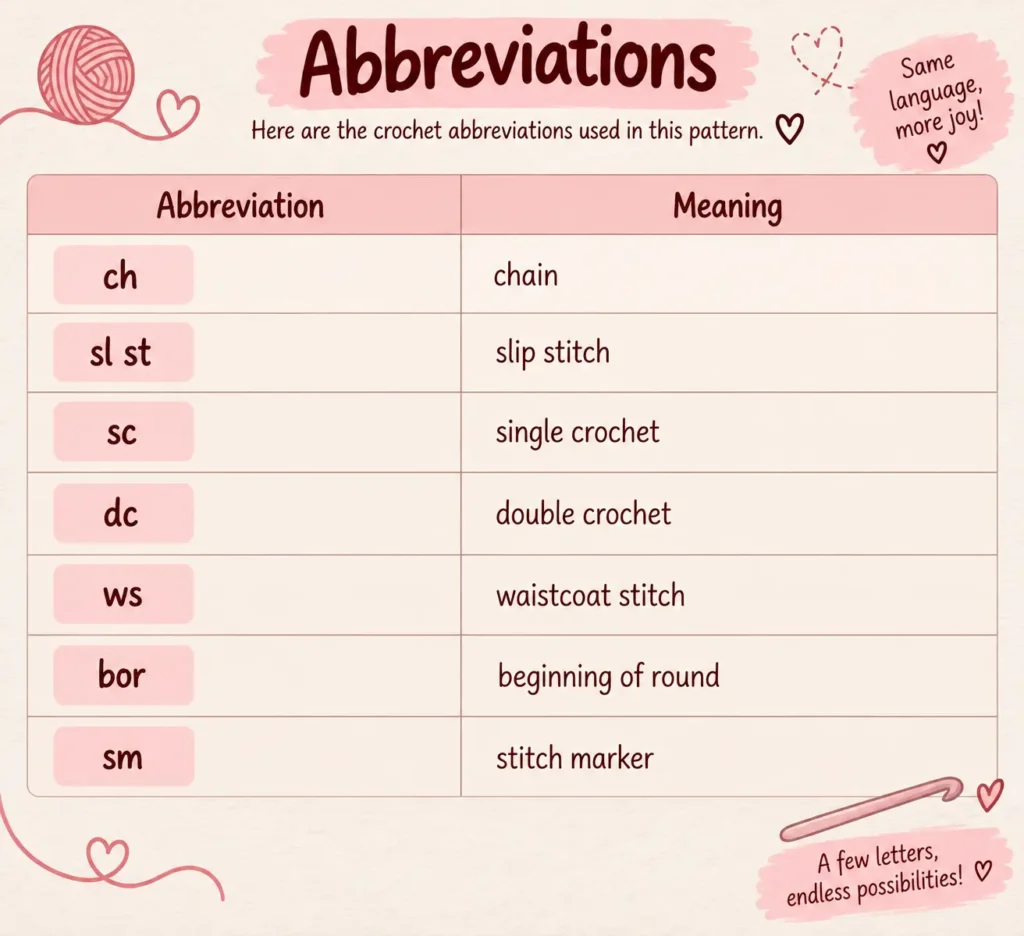
For the waistcoat stitch, insert the hook between the two vertical bars of the next stitch, yarn over, pull up a loop, then yarn over and pull through both loops.
If you can single crochet, you’re already most of the way there. The waistcoat stitch just asks you to put your hook somewhere slightly different—which is crochet’s favorite way of pretending it invented an entirely new skill.
Step 1: Crochet the Base of the Purse
The base is where our crochet purse pattern starts taking shape.
Using the 4 mm hook and red Ribbon yarn, chain 14.
For Round 1, work 2 single crochets into the second chain from your hook. Single crochet across the next 12 stitches, then work 3 single crochets into the final chain.
Instead of turning, rotate your work so you can crochet along the opposite side of the starting chain. Single crochet to the end and join with a slip stitch in the first stitch. You should have approximately 30 stitches.
For Round 2, chain 1 and single crochet in the same stitch. Increase around both ends of your oval, placing stitch markers around the increase areas. You’ll finish with approximately 34 stitches.
Continue increasing around those curved ends through Rounds 3–6. By the end of Round 6, you should have approximately 50 stitches, with 16 stitches across each long side and five stitches along each curved end.
Those stitch markers are about to earn their keep.
Step 2: Build the Red Body
Switch to the 5.5 mm / US I-9 hook.
For Round 7, work loosely in the back loop only. Chain 1, single crochet in each stitch to the first marker, work two single crochets in each of the two marked spaces, and continue around. You should reach approximately 74 stitches.
Now comes the technique that gives this crochet purse pattern its beautiful structured look.
From Round 8 onward, work continuously in the round using waistcoat stitch. Do not join each round. Move your stitch marker up as you work so you always know where the round begins.
Rounds 8–29 are worked in waistcoat stitch. Keep the stitches loose enough that inserting your hook remains comfortable.
If your hook starts requiring the strength of a medieval blacksmith to enter each stitch, loosen your tension. Your hands will thank you.
At Round 30, slip stitch at the beginning and work the specified marked sections to shape the upper edge. Rounds 31–32 finish this section in single crochet.
At this stage, the red bag body should measure roughly 20 cm (8″) high, excluding the base rounds.
And suddenly that flat oval has become an actual purse. Crochet magic? Technically no. Emotionally, absolutely.
Step 3: Add Structure With the Surface Border
A handbag needs enough structure to hold its shape, especially around the opening.
Return to Round 30 and work into the front loops. Attach your red yarn and create a surface slip-stitch border around the bag.
Chain 1, slip stitch along the side to the stitch marker, chain 3, slip stitch to the next marker, chain 3 again, and repeat around before joining.
This little detail makes the top of the crochet purse pattern feel more polished and creates useful spaces for the side ties.
You can also work an additional slip-stitch border underneath the bag along the remaining loops of Round 7. It’s a small finishing touch, but small finishing touches are exactly what make handmade projects look intentional.
Step 4: Give It That Fluffy Trim
Here comes the cozy part.
Using your fluffy yarn and the 5.5 mm hook, attach the yarn around the upper border. Work through both layers where indicated, crocheting around the top edge to create the soft accent.
This furry detail transforms the crochet purse pattern from “cute handmade bag” into “where did you buy that?”
Just remember that fluffy yarn has a personality. Sometimes it hides stitches. Sometimes it hides mistakes. We choose to appreciate the second talent.
If you prefer a cleaner, minimalist purse, you can skip the faux-fur accent entirely. The construction still works beautifully.
Step 5: Crochet Two Strong Handles
Now your purse needs handles worthy of all the treasures it’s going to carry.
Hold two strands of red Ribbon yarn together and use your 5.5 mm hook.
Starting near the upper edge, skip six stitches and attach your yarn in the back loop. Chain 1 and pull up a loop in the back loop of the next two stitches.
Pull one loop through all three loops on the hook. Continue until the strap reaches approximately 20 cm (8″), then attach it to the opposite side.
Repeat for the second handle.
Using two strands makes the straps substantially sturdier than a single strand, which is important because a beautiful crochet purse pattern is considerably less charming when the handle stretches toward your knees.
Sew in your ends securely before moving on.
Step 6: Make the Side Tie Strings
Chain approximately 60 stitches, cut the yarn, and tie a knot roughly 2.5 cm (1″) from each end.
Repeat to make a second string.
Thread each tie upward through the chain-3 spaces you created in the surface slip-stitch border. Pull gently and tie a bow.
These ties allow you to gather the sides slightly, giving the red purse a softer, more elegant silhouette.
Step 7: Add Two Secret Inside Pockets
Yes, pockets!
Because a gorgeous bag without pockets is how lip balm disappears into another dimension.
This crochet purse pattern includes two flat rectangular pockets. You can make both in red Ribbon yarn, or make one with your fluffy accent yarn if you want extra texture inside.
For the Ribbon pocket, use the 5.5 mm hook and chain 21. Single crochet into the second chain from the hook and across.
Turn and work Rows 2–19 in single crochet. For Row 20, chain 1, work a reverse single crochet across, and fasten off with a long tail.
For the fluffy pocket, follow the same general dimensions, working approximately 20 stitches across for 20 rows.
Position each pocket inside the bag and whipstitch the sides and bottom securely to the lining area, leaving the top open.
Your phone now has a home. Victory.
Step 8: Crochet the Green Flower
Now for the detail that makes our red version really pop: a green crochet rose applique.
Using green yarn and a 4.5 mm / US 7 hook, chain 6 and join with a slip stitch in the sixth chain from your hook.
For Round 1, chain 4, work four double crochets and chain 3 into the loop, then chain 3 and slip stitch into the loop. Repeat until you have six petals.
Round 2 creates another petal layer. Work behind the first petals, making chain spaces around the flower and building the next set of petals into them.
For Round 3, continue working in front of the previous petal layer, slip stitching into the center spaces as instructed.
Round 4 adds another layer using taller stitch groups to create that lush rose shape.
Don’t obsess over perfect symmetry. Flowers in nature don’t carry rulers, and your crochet flower doesn’t need one either.
Once finished, position the green rose toward one side of the red purse and sew it securely in place.
That contrast is what gives this crochet purse pattern its personality: bold red body, playful texture, and a fresh green floral accent.
Optional: Add Extra Faux-Fur Accents
If you want an even fluffier finish, add faux-fur accents along the side border.
Attach the fluffy yarn in the first chain-3 space, work through both layers, and crochet across to the next chain space. Repeat on the opposite side.
This step is optional, so trust your taste.
Love maximalist crochet? Fluff away.
Prefer a sophisticated red handbag with one statement flower? Stop while you’re ahead.
That flexibility is one reason this crochet purse pattern is so satisfying to customize.
How to Finish Your Crochet Purse
Before celebrating, give the whole bag a quick inspection.
Check your handles and reinforce their attachment points if necessary. Make sure the pockets are firmly sewn, weave in every loose end, straighten the side ties, and gently shape the base.
If your yarn allows it, lightly block the purse rather than aggressively stretching it.
Then attach your green flower securely enough to survive daily use.
Your finished crochet purse pattern should measure approximately 20 cm wide × 10 cm deep × 23 cm high, although yarn choice and tension can create small variations.
And now comes the extremely difficult final step:
Put the purse somewhere visible and casually wait for compliments.
Can a Beginner Make This Crochet Purse?
An adventurous beginner who already knows chains, single crochet, double crochet, and slip stitches can certainly attempt it.
The most unusual part is the waistcoat stitch, but once you understand where to insert your hook, the body becomes pleasantly repetitive.
Take the crochet purse pattern one section at a time instead of looking at the entire project at once: base first, body second, borders next, handles after that, and finally the decorative details.
Crochet rarely requires perfection. It mostly requires patience, yarn, and occasionally staring at the same stitch for 45 seconds wondering what it has personally done to offend you.
Keep going.
Easy Ways to Customize Your Purse
Once you understand the construction, this crochet purse pattern becomes a fantastic base for experimenting.
Try burgundy for an autumn bag, cream for something elegant, pink for a playful version, or black with a bright flower for dramatic contrast. You could also replace the single rose with several smaller flowers, leave the flower off entirely, or use contrasting side ties.
You can even adjust the strap length if you prefer a different carrying style, though changing dimensions may require modifying stitch counts and yarn quantities.
The red-and-green combination used here is especially fun because the flower becomes an immediate focal point without requiring complicated colorwork.
And that means you get maximum “wow” for surprisingly little extra crochet.
Frequently Asked Questions
What size is the finished purse?
The finished crochet purse pattern is approximately 20 cm (8″) wide, 10 cm (4″) deep, and 23 cm (9″) high. Your finished dimensions may vary slightly depending on yarn, hook and tension.
Why is the waistcoat stitch used?
Waistcoat stitch creates a dense, structured fabric with distinctive vertical “V” shapes. That makes it particularly attractive for bags where you want more body than a very loose crochet fabric provides.
Can I skip the flower?
Absolutely. The green flower is decorative rather than structural. You can leave it off for a cleaner purse or replace it with another applique.
Can I use different yarn?
Yes, but changing yarn thickness can affect gauge, dimensions and structure. Make a gauge swatch before committing your entire yarn stash to the experiment.
Can I make this crochet purse pattern in Halloween colors?
Absolutely! This crochet purse pattern would look adorable in orange and black for Halloween. Try an orange bag with a black flower, or make the bag black with a bright orange flower for a spooky seasonal version.
What other colors work well for this crochet purse pattern?
You can customize this crochet purse pattern with almost any color combination. Try cream and brown for fall, red and green for Christmas, or soft pink and white for spring—the same crochet purse pattern can look completely different with a simple color change. 🧶
You Made a Purse—Seriously!
There’s something especially satisfying about making an accessory you can actually carry.
You started with yarn and a hook. Then came an oval base, a few suspicious-looking rounds, a growing red body, sturdy handles, hidden pockets, fluffy details—and finally a green flower that pulled the whole design together.
That’s the joy of this crochet purse pattern. It looks detailed when finished, but every individual step is manageable when you tackle it one at a time.
So don’t wait until you feel like an “advanced crocheter.” Choose your red yarn, grab your hook, make that first chain, and allow the project to teach you as you go.
And when someone asks where you bought your gorgeous new bag?
You get to say the four most satisfying words in crochet:
“Oh, I made it.” 🧶❤️
And why stop at just one handmade bag? Now that you’ve finished this crochet purse pattern, keep that creative momentum going! Try another shape, experiment with new colors, or discover a completely different crochet bag style below. Your next favorite project might be only a few stitches away.
Crochet Accordion Bag Pattern: 7 Easy Steps to a Stunning Striped Bag
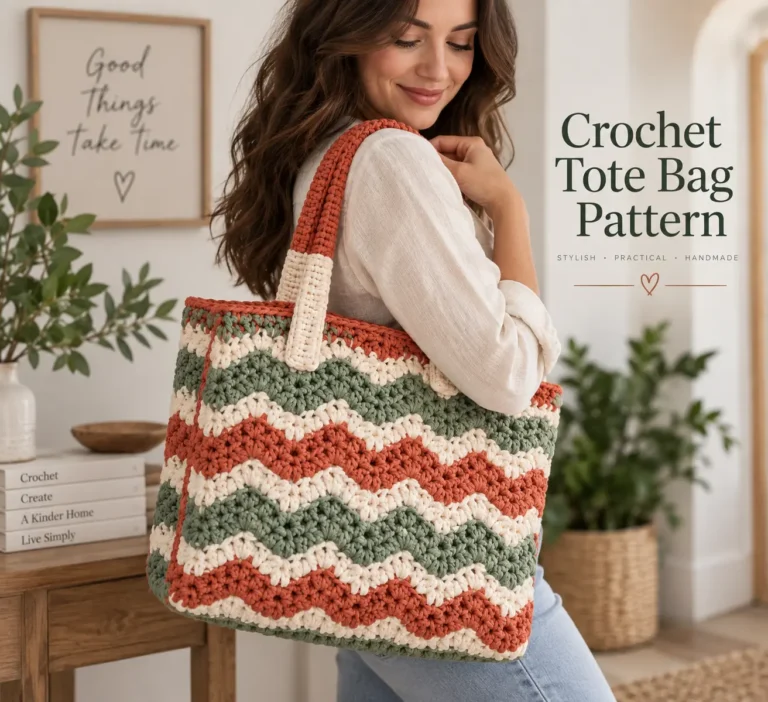
Crochet Tote Bag Pattern: 6 Easy Steps to a Stunning Striped Bag
Loved this project? Follow us on Facebook for more cozy crochet inspiration, and save this pattern on Pinterest so you can find it when your yarn is ready for its next adventure.