Free Crochet Ballerina Bunny Pattern: 7 Easy Steps to a Beautiful Amigurumi Doll
There are cute crochet bunnies… and then there are crochet bunnies that look as though they are ready to walk straight onto a tiny ballet stage.
This crochet ballerina bunny pattern creates exactly that kind of character.
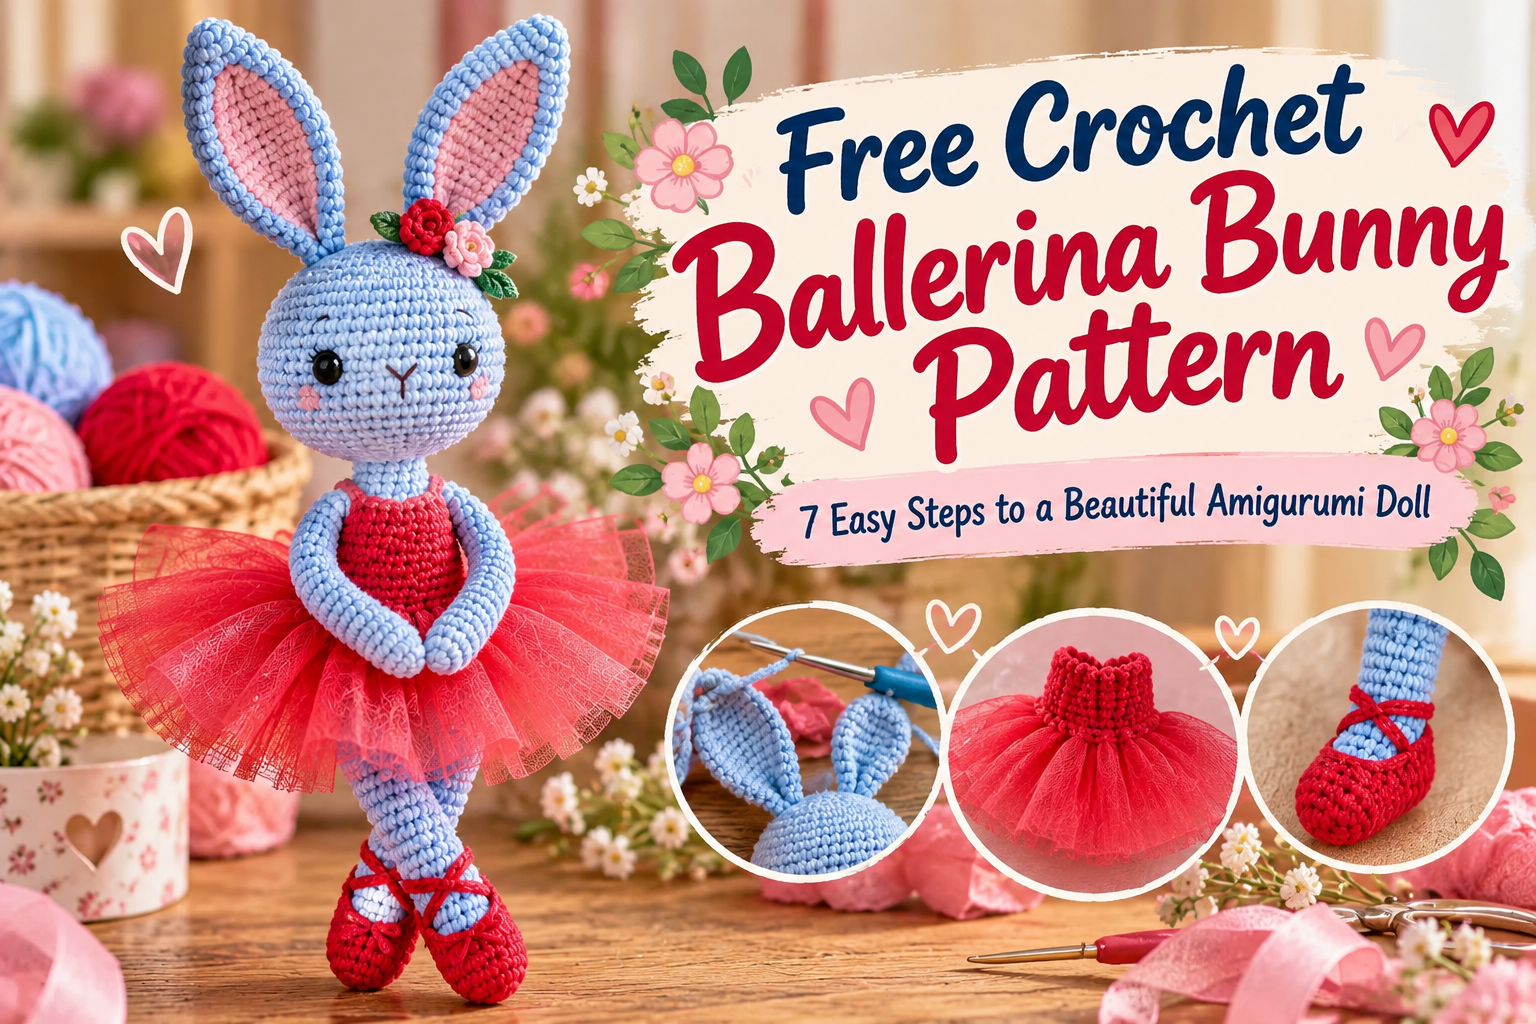
She has extra-long legs, delicate red ballet slippers, a slim ballerina body, oversized bunny ears, long graceful arms, and a soft red tutu that completely transforms the finished amigurumi.
The proportions are what make this bunny special. Instead of the short legs and round body you often see in traditional amigurumi, this design uses long limbs and a large rounded head to create a charming doll-like silhouette.
And despite how impressive she looks when finished, the construction is surprisingly logical.
The legs, body, and head are worked as one continuous piece. The arms and ears are made separately, then the final ballet details are added during assembly. The finished bunny measures approximately 30 cm tall.
If you already know how to make a magic ring, single crochet, increases, and decreases, this is a wonderfully satisfying project to try.
And once the pink tutu goes on?
That is the moment your crochet bunny officially becomes a ballerina. 🐰🩰
Crochet Ballerina Bunny Pattern at a Glance
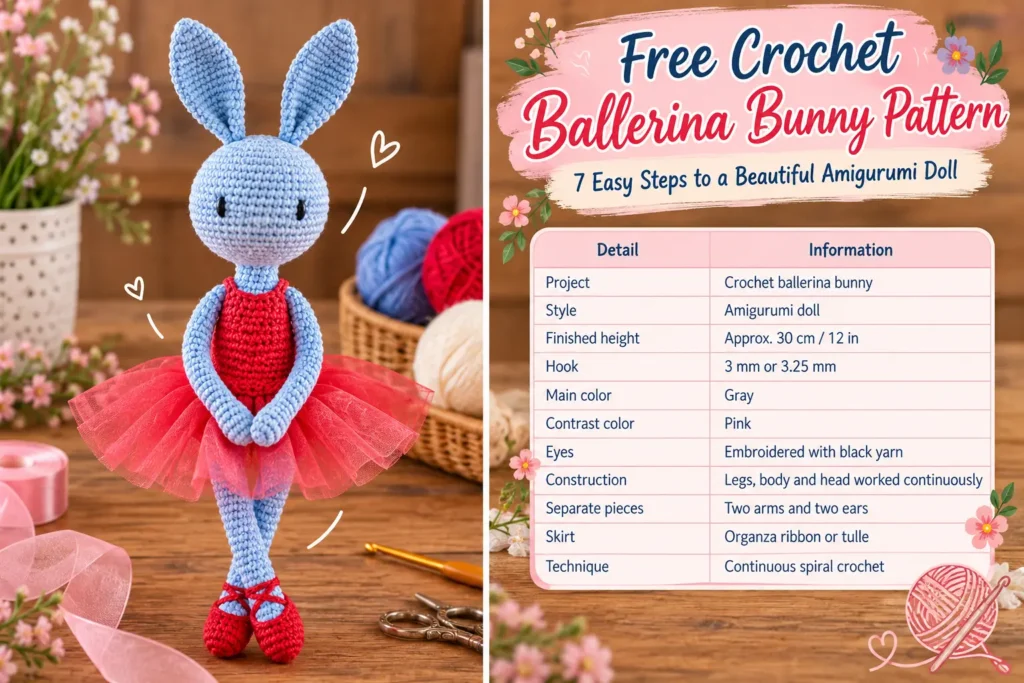
Each crocheted section in a continuous spiral beginning with a magic ring and recommends marking the end of every round. It also emphasizes stuffing the bunny firmly as you work.
Materials You Will Need
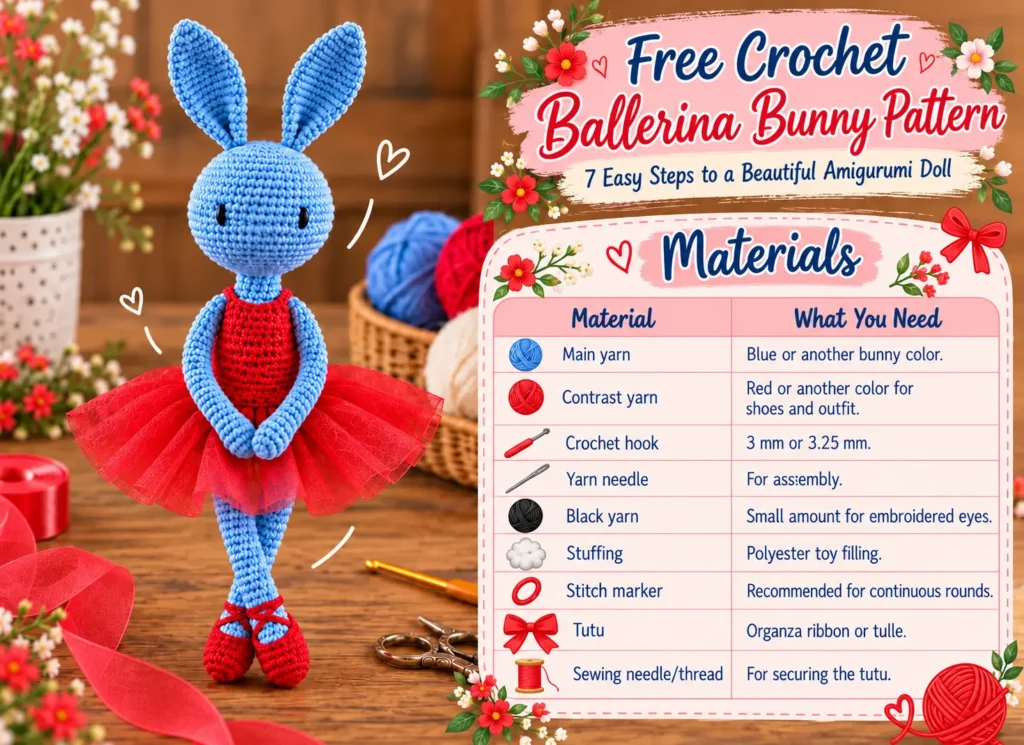
The exact finished size can vary depending on the yarn, crochet hook, and your personal tension.
Crochet Abbreviations
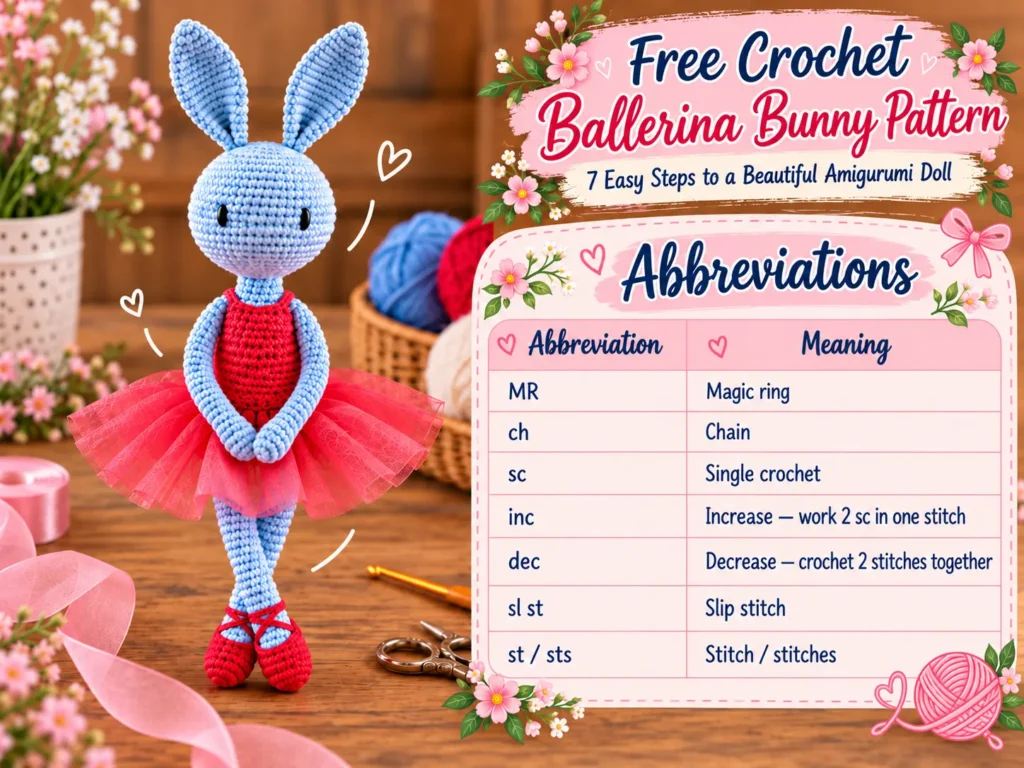
The bunny is crocheted mostly in continuous rounds, so a stitch marker is extremely helpful.
How to Crochet the Ballerina Bunny
The easiest way to approach this crochet ballerina bunny pattern is to divide it into seven stages:
legs → body → head → arms → ears → assembly → tutu and ballet details
Step 1: Crochet the Ballet Shoes and Legs
You will make two legs.
Begin with the contrast color for the ballet slippers. Change to the main body color after the first few rounds.
Leg — Make 2
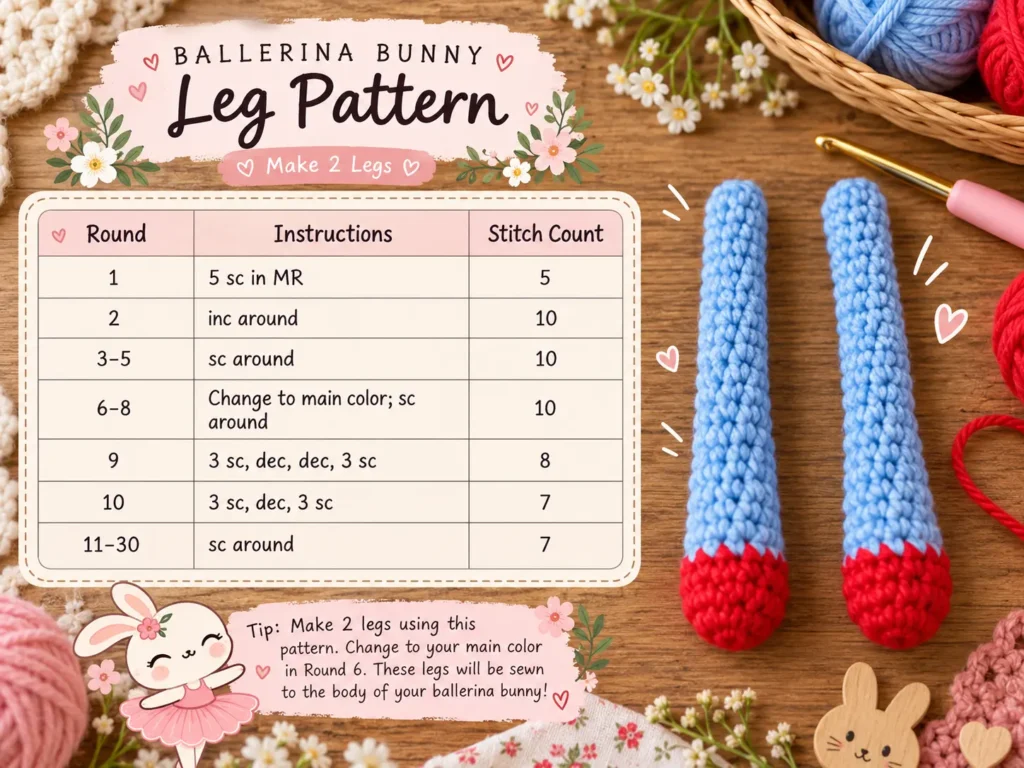
Make the second leg the same way, but do not fasten off because you will continue directly into the body. Stuff the legs as you work.
Shaping tip
Because these legs are extremely long and narrow, add stuffing gradually.
A thin crochet hook handle, chopstick, or stuffing tool can help push small amounts of filling down toward the foot.
Avoid packing too much stuffing into one area or the legs may become uneven.
Step 2: Join the Legs and Crochet the Body
Now the bunny begins to take shape.
After completing the second leg, change to the contrast color used for the ballerina outfit.
Chain 6 stitches, then connect to the first leg with a slip stitch.
You will now crochet around both legs and both sides of the connecting chain to form the lower body.
Body
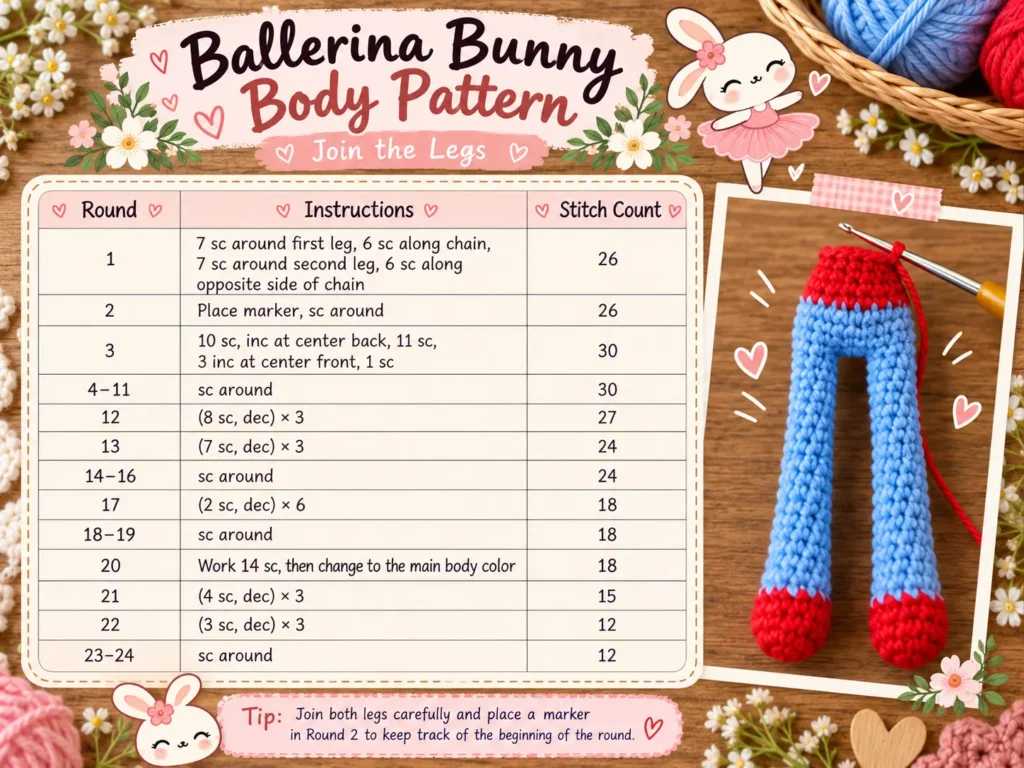
Note about Round 20: chang back to the main body color after 14 sc but does not provide a separate final stitch count for that round. Keep the round alignment consistent with the previous 18-stitch section before continuing to Round 21.
The red section becomes the bunny’s ballet leotard, so you do not need to crochet a completely separate dress.
That simple color change does a lot of visual work.
Step 3: Crochet the Head
Do not fasten off after the body.
The head grows directly from the neck, creating a clean transition without a sewn seam.
Head
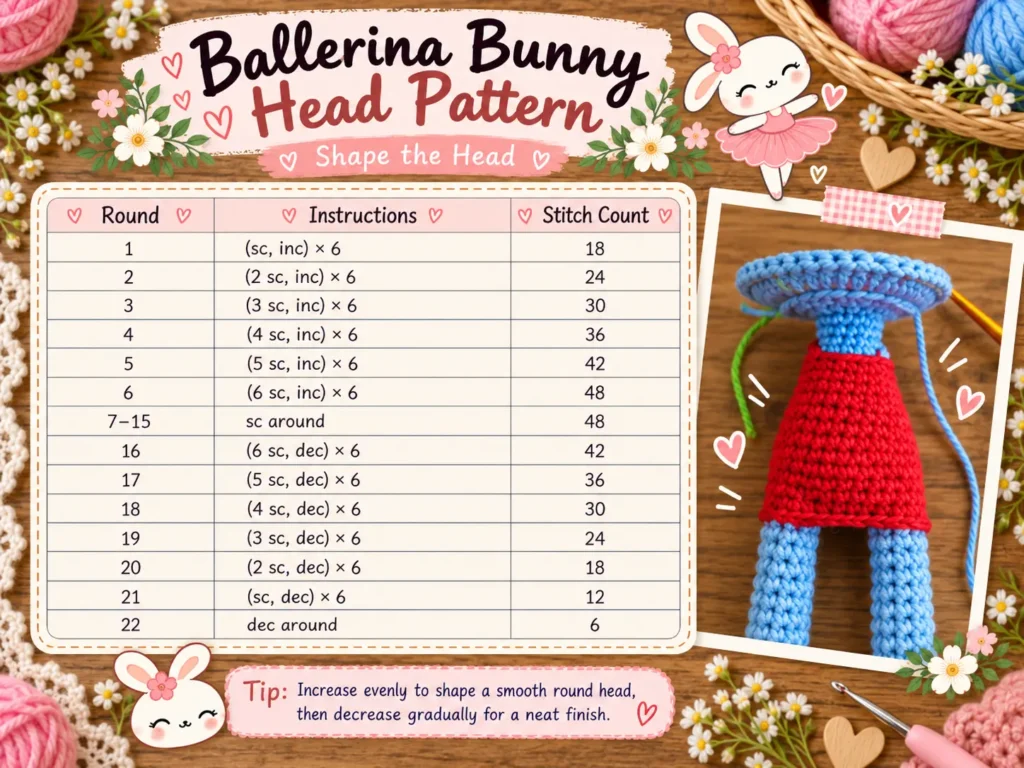
Eye placement tip
Before embroidering the eyes permanently, insert two pins where you think the eyes should sit.
Look at the bunny from several angles.
Moving the eyes even one stitch can dramatically change the expression.
For a sweet amigurumi face, simple embroidered eyes work beautifully.
Step 4: Crochet the Arms
Make two arms using the main bunny color.
The arms are long and narrow so they can curve naturally toward the front of the ballerina’s body.
Arm — Make 2
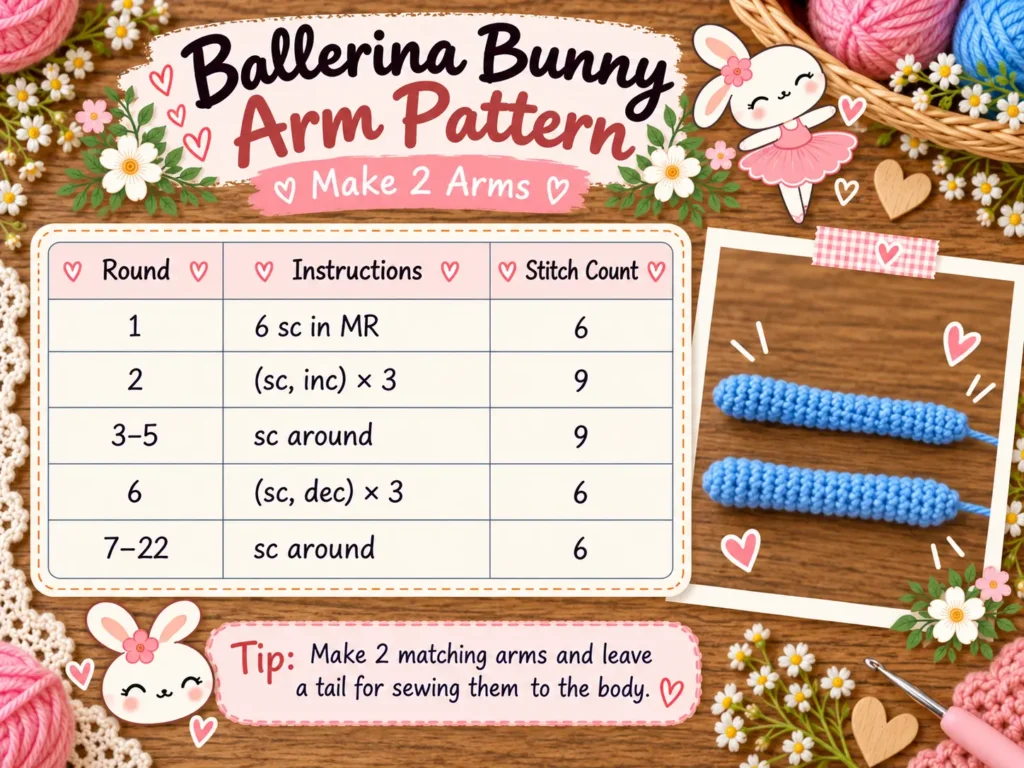
Flatten the upper arm and close the opening with single crochet.
Fasten off, leaving a long yarn tail for sewing.
Leaving the majority of each arm unstuffed gives it enough flexibility to curve naturally.
That is exactly what you want for the elegant ballerina pose.
Step 5: Crochet the Bunny Ears
Make two ears in the main bunny color.
These long ears balance the large round head and make the finished doll instantly recognizable as a rabbit.
Ear — Make 2
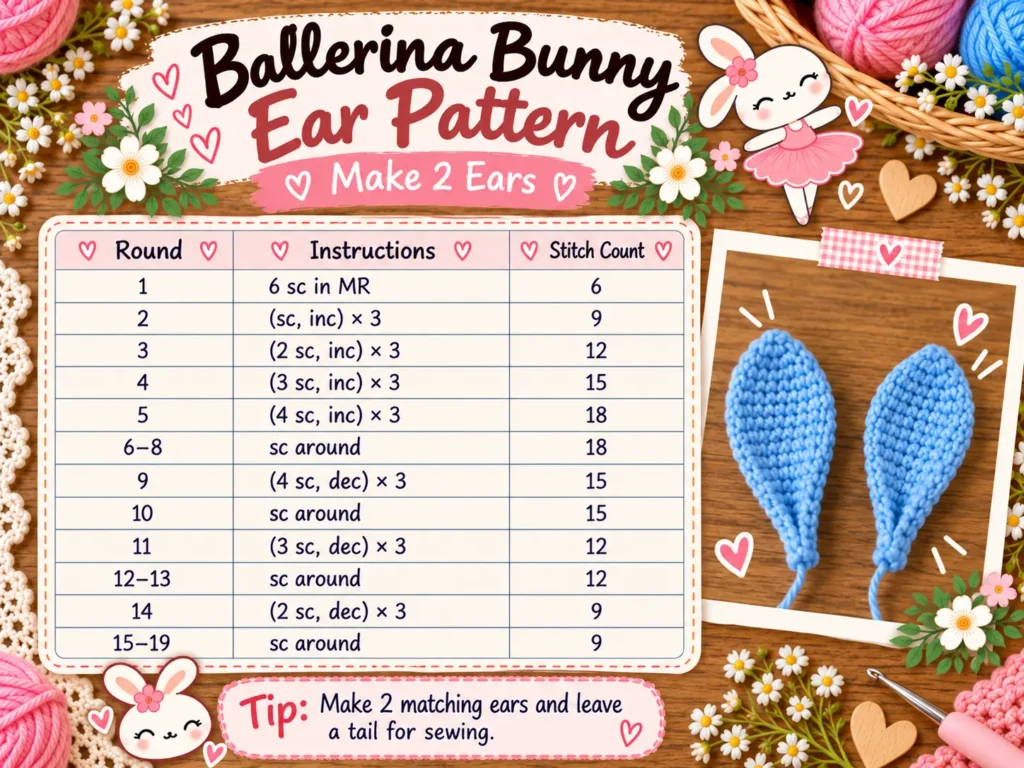
Fasten off while leaving enough yarn for sewing.
Step 6: Assemble Your Crochet Ballerina Bunny
Now comes one of the most satisfying moments in the entire project.
You finally have a bunny.
Before sewing anything permanently, place the arms and ears around the body and pin them in position.
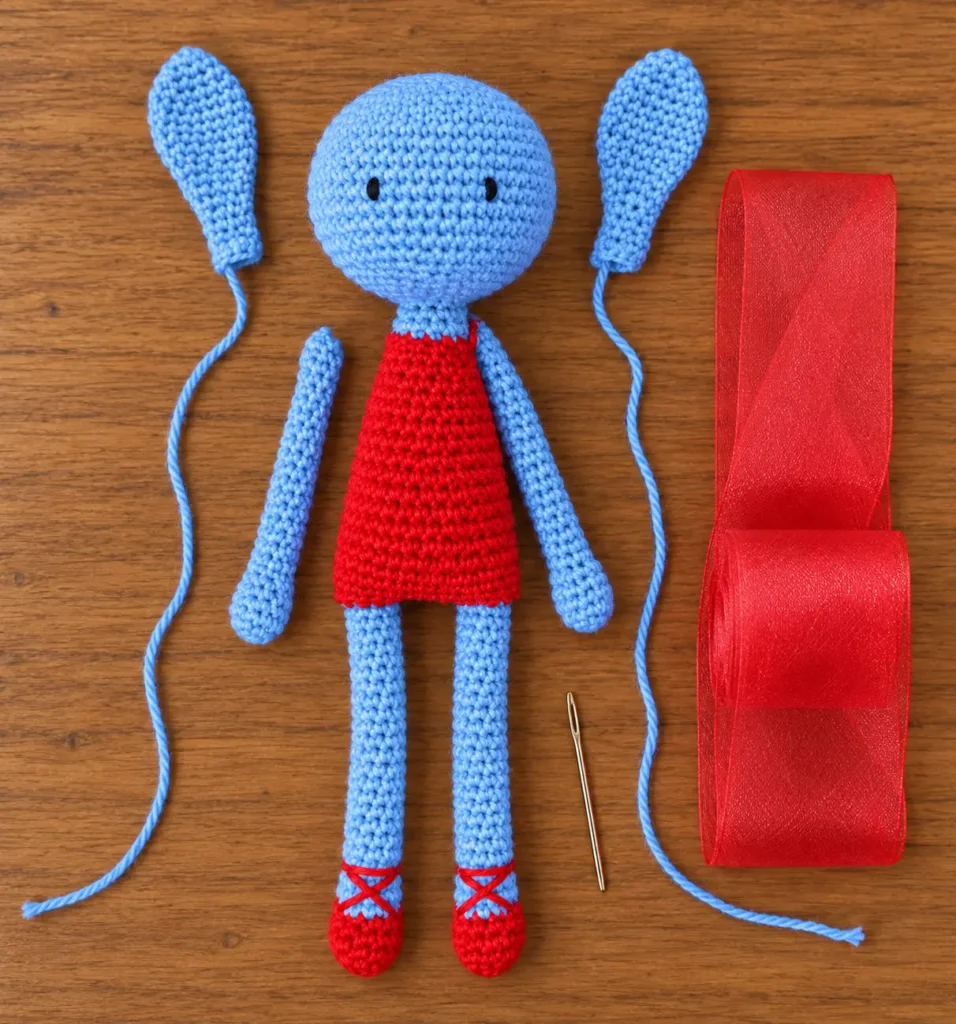
Attach the ears
Fold the bottom of each ear slightly in half before sewing it onto the head.
This gives the ears more shape and prevents them from looking completely flat.
Attach the arms
Position the arms around the final round of the neck.
Sew them securely while keeping the placement symmetrical.
The long unstuffed sections should naturally bend forward.
Step 7: Add the Ballet Slippers and Red Tutu
Now we reach the details that completely transform the bunny.
Add Ballet Shoe Ribbons
Use the red yarn to create crossed ballet-style ribbons around the lower legs.
Keep both shoes symmetrical.
If one ribbon sits noticeably higher than the other, the difference will be easy to see because the bunny’s legs are so long.
Make the Tutu
The tutu is not crocheted.
Instead, the source uses organza ribbon gathered around the body.
Arrange the ribbon around the bunny’s waist, pin it temporarily, and then attach it with a light running stitch.
For a fuller tutu, double the amount of ribbon.
You can make the skirt as delicate or dramatic as you like.
A single layer of organza gives the bunny a graceful classical ballet look.
Two layers create a fuller tutu.
Soft tulle gives you an even fluffier silhouette.
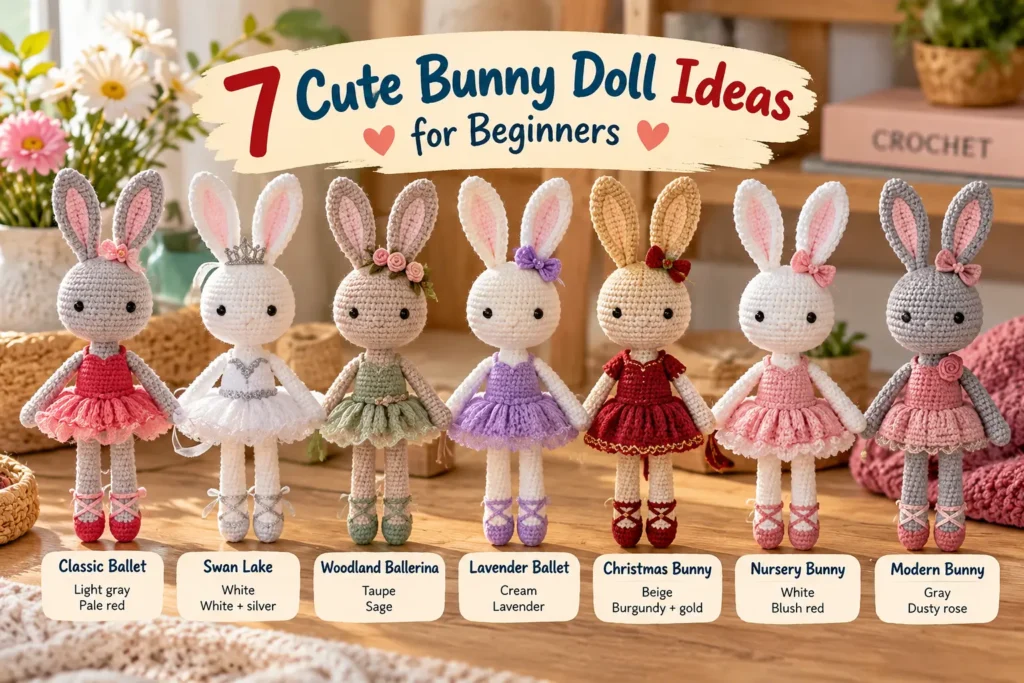
Best Colors for a Crochet Ballerina Bunny
Once you understand the construction, the same crochet ballerina bunny pattern can create very different dolls simply by changing the colors.
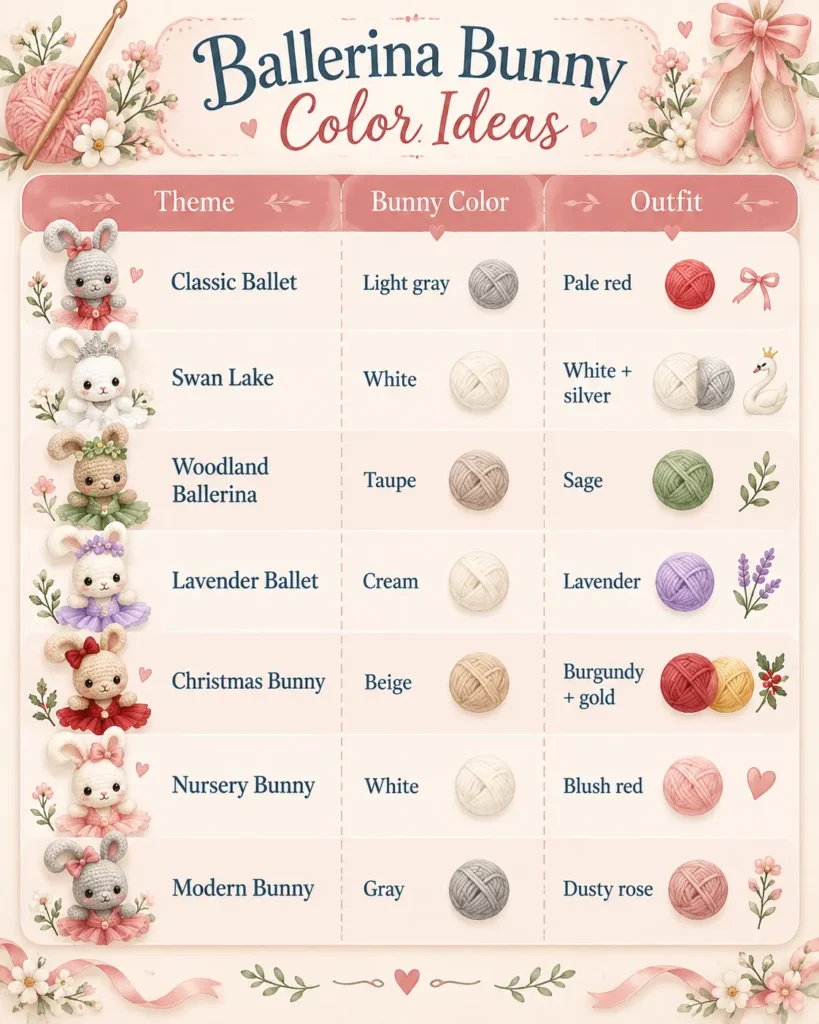
For a Christmas version, I especially like cream or beige yarn with a deep red tutu and tiny gold ballet ribbons.
How to Make Your Amigurumi Bunny Look More Professional
Long-legged amigurumi dolls show uneven stuffing more easily than round toys, so take your time.
Add small amounts of filling to the legs instead of one large clump.
Keep both legs approximately equal in firmness.
Pin the ears and arms before sewing them.
Use simple embroidered eyes rather than oversized facial details.
Keep the shoulder straps delicate.
And spend a few extra minutes positioning the tutu.
The crochet itself creates the doll.
But the final assembly creates her personality.
Crochet Ballerina Bunny Pattern FAQ
Is the Crochet Ballerina Bunny suitable for beginners?
Yes. The Crochet Ballerina Bunny is suitable for confident beginners who already know the magic ring, single crochet, increases, decreases, and continuous rounds. Most of the project uses standard amigurumi techniques.
How tall is the finished Crochet Ballerina Bunny?
The finished Crochet Ballerina Bunny measures approximately 30 cm (12 inches) tall. The final size may vary depending on your yarn, hook size, stuffing, and crochet tension.
How is the Crochet Ballerina Bunny constructed?
The legs, body, and head of the Crochet Ballerina Bunny are worked continuously as one main piece. The two arms and two ears are crocheted separately and attached during assembly.
Do I have to use organza ribbon for the tutu?
No. You can use organza ribbon or tulle for the skirt. If you want a fuller tutu, simply use more ribbon or double the layers for extra volume.
Can I make the Crochet Ballerina Bunny in different colors?
Absolutely. You can customize your Crochet Ballerina Bunny with almost any color combination. Try blue and red, white and silver, cream and lavender, or beige and burgundy for a completely different style.
Final Thoughts
The long proportions, simple embroidered face, delicate ballet slippers, and translucent skirt give this ballerina bunny a graceful handmade look that feels far more elaborate than the techniques needed to create her.
Start with the classic blue-and-red version, then make the pattern your own. Try cream and lavender for a softer ballet look, white and silver for a Swan Lake-inspired bunny, or completely different colors to match a nursery, holiday, or handmade gift theme.
And if your first bunny suddenly looks like she needs a ballet partner?
Well… now you already know how to make one. 🐰
Keep Crocheting With Tiny Crochet Nest
If you enjoyed making this ballerina bunny, there are plenty of other cute amigurumi projects waiting for your hook.
For another adorable character, try this Hello Kitty Crochet Pattern, or make a cuddly black-and-white friend with the Panda Crochet Pattern.
Looking for something a little more playful and spooky? 🎃 Save the Halloween Eyeball Crochet Pattern for your next Halloween crochet session.
And for new crochet ideas, free patterns, inspiration, and upcoming projects, follow Tiny Crochet Nest on Facebook. ❤️