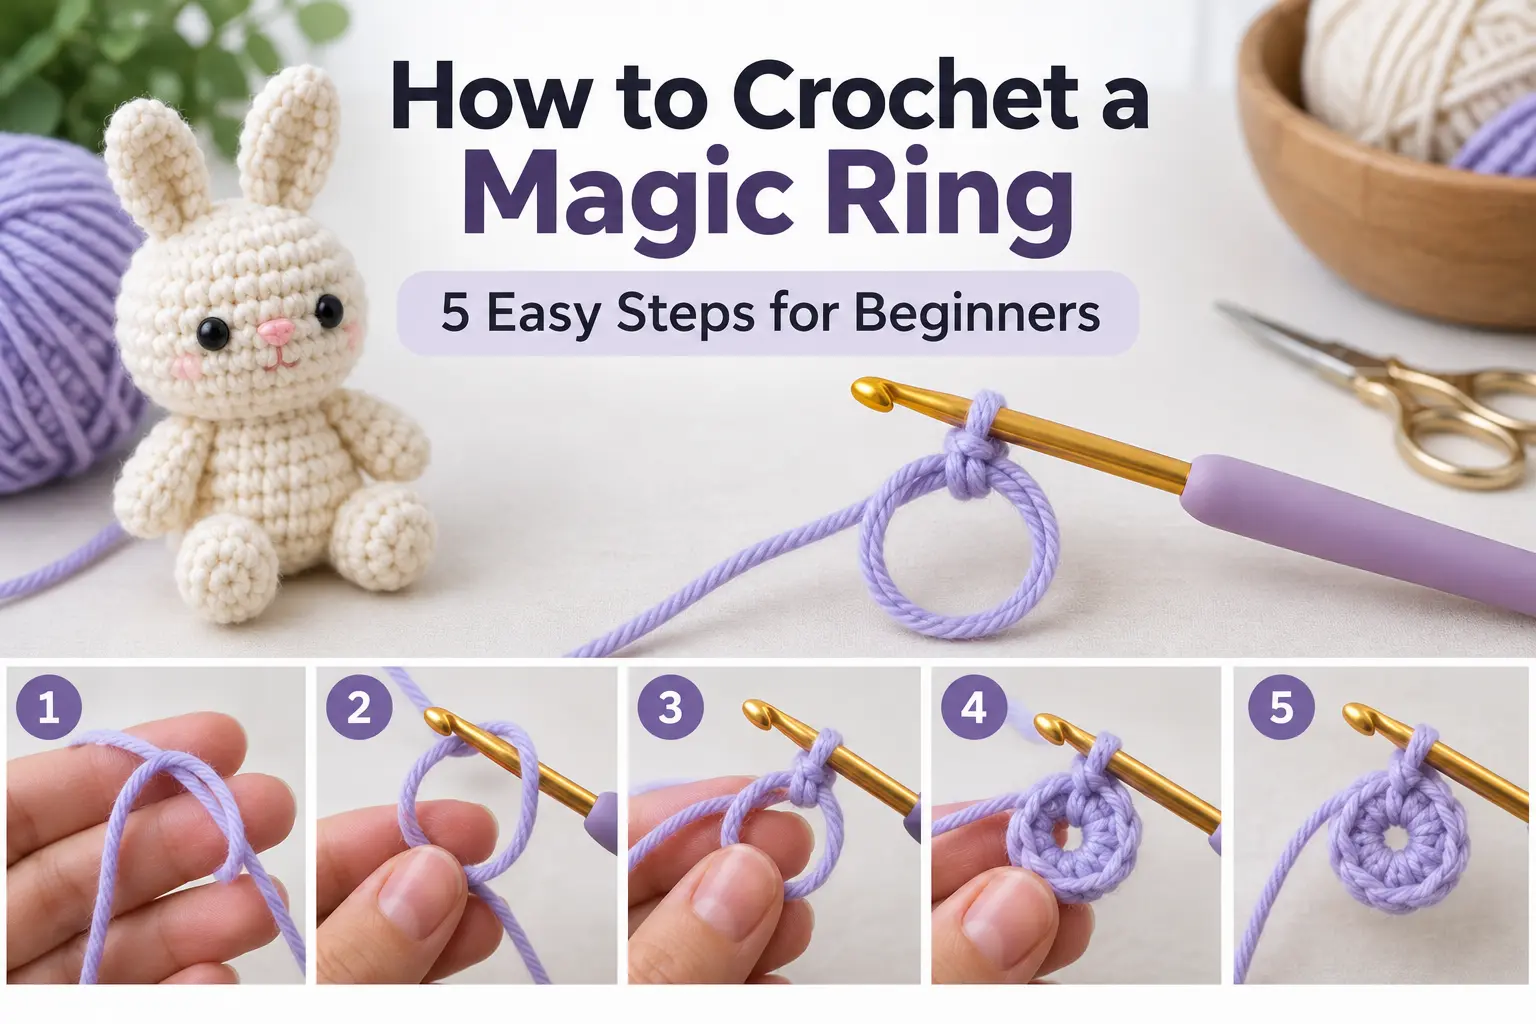
How to Crochet a Magic Ring: 5 Easy Steps for Beginners
If you are learning amigurumi, one of the first techniques you will want to master is how to crochet a magic ring. Also called a magic circle, this simple technique creates an adjustable loop that can be pulled tightly closed, leaving a neat center with little to no visible hole.
The crochet magic ring may feel a little tricky the first time you try it, but once you understand how the yarn and hook work together, it becomes much easier.
In this beginner-friendly tutorial, I’ll walk you through the process step by step. Grab your yarn and crochet hook, and let’s make your first magic ring!
What Is a Magic Ring in Crochet?
A magic ring is an adjustable loop used to begin crochet projects that are worked in the round.
Instead of starting with several chains and joining them into a circle, you crochet your first stitches directly around an adjustable yarn loop. Once the stitches are complete, you pull the yarn tail to close the center.
This creates the small, clean center that you often see on crochet animals, dolls, plushies, and other amigurumi projects.
You may also see this technique called a magic circle, magic loop, or crochet magic circle. These names generally describe the same starting method.
Why Use a Magic Ring for Amigurumi?
The biggest advantage of a magic ring for amigurumi is that you can tighten the center after crocheting your first round.
When you make the head or body of a stuffed crochet animal, you usually want the opening at the beginning to be as small as possible. A large center hole can allow stuffing to become visible.
With a magic ring, you simply pull the yarn tail until the opening closes.
It is especially useful for projects such as:
- Crochet animals
- Amigurumi dolls
- Mini plushies
- Crochet balls
- Crochet food
- Small ornaments
- Granny squares and motifs worked from the center
If you’re completely new to making stuffed crochet projects, you can also read my Amigurumi for Beginners guide to learn the other basic techniques you’ll need.
What You Need to Crochet a Magic Ring
You don’t need any special tools to learn how to crochet a magic ring.
You only need your regular crochet supplies: yarn, a crochet hook appropriate for your yarn, and scissors.
For your first practice attempt, I recommend using a smooth, light-colored yarn. It is much easier to see individual stitches with a lighter yarn than with fuzzy or very dark yarn.
Avoid chenille or plush yarn while you’re learning the technique. Once you’re comfortable making the ring with regular yarn, you can practice with different fibers.
How to Crochet a Magic Ring Step by Step
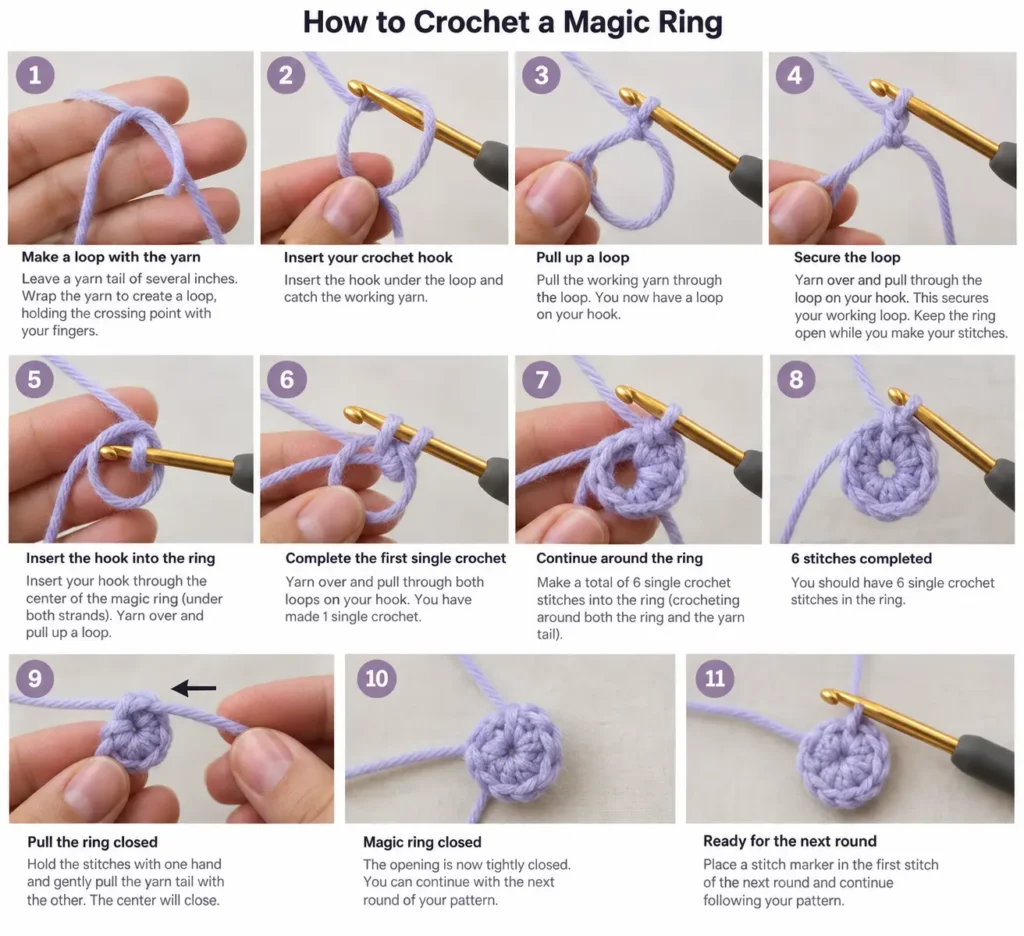
Let’s make a basic magic ring with 6 single crochet stitches, a very common beginning for amigurumi patterns.
Step 1: Make a Loop With the Yarn
Leave a yarn tail of several inches.
Wrap the working yarn around your fingers to create a loop. The yarn tail should remain accessible because you’ll need to pull it later to close the ring.
Hold the crossing point of the yarn securely with your fingers.
Step 2: Insert Your Crochet Hook
Insert your crochet hook underneath the loop.
Catch the working yarn with your hook and pull it through the loop.
You should now have a loop sitting on your crochet hook.
Keep holding the original ring with your fingers so it doesn’t come apart.
Step 3: Secure the Loop
Yarn over and pull the yarn through the loop on your hook.
This secures your working loop and prepares you to crochet into the center of the ring.
Don’t tighten the center yet. You need enough space to work your first stitches into it.
Step 4: Crochet 6 Single Crochet Stitches
Insert your hook through the center of the magic ring.
Yarn over and pull up a loop. You should have two loops on your hook.
Yarn over again and pull through both loops. You have completed your first single crochet.
Continue crocheting around the ring until you have 6 single crochet stitches.
Make sure you are crocheting around both the ring and the yarn tail.
Step 5: Pull the Magic Ring Closed
Once all 6 stitches are complete, hold your stitches with one hand and gently pull the yarn tail with the other.
As you pull, the center of your crochet magic ring will begin to shrink.
Continue pulling until the opening is tightly closed.
You now have a magic ring!
How Do You Continue After the Magic Ring?
For most amigurumi patterns, you will continue crocheting in a spiral rather than joining each round.
For example, a pattern might begin:
Round 1: 6 sc in magic ring (6)
Round 2: inc in each stitch around (12)
After closing your magic ring, place a stitch marker in the first stitch of the next round. This helps you keep track of where each round begins.
Always follow the instructions for the specific pattern you’re making.
Common Magic Ring Mistakes
Don’t worry if your first few attempts don’t look perfect. Learning how to crochet a magic ring takes a little practice.
One common problem is accidentally crocheting only around one strand instead of working around the loop and yarn tail together. This can make closing the ring more difficult.
Another problem is tightening the ring before finishing the first round. Keep the center open while making your stitches, then pull it closed afterward.
Your tension can also make a difference. If everything is extremely tight, inserting your hook may become difficult.
Finally, don’t cut the yarn tail too short. A longer tail is easier to grip and gives you enough yarn to secure the center properly when finishing your project.
Magic Ring vs. Chain Method
A magic ring isn’t the only way to start crocheting in the round.
Some beginners prefer to chain two stitches and work the first round into the second chain from the hook. This method can be easier because it doesn’t require holding an adjustable loop.
However, it can leave a small opening in the center.
The magic circle crochet method gives you more control because you can pull the center closed after completing your stitches. That’s why it is so popular for amigurumi.
If the magic ring feels impossible right now, using an alternative starting method is completely fine while you practice.
Tips for a Neater Amigurumi Magic Ring
Practice with regular cotton or acrylic yarn before moving to plush yarn.
Count your stitches carefully before pulling the center closed. Once the ring is tight, finding a missing stitch can be frustrating.
Use a stitch marker when working continuously in the round.
Most importantly, practice the movement several times. Make a ring, crochet six single crochets, close it, undo it, and repeat. Repetition helps your hands become familiar with the technique.
Frequently Asked Questions
Is a magic ring the same as a magic circle?
Yes. In crochet patterns, magic ring and magic circle usually refer to the same adjustable-loop technique for starting projects in the round.
How many stitches should I put in a magic ring?
It depends on your pattern. Many amigurumi patterns begin with 6 single crochet stitches, but other projects may require a different number. Always follow the stitch count given in your pattern.
Why won’t my magic ring close?
Check that your stitches were worked correctly around the adjustable loop and yarn tail. Also make sure the tail can move freely before pulling it.
Is the magic ring necessary for amigurumi?
Not always. Alternative starting methods can work, but a magic ring is particularly useful because it allows you to create a tightly closed center.
Can beginners learn a crochet magic ring?
Absolutely. It may take several attempts to understand how to hold the yarn, but it becomes much easier with practice.
What to Crochet After Learning the Magic Ring
Now that you know how to crochet a magic ring, you’re ready to use it in your first amigurumi project.
Try a small crochet animal or another simple project that begins with six single crochet stitches. Small projects are great for practicing increases, decreases, stuffing, and shaping without feeling overwhelming.
If you’re new to amigurumi, continue with my Amigurumi for Beginners guide, where you’ll learn the essential stitches and techniques you need to start making cute crochet characters.
Ready to put your new magic ring skills into practice? Try my Panda Crochet Pattern for a fun amigurumi project and start practicing the techniques you’ve learned.
Once you’ve practiced the magic ring a few times, that little adjustable loop will quickly become a familiar part of your crochet routine. 🧶
Love cute crochet projects? Follow Tiny Crochet Nest on Facebook and Pinterest for more amigurumi patterns, beginner-friendly crochet tutorials, and new project ideas.